


The Hidden Technique Behind Perfectly Layered Mille-Feuille
February 13, 2025
7 Simple Adjustments for a Flawless Pumpkin Pie
February 13, 2025
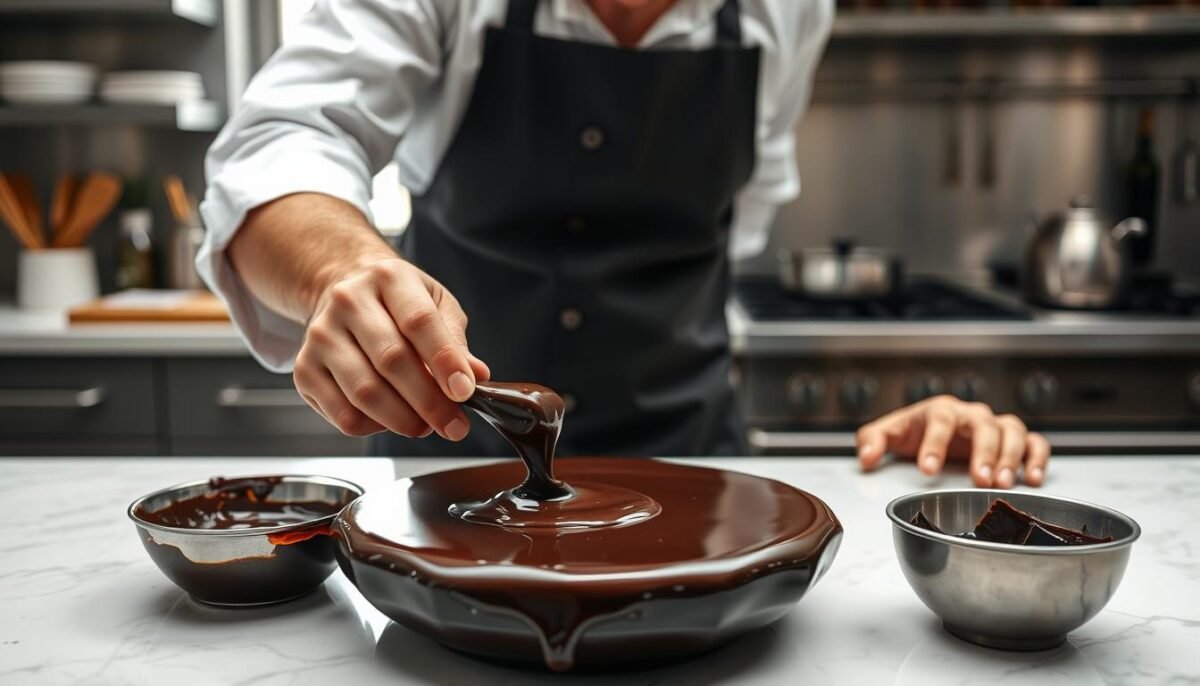
I stood amazed watching a Michelin-starred pastry chef temper chocolate. The glossy shine and crisp snap of each piece captivated me. I wondered, “How do they do it so perfectly every time?” Soon, I began my journey to master tempered chocolate.
My first tries were far from perfect. The chocolate often came out grainy or lacked shine. But I kept trying, using tips from top chefs. I learned that tempering chocolate needs both art and science. It takes patience and careful steps. Now, I’m excited to share what I’ve learned with you.
If you want to make stunning desserts or improve your chocolate skills, this guide is for you. It will show you how to temper chocolate like a Michelin-star chef.
Key Takeaways:
- Tempering chocolate is key for a professional look and feel.
- You need to control the temperature carefully and use the right tools.
- Dark, milk, and white chocolates melt and cool at different temperatures.
- An instant-read thermometer is vital for success in tempering.
- Learning to temper chocolate well requires patience and practice.
What is Tempered Chocolate and Why it Matters?
Tempered chocolate is a crucial technique for anyone who loves cooking. It makes chocolate stable through careful melting and cooling. This means it hardens with a shine and a solid feel. By doing this, the quality of the chocolate is boosted. This makes it great for making the best tempered chocolate recipe every time.
The Science Behind Chocolate Tempering
Tempering chocolate is about heating and then cooling it to get the fat crystals right. For dark chocolate, you melt it at 45-50°C, cool it to 28-29°C, and temper it at 31-32°C. Having stable beta crystals in cocoa butter is key. They give tempered dark chocolate its shine and a hard snap.
Benefits of Tempered Chocolate
There are many good things about tempered chocolate. It lasts longer, so your treats won’t melt so fast. It tastes smooth and creamy, which makes the best tempered chocolate recipe stand out. And, it looks amazing with its glossy finish and hard snap. It doesn’t get the white streaks or spots that untempered chocolate does.
Common Mistakes to Avoid
Some errors can mess up the tempering process. If you overheat the chocolate, it loses its nice look and feel. It becomes dull and grainy. Water is another enemy during melting. It can make the chocolate seize, turning it clumpy. Tools must be dry, and temperatures must be right for perfect tempered dark chocolate. Skipping these steps can spoil both the look and quality of your chocolate works.
Essential Tools for Tempering Chocolate
Settling chocolate perfectly needs a good technique. In my kitchen, specific tools help me get that shiny finish.
Equipment I Use in My Kitchen
I use important tools for tempering chocolate. A double boiler is key for melting, yet some bakers use a microwave. A chocolate melter is great for businesses. A heat-proof spatula stops white chocolate from burning. Cooling it on granite or marble makes it set faster, and I use a scraper for spreading.
Choosing the Right Chocolate
I pick high-quality chocolate for the best look and taste. Knowing how to melt it right is important. For dark chocolate, start at 122°F. Milk and white chocolate melt at about 105°F. Keep dark chocolate at 86°F to 90°F and milk or white chocolate at 84°F to 86°F for the best temper.
Adding chopped chocolate to the melted mix helps it set right. This is called the seeding method.
Thermometers: Key to Success
Having a good thermometer is crucial. Whether it’s instant-read, candy, or infrared, it makes sure you’re accurate. It’s important to hit 115-120°F for dark chocolate and 110-115°F for milk and white during melting. Cooling to the right temperature is essential for perfect chocolate. The right thermometer ensures you don’t overheat or cool it too little. This helps make the chocolate look and taste amazing.
Step 1: Melting the Chocolate
Melting chocolate the right way is key when learning *How to Temper Chocolate*. The wrong method can ruin your chocolate. It’s important to melt it correctly.
Methods for Melting Chocolate
There are two main ways I melt chocolate: with a double boiler and a tempering machine.
- Double Boiler Method: You place a bowl that can handle heat over a pot of gently boiling water. The steam from the water heats the bowl. This lets the chocolate melt smoothly without burning.
- Tempering Machine: This machine is made to melt and temper chocolate at exact temperatures. It helps get the perfect texture.
Ensuring Even Melting
Melting the chocolate evenly is vital for good tempered chocolate. Stir the chocolate as it melts. This keeps the heat even and stops parts from getting too hot.
“The constant stirring motion is akin to nurturing your chocolate—give it care and attention, and it will reward you with a flawless temper.”
Watching Out for Seizing
When chocolate seizes, it becomes lumpy and hard to melt. This can happen if water gets in. Always use dry spoons or stirrers. Make sure no water splashes from the pot.
Here are some useful Tempered Chocolate Tips to avoid seizing and ensure smooth melting.
| Tempered Chocolate Tips | Details |
|---|---|
| Use a thermometer | Watch the temperature to keep it below 100°F for dark chocolate. |
| Choose high-quality chocolate | Pick chocolate with about 70% cocoa for the best results. |
| Avoid moisture | Make sure all your tools are dry to stop the chocolate from seizing. |
| Consistency in stirring | Stir regularly to spread the heat evenly and avoid hot spots. |
| Temperature control | Keep the chocolate at the right melting temperature, not over 92°F. |
Knowing how to melt chocolate well is the first step in tempering. It helps you master How to Temper Chocolate and use *Tempered Chocolate Tips* successfully.
Step 2: Cooling the Chocolate
After melting the chocolate properly, we move to an important step in Chocolate Tempering: cooling it down. Cooling is crucial because it helps form beta crystals. These crystals make the chocolate look shiny, hard, and give it a nice snap.
How to Cool it Down Correctly
To get the best tempered chocolate, cooling it to the right temperature is key. Typically, this means bringing it down to the low 80s F (around 27º C). An ice water bath or a cold marble slab works great for this.
- Dark chocolate should reach approximately 86°F (30°C).
- Milk chocolate should cool to around 81°F (27°C).
This cooling step helps the chocolate develop stable beta crystals. These crystals are what make well-tempered chocolate so good.
Importance of Temperature Control
Controlling the temperature carefully during cooling is vital. If the chocolate gets too warm again, it can ruin the crystal structure. Dark chocolate works best between 88°F and 91°F (31º-32º C), while milk chocolate should be a bit cooler, at 86º-88º F (30º-31º C).
Not controlling the temperature right can spoil the temper, making the chocolate look dull and blotchy. But when done right, well-tempered chocolate hardens quickly, looks shiny, and doesn’t have any bloom. So, keeping the chocolate within the right temperature range is key to great results.
| Chocolate Type | Cooling Temperature | Working Temperature |
|---|---|---|
| Dark Chocolate | 86°F (30°C) | 88°F – 91°F (31º-32º C) |
| Milk Chocolate | 81°F (27°C) | 84°F – 86°F (30º-31º C) |
Knowing why these temperatures matter is key to mastering Chocolate Tempering. It helps make the best tempered chocolate every single time.
Step 3: Reheating the Chocolate
After cooling the chocolate, we warm it up to the perfect temperature for working. This step is key in chocolate tempering, ensuring we get smooth, shiny milk chocolate. It’s crucial to reheat carefully to keep the chocolate’s temper and quality from the earlier steps.
The Perfect Temperature to Heat Up
For the best results, the reheating temperature is very important. Milk and white chocolates need to be heated to 29°C-30°C (84°F-86°F), and dark chocolate to 31°C-32°C (88°F-90°F). It’s important to keep the heat below these points to stop the chocolate from getting too hot. Going over 32°C (90°F) can ruin the temper, making the chocolate thick and grainy.
Keeping an Eye on the Consistency
Getting the right thickness is as crucial as the perfect heat. Stirring the chocolate as it heats helps keep it smooth. This even heating stops the chocolate from getting too thick or too runny, perfect for molding and creating in the kitchen.
Here’s a quick reference table outlining the reheating temperature ranges and their impacts:
| Type of Chocolate | Reheat Temperature Range | Impact of Incorrect Temperature |
|---|---|---|
| Dark Chocolate | 31°C-32°C (88°F-90°F) | Exceeding 32°C can cause chocolate to lose temper |
| Milk Chocolate | 29°C-30°C (84°F-86°F) | Temper loss and thick consistency |
| White Chocolate | 29°C-30°C (84°F-86°F) | Grainy texture due to temper loss |
Step 4: Testing for Temper
The last step in mastering how to temper chocolate is testing for temper. This check is essential. It gives your chocolate that perfect smooth texture and sharp break we all love.
How to Conduct a Test
To see if your chocolate is tempered right, just take a little bit and spread it on parchment paper. Wait for two to three minutes. If it sets fast and looks shiny and hard, then it’s done right.
What to Look For in Tempered Chocolate
Knowing how to temper chocolate means knowing what good results are. After spreading it on parchment, look for these signs:
- Glossy Finish: Good tempered chocolate will turn solid and glossy in just a few minutes.
- Firm Consistency: It will also feel solid shortly after.
With these tempered chocolate tips, your chocolate will not only look good but will be perfect for any use. This confirms that it’s ready for any shape or decoration you have in mind.
Techniques for Working with Tempered Chocolate
Working with tempered chocolate lets you create beautiful things. Whether it’s molding, shaping, drizzling, or dipping, you need to know the right techniques. Keeping the temperature right is very important.
Molding and Shaping
Molds are great for making fancy chocolate shapes. Once you’ve got the tempered chocolate ready, pour it into your chosen molds. Make sure the chocolate stays between 88°F and 92°F. This temperature helps create shiny chocolate that breaks with a snap. When you start, the chocolate pieces should be small for proper melting, between 110°–115°F.
Use food-grade silicone molds because they release the chocolate easily. To remove air bubbles, tap the mold gently. For the best finish, cool the molds at 80°–82°F.
- Use food-grade silicone molds for easy release.
- Tapping the mold gently can remove air bubbles.
- Cool the filled molds at a consistent 80°–82°F for optimal results.
Drizzling and Dipping
Add stylish touches to desserts by drizzling and dipping. Use a piping bag or spoon for drizzling to make fine patterns. For dipping, your chocolate should be a tad cooler, at 87°–91°F. This gives a smooth coat.
- Fruits, cookies, and pretzels are excellent for dipping.
- Chill your items briefly before dipping to enhance the chocolate’s adhesion.
- Work quickly but methodically to prevent the chocolate from falling below 81°F, as this can disrupt crystal formation.
Dark chocolate that’s tempered right will coat evenly and snap nicely. Mastering these techniques makes desserts look and taste amazing. Practice a lot and watch the temperature closely to get it just right.
Storing Tempered Chocolate
Keeping tempered chocolate right is key for its taste, look, and feel. Learning how to do this lets you keep it longer and dodge problems like blooming.
Best Practices for Storage
For yummy Tempered Chocolate Recipe, store it right. You should keep it at 60-70°F. Make sure it’s dry, with humidity under 50% to stop water and sugar blooms. Don’t put chocolate in the fridge or freezer. It can make it look dull and feel rough. If you must chill it, use an airtight container. Also, wrap it in a towel to help it adjust slowly to temperature changes.
- Temperature range: 60-70°F
- Relative humidity:
- Store in an airtight container if refrigerating
- Wrap with dish towel to temper temperature changes
How to Maintain Texture and Flavor
Keep your Tempered Milk Chocolate’s snap and shine. Avoid places that are too hot, cold, or smelly. Chocolate should be in a cool spot, away from sun and strong smells. This stops it from picking up weird tastes. Don’t let it get over 75°F.
Don’t store it with things like coffee or spices that have strong smells. This keeps your chocolate tasty.
“Temperature control is crucial in maintaining the integrity of tempered chocolate. Consistent temperatures between 60-70°F with low humidity will keep your chocolate looking and tasting its best.”
Remember to let altered temp chocolates get back to room temp slowly. Quick changes can make water form, ruining its texture and look. For moldings, keep your area at 65-75°F.
By doing all this, your chocolate stays perfect. Its shelf life grows and its amazing quality lasts.
Creative Uses for Tempered Chocolate
Making beautiful decorative pieces with tempered chocolate is not hard. With some tips and techniques, you can make desserts and drinks look amazing. Tempered chocolate has a smooth and shiny finish that is perfect for detailed designs.
Decorative Pieces and Garnishes
I love using tempered chocolate to make things like feathers and leaves. These decorations can turn a simple treat into something special. By using molds, you can create your own unique designs. Just be sure to keep the chocolate at the right temperature to avoid problems.
Chocolate piping is another way to add flair to your treats. For example, writing with chocolate can add a personal touch. It’s important to connect the letters so they don’t break when you lift them. This helps your dessert look perfect.
Incorporating into Desserts
Tempered chocolate is great for many desserts, like mousses and tarts. It gives them a nice crisp texture that goes well with softer parts.
Adding cherries to chocolate desserts is a popular choice. For tips on using cherries in your treats, check out this guide on picking cherries for cocktails. Cherries add a fresh and tangy flavor that makes each bite delicious.
| Chocolate Type | Tempering Temperature | Uses |
|---|---|---|
| White Chocolate | 28-29°C (83°F) | Decorative writing, garnishes |
| Milk Chocolate | 29-30°C (84-85°F) | Mousses, tarts |
| Dark Chocolate | 30-31°C (86-87°F) | Ganache, dipped fruits |
Use these tips and techniques with tempered chocolate to make your desserts stand out. Enjoying the process is as important as the beautiful results!
Troubleshooting Common Tempering Issues
Even skilled chocolatiers sometimes run into tempering troubles. Knowing how to fix these problems can change your final product. Here’s how to tackle common issues with Tempered Dark Chocolate.
Fixing Overheated Chocolate
If your chocolate gets too hot—over 45°C (113°F) for dark chocolate, or 40°C (104°F) for milk and white—it might get grainy and thick. To fix it, cool it down to about 82°F (28°C) for dark chocolate and 78°F (26°C) for milk or white. After cooling, gently reheat it to its working temp of 31-32°C (88-90°F) for dark or 29-30°C (84-86°F) for milk and white chocolates.
Addressing Dull or Cloudy Chocolate
Dull or cloudy chocolate often comes from not tempering right or working in a humid place. Keep your area dry, under 50% humidity. Also, cooling and setting temperatures must be right for shiny chocolate. Here’s a guide to keeping ideal conditions:
| Chocolate Type | Cooling Temperature | Reheating Temperature |
|---|---|---|
| Dark Chocolate | 82°F (28°C) | 31-32°C (88-90°F) |
| Milk Chocolate | 78°F (26°C) | 29-30°C (84-86°F) |
| White Chocolate | 78°F (26°C) | 29-30°C (84-86°F) |
Knowing how to temper chocolate is key to fixing these problems. Control the temperatures well when melting, cooling, and reheating. Stir your chocolate well to keep it smooth and to stop fat bloom or graininess from messing it up.
The Importance of Practice
Mastering Tempered Chocolate is an art that demands patience and hard work. My journey with Chocolate Tempering has taught me valuable lessons. I’m eager to share these insights with you.
My Journey with Tempered Chocolate
When I first tried Chocolate Tempering, I faced many hurdles. My batches were either too hot or not tempered right. It was a tough start.
But, I learned the science behind it was crucial. For example, milk chocolate melts at 88°F and dark chocolate at 91°F. This knowledge helped me get consistent results.
At first, understanding the six crystal forms of cocoa butter was hard. But realizing Form five is best for smooth chocolate changed everything for me.
“Practice isn’t the thing you do once you’re good. It’s the thing you do that makes you good.” — Malcolm Gladwell
I spent a lot of time perfecting my technique. Using Callebaut’s “callets” made the process easier. These couverture chocolate discs have more fat. The tempering usually took me 10 to 20 minutes, keeping the temperatures right was key.
Building Confidence in the Kitchen
To grow confident in the kitchen, practice regularly. A great tip is to chop the chocolate finely before tempering. This, along with precise temperature control, really helped.
Also, how long you stir matters. Starting with 5 seconds on heat and 30 seconds off, then 3 seconds on later helped with consistency.
Through trial and error, I got better at managing Tempered Chocolate. I learned to recognize the right crystal form. This experience is priceless. It not only improved my skills but also gave me the confidence to try new things in the kitchen.
In conclusion, my journey was guided by these key findings:
| Aspect | Detail |
|---|---|
| Ideal Melting Temperature for Milk Chocolate | 88°F |
| Ideal Melting Temperature for Dark Chocolate | 91°F |
| Crystal Forms for Cocoa Butter | Six (Form Five is Ideal) |
| Tempering Duration | 10 to 20 Minutes |
Frequently Asked Questions
Tempering chocolate can sometimes be confusing, especially if you’re new to the art. Here, I’ve compiled answers to some of the most frequently asked questions. This will help you understand how to temper chocolate better. You’ll also get some tips for success with tempered chocolate.
How Long Does Tempered Chocolate Last?
Tempered chocolate lasts a long time if you store it correctly. Keep it at room temperature, between 20-22 degrees Celsius (68-72 degrees Fahrenheit), and it can stay good for months. You must keep it away from too much heat, humidity, or light. This helps avoid texture or appearance changes.
Can I Re-temper Chocolate?
Yes, you can re-temper chocolate. One good way is to mix in about 10% new chocolate. This adds back the stable crystals needed for tempering. Make sure to heat the chocolate to the recommended temperatures for the best results:
- Dark Chocolate: approximately 34 degrees Celsius (93°F)
- Milk Chocolate: around 32 degrees Celsius (90°F)
- White Chocolate: about 31 degrees Celsius (88°F)
Why Does Chocolate Seize?
Chocolate seizes when it meets moisture. Even a little water can make the sugar in chocolate clump. This causes a grainy texture. That’s why you must keep everything dry when working with melted chocolate. Also, don’t overheat it. Melt dark chocolate at at least 115°F (46°C), and milk and white chocolates at about 110°F (44°C).
Avoiding moisture and not overheating are key. These tips will help you make perfect tempered chocolate every time.
Conclusion: My Tips for Lasting Success
Learning to temper chocolate takes patience and effort, yet it’s very rewarding. Remember, making the Best Tempered Chocolate Recipe demands accuracy and love. As you keep trying, your skills and confidence will improve, making each batch a reflection of your hard work.
Final Thoughts on Mastering Chocolate
For consistently good tempered chocolate, precise temperature control is key. Use a good candy thermometer to keep the right temperature. For dark chocolate, aim for 113-122ºF (45-50ºC). For white chocolate, it’s 104-113ºF (40-45ºC).
Cooling chocolate to the exact right temperature is crucial for a smooth, shiny finish. Dark chocolate should be between 87.8-89.6ºF (31-32ºC). Lighter chocolates need to be 78.8-82.4ºF (26-28ºC).
Embrace the Process and Enjoy!
Making mistakes is part of learning. Use these opportunities to improve your tempering skills or try new things. Keep your work area dry, heat properly, and use the best chocolate. This ensures your chocolate has that ideal snap and gloss. Enjoy making each batch as it brings you closer to being a master. The happiness in creating delicious chocolates is as rewarding as the sweets themselves!
FAQ
How Long Does Tempered Chocolate Last?
Tempered chocolate can last for months if stored right. Keep it cool, dry, and away from strong smells. This preserves its quality and taste. Always use an airtight container to keep it dry and prevent blooming.
Can I Re-temper Chocolate?
Yes, you can. If your chocolate isn’t right or has bloomed, you can fix it. Melt it down and temper it again by following the right steps. This includes melting, cooling, and reheating correctly.
Why Does Chocolate Seize?
Chocolate seizes if water gets into it. Even a little water makes it clump and turn grainy. Always use dry tools and keep moisture away when melting it.
What is the Ideal Temperature for Melting Chocolate?
The perfect temperature depends on the chocolate type. Melt dark chocolate to 115°F – 120°F. Milk and white chocolate should be melted to 110°F – 115°F. A thermometer ensures the right temperature for smooth chocolate.
Can I Temper Chocolate Without Special Equipment?
Yes, even without tools like a thermometer you can temper chocolate using simple methods. For the best results, the right tools can make tempering easier and more dependable.
How Can I Avoid Overheating Chocolate?
Melt chocolate slowly in a double boiler or microwave it in short bursts. Always stir and check the temperature to prevent overheating. This keeps it from burning or losing temper, which ruins its texture.
What Should I Look for in Properly Tempered Chocolate?
Look for a shiny finish, quick setting at room temperature, and a clean snap. Test by spreading a small amount on parchment paper. If it’s shiny and firm, it’s tempered right.
Why is Temperature Control Crucial in Chocolate Tempering?
Accurate temperature control helps cocoa butter crystals form right. This is what makes chocolate shiny and firm. It prevents problems and ensures a good final product. Always use a thermometer for precision.
What are the Benefits of Using Couverture Chocolate for Tempering?
Couverture chocolate melts and sets better because it has more cocoa butter. It gives a smooth, shiny finish and tastes great. This makes it top-notch for professional sweets and decorations.


