


7 Unexpected Superfoods That Pack More Protein Than Meat
February 22, 2025
How to Sear Tuna Steaks for a Restaurant-Quality Finish
February 22, 2025
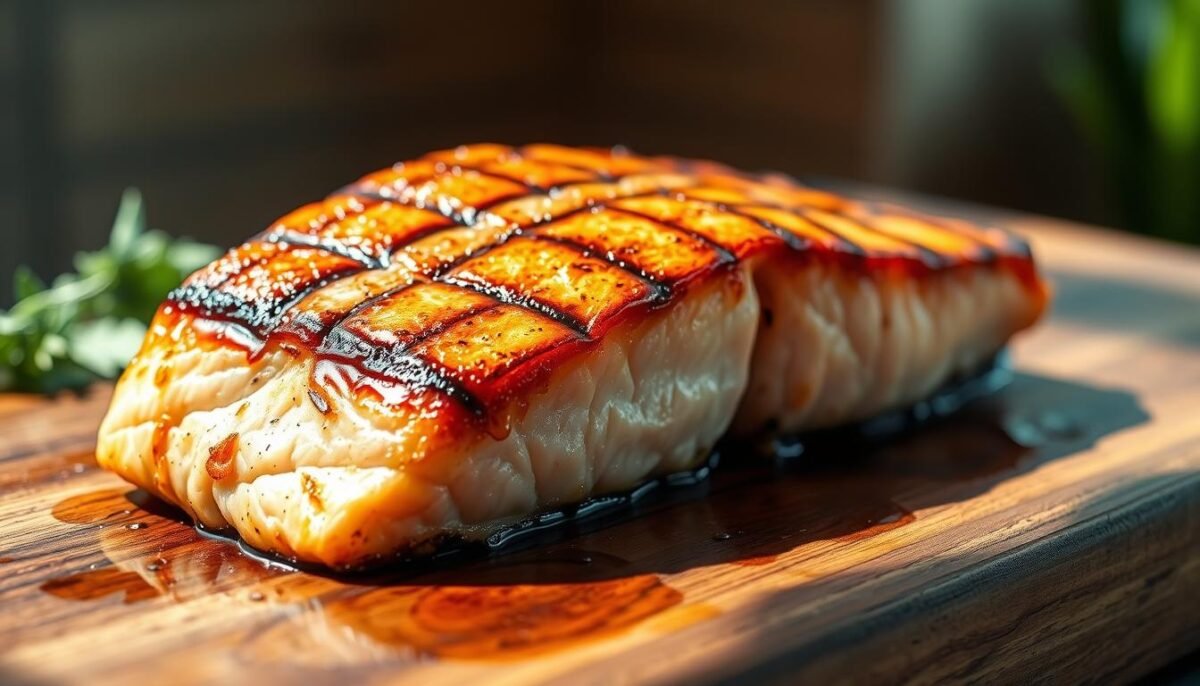
Picture this: It’s a warm summer evening, and you’re hosting a backyard gathering. The aroma of something delicious wafts through the air, drawing everyone closer. What’s on the menu? A perfectly grilled dish that’s succulent, flavorful, and never dry. It’s a crowd-pleaser every time.
Did you know that over 100 grilling enthusiasts have rated this method a solid 5 stars? That’s because mastering the art of cooking this dish isn’t just about heat—it’s about technique. Whether you’re a seasoned pro or a beginner, a few simple tips can make all the difference.
In this article, I’ll share my top five secrets to achieving that perfect result every time. From timing to temperature, I’ll guide you through the process step by step. Ready to elevate your skills? Let’s dive in.
Key Takeaways
- Learn how to keep your dish moist and flavorful with expert techniques.
- Discover the importance of timing and heat control for perfect results.
- Explore both direct and foil methods for versatile cooking options.
- Understand why fresh ingredients and a well-heated surface are crucial.
- Get insights from trusted recipes and personal grilling experiences.
Getting Started with My Grilled Salmon Adventures
Freshness is the cornerstone of any great seafood recipe. When I first started cooking fish, I quickly learned that the quality of the ingredients makes all the difference. Choosing the right cut ensures even cooking and maximizes flavor.
Choosing the Freshest Salmon
I always look for center-cut, skin-on fillets. The skin helps hold the fish together during cooking and adds a layer of flavor. When selecting, I check for a bright pink color and a clean, fresh smell. These are clear signs of quality.
Before cooking, I pat the fillets dry with a paper towel. This step ensures a crispy exterior. Then, I season generously with salt, pepper, and a touch of olive oil. Simple seasoning lets the natural flavors shine.
One of my favorite recipes involves marinating the fish for 30 minutes with a mix of lemon juice, garlic, and herbs. This method keeps the dish moist and flavorful. Pairing it with a light salad creates a balanced meal.
Choosing the right type of fish makes a big difference in the final dish. Whether you’re cooking for a family dinner or a special occasion, starting with fresh ingredients sets the stage for success.
Grilling salmon: Key Equipment and Marinade Prep
The secret to a memorable meal lies in the equipment and seasoning you choose. Whether you’re a seasoned cook or just starting, having the right tools and flavors can make all the difference. Let’s dive into the essentials for preparing a dish that’s both flavorful and perfectly cooked.
Selecting the Right Grill
Choosing the right grill is the first step to success. I prefer using a clean gas or charcoal grill for even heat distribution. Before starting, I always oil the grates to prevent sticking and achieve those beautiful sear marks. Pre-heating the grill is crucial—it ensures the fish cooks evenly and locks in moisture.
Classic Marinade Ideas
A good marinade can elevate your dish to the next level. My go-to options include a zesty lemon-garlic mix and a spicy lime-harissa blend. These not only add flavor but also keep the fish moist during cooking. For a simpler approach, I sometimes just season with olive oil, salt, and pepper to let the natural flavors shine.
Pairing your dish with the right side can complete the meal. A light salad or grilled vegetables works wonders. If you’re looking for more tips on perfecting your technique, check out this guide on how to bake salmon like a.
Mastering Temperature And Timing
Getting the temperature and timing right is the key to a flawless dish. Whether you’re using a gas grill or another method, understanding heat distribution ensures even cooking and prevents dryness. Let’s break down the essentials.
First, always preheat your gas grill to 375-400°F. This medium-high heat is ideal for locking in moisture. I also recommend using a two-zone setup—one side for direct heat and the other for indirect cooking. This method prevents charring and ensures even results.
Next, pay attention to time. For a 1-inch thick fillet, I cook each side for 6-8 minutes. This ensures the internal temperature reaches 145°F, the perfect doneness. Timing each side correctly avoids overcooking and keeps the fish tender.
Seasoning plays a role too. I always season with salt and pepper before cooking. These simple ingredients enhance the natural flavors without overpowering them. For extra flavor, I sometimes add a sprinkle of herbs or a drizzle of olive oil.
Finally, think about place. Where you put the fish on the grill matters. I place it skin-side down first for a crispy exterior. Then, I flip it carefully to avoid breaking the fillet. This technique maximizes flavor and prevents burning.
| Step | Details |
|---|---|
| Preheat Grill | 375-400°F, two-zone setup |
| Seasoning | Salt, pepper, optional herbs |
| Cooking Time | 6-8 minutes per side |
| Internal Temp | 145°F |
| Placement | Skin-side down first |
Creating a Flavorful Rub and Seasoning
A great dish starts with the right seasoning. Over the years, I’ve perfected a rub that brings out the best in every fillet. It’s simple, versatile, and packed with flavor. Here’s how I do it.
My Go-To Rub Recipe
My rub combines sweet, smoky, and tangy notes. It’s perfect for enhancing the natural taste of the fish. Here’s the recipe I use:
| Ingredient | Quantity |
|---|---|
| Brown sugar | 2 tablespoons |
| Smoked paprika | 2 teaspoons |
| Garlic powder | 1/2 teaspoon |
| Coarse sea salt | 1 teaspoon |
| Lime zest | From 1 lime |
Mix these ingredients well and store them in a glass jar. This rub keeps for up to six months, so you’ll always have it ready.
Balancing Citrus and Garlic
Citrus and garlic are the stars of my seasoning. The lime zest adds a bright, tangy note, while the garlic powder brings depth. Together, they create a vibrant flavor profile that complements the fish perfectly.
When applying the rub, make sure to coat the fillets evenly. Let them sit for 15-20 minutes before cooking. This allows the seasoning to penetrate the fish, resulting in a more aromatic meal.
Using a lid during cooking is essential. It helps maintain heat and locks in moisture, ensuring the fish stays tender. Whether you’re using a gas or charcoal grill, this technique works wonders.
With this rub and a few simple tips, you’ll elevate your dish to a whole new level. Happy cooking!
Grilling Techniques That Guarantee Perfection
Mastering the art of cooking fish on an open flame requires more than just heat—it’s about technique. Whether you’re using a gas or charcoal grill, understanding how to control your equipment ensures consistent results every time. Let’s explore two essential methods to elevate your outdoor cooking game.
Using a Grill Lid Effectively
A grill lid is your best friend when it comes to maintaining consistent heat. Closing the lid creates an oven-like environment, locking in moisture and ensuring even cooking. This is especially helpful during summer months when outdoor temperatures can fluctuate.
For gas grills, I recommend preheating with the lid closed for at least 10 minutes. This ensures the grates are hot enough to sear the fish properly. On a charcoal grill, the lid helps regulate airflow, keeping the coals burning evenly.
Managing Flare-Ups
Flare-ups can quickly ruin a perfectly good dish. To prevent this, I always trim excess fat and pat the fish dry before placing it on the grill. For thicker cuts, I use a two-zone setup—direct heat for searing and indirect heat for finishing.
If a flare-up occurs, move the fish to the cooler side of the grill immediately. A quick spritz of water or a squeeze of citrus juice can also help tame the flames. Remember, monitoring the thickness of your fillets is key to avoiding overcooking.
| Technique | Tips |
|---|---|
| Using a Lid | Preheat with lid closed, maintain consistent heat |
| Managing Flare-Ups | Trim fat, use two-zone setup, monitor thickness |
With these techniques, you’ll achieve tender, flavorful results every time. Happy cooking!
Tips for Achieving Optimal Doneness
Achieving the perfect doneness is a skill that transforms good cooking into great cooking. It’s all about paying attention to the details—visual cues, temperature, and timing. Let me walk you through my tried-and-true techniques for ensuring your dish turns out just right every time.

Visual and Temperature Cues
One of the best ways to check for doneness is by observing visual cues. When the fish starts to flake slightly and the center becomes slightly translucent, it’s a sign that it’s ready. I also rely on an instant-read thermometer to ensure the internal temperature reaches 120-125°F. This combination of cues guarantees a moist and tender result.
Using tongs to flip the fish is another essential step. I always handle the fillet gently to avoid breaking it. This ensures the structure remains intact while allowing for even cooking on both sides.
To maintain moisture, I brush the fish with a light layer of olive oil before placing it on the grill. This not only prevents sticking but also enhances the flavor and texture. A well-oiled surface ensures a perfect sear every time.
- Visual cues: Look for subtle flaking and slight translucency in the center.
- Temperature: Use a thermometer to check for 120-125°F internally.
- Tools: Use tongs to flip the fish carefully without breaking it.
- Moisture: Apply olive oil before cooking to lock in flavor and prevent dryness.
From my experience, removing the fish from the grill at just the right moment makes all the difference. Overcooking can lead to dryness, so I always err on the side of caution. Once it’s off the heat, I let it rest for a few minutes. This allows the temperature to equalize, ensuring a moist and perfectly cooked fillet.
Mastering these techniques will elevate your cooking game. Whether you’re a beginner or a seasoned pro, these tips will help you achieve optimal doneness every time.
Side Dishes That Enhance Grilled Salmon
Pairing the right sides with your dish can elevate the entire meal. From refreshing salads to easy foil packs, the right accompaniments balance flavors and textures. Let’s explore some of my favorite options that complement the main dish perfectly.
Refreshing Summer Salads
Summer salads are a go-to for adding freshness to your plate. I love pairing my dish with a vibrant avocado or Greek salad. These options are light, flavorful, and quick to prepare.
For a seasonal twist, try a spinach and blueberry salad. The sweetness of the berries contrasts beautifully with the savory notes of the fish. Adding a citrus-based dressing ties everything together.
Easy Salmon Foil Pack Recipes
Using foil packets is a game-changer for cooking fish. Wrapping the fillets in foil locks in moisture and flavor, ensuring a tender result every time. I often season with kosher salt and a simple marinade for even cooking.
This method also makes cleanup a breeze. Just place the foil-wrapped fish on the grill, and you’re done. Plus, you can add vegetables like asparagus or zucchini to the packet for a complete meal.
Here are a few tips for perfect foil packs:
- Use heavy-duty foil to prevent tearing.
- Season generously with herbs and spices.
- Cook over medium heat for even results.
Whether you’re hosting a summer cookout or a weeknight dinner, these side dishes and techniques ensure a well-rounded meal. Experiment with flavors and find your perfect pairing!
Troubleshooting Common Grilling Challenges
Even the most experienced cooks face challenges when cooking fish outdoors. From overcooked edges to unexpected flare-ups, these issues can turn a perfect meal into a disappointment. But don’t worry—I’ve got you covered with practical solutions to ensure every fillet turns out just right.
Avoiding Overcooked Edges
One of the most common problems is overcooked edges. To prevent this, I always monitor the grill’s temperature closely. Keeping it between 375-400°F ensures even cooking. I also pay attention to each piece, flipping it gently to avoid breaking the delicate flesh.
Another tip is to adjust the oil application. Too much can cause flare-ups, while too little can lead to sticking. I use a light brush of olive oil to keep the fish moist and prevent it from drying out.
Fixing Unexpected Flare-Ups
Flare-ups can happen, but they don’t have to ruin your meal. When I notice flames, I immediately move the fillet to a cooler part of the grill. This prevents burning and allows the heat to stabilize.
Using an instant-read thermometer is another lifesaver. I check that the internal temperature reaches 120-125°F before removing the fish. This ensures it’s cooked to the perfect degree of doneness without overcooking.
- Monitor heat: Keep the grill at 375-400°F for even cooking.
- Use oil wisely: Apply a light layer to prevent sticking and flare-ups.
- Check temperature: Use a thermometer to ensure the fish is cooked just right.
- Reposition as needed: Move the fillet to cooler areas if flare-ups occur.
With these tips, you’ll tackle common challenges like a pro. Remember, practice makes perfect, and every mistake is a chance to learn. Happy cooking!
Conclusion
Cooking outdoors can be a rewarding experience when you know the right techniques. My top tip is to focus on proper seasoning—garlic-infused marinades add incredible flavor. Temperature control is also key; using a grill lid helps lock in moisture and ensures even cooking.
Don’t forget to let your dish rest minute after cooking. This allows the flavors to settle and ensures a tender result. Experiment with different methods and seasoning ideas to find what works best for you.
With these tips, you’ll create a good meal every time. Enjoy the process and savor every bite of your perfectly cooked dish. Happy cooking!
FAQ
How do I choose the freshest salmon for grilling?
Look for firm, bright flesh with a mild ocean scent. Avoid any fish with a strong fishy smell or discolored spots.
What’s the best type of grill for cooking salmon?
Both gas and charcoal grills work well. Gas offers precise heat control, while charcoal adds a smoky flavor. Choose based on your preference.
How long should I marinate the fish before grilling?
I recommend marinating for 15 to 30 minutes. Over-marinating can break down the delicate texture of the fish.
What’s the ideal temperature for grilling salmon?
Aim for a medium heat of around 375°F to 400°F. This ensures even cooking without burning the exterior.
How do I know when the salmon is done?
The fish should flake easily with a fork and reach an internal temperature of 145°F. It will also turn opaque and slightly firm to the touch.
What’s a simple rub recipe for grilled salmon?
My go-to mix includes kosher salt, black pepper, garlic powder, and a touch of smoked paprika for depth of flavor.
How can I prevent flare-ups while grilling?
Keep the grill clean and trim excess fat from the fish. If flare-ups occur, move the salmon to a cooler part of the grill temporarily.
What side dishes pair well with grilled salmon?
I love serving it with a fresh summer salad or roasted vegetables. Foil packs with herbs and citrus are also a great option.
How do I avoid overcooking the edges of the salmon?
Start with a preheated grill and cook the fish skin-side down first. This helps protect the delicate flesh from direct heat.
Can I use foil when grilling salmon?
Absolutely! Foil helps lock in moisture and prevents sticking. Just make small holes to allow some smoke flavor to penetrate.


