


How to Grill Chicken Breasts Without Losing Their Juiciness
February 25, 2025
How to Make Juicy Chicken Burgers with 5 Simple Tricks
February 25, 2025
Did you know that baked chicken thighs are one of the most searched recipes in the U.S.? Their popularity isn’t surprising—they’re easy to prepare, family-friendly, and deliver incredibly juicy and tender results every time. Whether you’re a seasoned cook or a beginner, mastering this dish can elevate your dinner game.
Imagine this: It’s a busy weeknight, and you’re craving something delicious but don’t want to spend hours in the kitchen. With just a few simple steps, you can create a meal that feels gourmet yet requires minimal effort. The secret lies in using quality chicken thighs and the right techniques.
In this guide, we’ll walk you through four chef-approved methods to achieve perfection. From essential equipment to smart oven settings, you’ll learn everything you need to make your next meal unforgettable. Let’s get started!
Key Takeaways
- Discover four expert methods for perfect baked chicken thighs.
- Enjoy a recipe that’s simple yet packed with gourmet flavor.
- Use quality ingredients for juicy and tender results.
- Learn essential tips from experienced chefs and cooking blogs.
- Transform your dinner routine with actionable, easy-to-follow advice.
Why Baking Chicken Thighs is a Game-Changer for Your Dinner
Crispy, juicy, and flavorful—oven cooking delivers it all. Using your oven for this dish is a game-changer because it’s hands-off and consistent. You can focus on other tasks while your meal cooks to perfection. Plus, the oven’s even heat ensures a perfect balance between crispy skin and tender meat.
Timing is key. Cooking for the right number of minutes ensures the skin stays crispy without drying out the meat. For example, 30-40 minutes at 400°F is a sweet spot. Using a reliable timer helps you stay on track.
Don’t forget to check the internal temperature. Aim for 165°F to ensure safety and juiciness. A good thermometer is your best friend here. It takes the guesswork out of cooking and guarantees delicious results every time.
Crispy Skin Tips for Maximum Flavor
To get that extra crunch, pat the skin dry before cooking. This removes moisture, helping it crisp up. You can also lightly coat it with oil or butter for added flavor.
Another trick is to start with high heat. This quickly crisps the skin while locking in moisture. Lower the temperature later to finish cooking the meat evenly.
Achieving Juicy and Tender Results
Juicy meat starts with the right internal temperature. Overcooking can dry it out, so keep an eye on the thermometer. Letting it rest for a few minutes after cooking also helps retain moisture.
Seasoning plays a role too. A simple mix of salt, pepper, and herbs can enhance the natural flavors. Pair it with a marinade for even more depth.
Selecting the Perfect Chicken Thighs
The secret to a flavorful meal starts with selecting the best cuts. Whether you’re cooking for a weeknight dinner or a special occasion, the type of meat you choose plays a huge role in the final result. Let’s explore the options to help you make the best choice.
Bone-In vs. Boneless Considerations
Bone-in chicken is a favorite among chefs for its rich flavor and moisture retention. The bone helps distribute heat evenly, making it forgiving even at higher temperatures. This makes it a great option for beginners or anyone looking for consistent results.
On the other hand, boneless cuts are quicker to cook and easier to eat. They’re ideal for recipes where convenience is key. However, they require careful timing to avoid drying out. Adjust your cooking time slightly to ensure they stay juicy.
Another factor to consider is whether to go for skin-on chicken. The skin adds an extra layer of flavor and helps keep the meat tender during cooking. It also crisps up beautifully, adding texture to your dish.
Tips for Perfect Arrangement
- Place the meat in a single layer in your pan to ensure even cooking.
- Leave a little space between each piece to allow heat to circulate.
- If using bone-in cuts, position them skin-side up for maximum crispiness.
Remember, the quality of your ingredients is just as important as the cooking method. Always choose fresh, high-quality cuts for the best results. With these tips, you’re well on your way to creating a dish that’s both delicious and memorable.
Prepping and Marinating: The Key to Flavorful Chicken
The foundation of a delicious dish lies in how you prep and marinate. Proper preparation ensures every bite is packed with flavor and juiciness. Start by patting your meat dry with paper towels. This simple step removes excess moisture, helping the seasoning stick better and creating a crispier finish.
Marinade Secrets to Boost Taste
A great marinade can transform your meal. Use oil, like extra virgin olive oil, as a base. It helps the seasoning cling to the meat and locks in moisture. Add a mix of garlic, onion, paprika, and Italian herbs for depth of flavor. “A well-balanced marinade is the secret to unforgettable taste,” says one expert.
Measure your seasoning carefully. A teaspoon is your best tool for precision. Too much can overpower, while too little may leave your dish bland. Mix everything in a bowl to ensure even distribution. Adjust ingredients like garlic to suit your taste preferences.
Essential Seasoning Mixes and Techniques
Creating the perfect seasoning mix is an art. Combine salt, pepper, and your favorite herbs in a bowl. For a Mediterranean twist, add oregano and thyme. If you prefer a smoky flavor, include paprika and cumin. Experiment with different combinations to find your signature blend.
Marinating in advance can make a big difference. Let your meat soak in the marinade for at least 30 minutes, or overnight for maximum flavor. This allows the ingredients to penetrate deeply, resulting in a richer taste and tender texture. With these tips, you’re ready to elevate your cooking game!
Chef-Approved Oven Settings & Techniques
Mastering oven settings can make or break your dish. The right techniques ensure crispy, juicy results every time. Whether you’re a beginner or a seasoned cook, understanding your oven’s capabilities is essential for success.

Optimal Temperature and Timing for Crispiness
Preheating your oven is the first step to consistent cooking. Set it to 400°F or 425°F for the best results. This ensures even heat distribution, which is crucial for rendering fat and crisping the skin.
Timing is equally important. Cooking for 30-40 minutes at this temperature strikes the perfect balance between crispy skin and tender meat. Use a timer to avoid overcooking.
Adding spice and pepper enhances the natural flavors. A simple mix of salt, pepper, and your favorite herbs can elevate the dish. “The right seasoning brings out the best in every bite,” says a professional chef.
Broiling for Extra Crunch
For an extra layer of crispiness, use the broiler. After baking, switch to broil for 2-3 minutes. This quickly crisps the skin without drying out the meat.
Keep a close eye during this step. Broiling works fast, and leaving it too long can lead to burning. A golden-brown finish is what you’re aiming for.
| Oven Setting | Effect |
|---|---|
| Preheat to 400°F | Ensures even cooking and crispy skin |
| Bake for 30-40 minutes | Balances tenderness and crispiness |
| Broil for 2-3 minutes | Adds extra crunch to the skin |
With these tips, you’ll achieve restaurant-quality results at home. Experiment with different spice blends and temperature settings to find your perfect combination.
Baking Chicken Thighs: Your Step-by-Step Guide
Getting the perfect baked chicken thighs starts with proper preparation and arrangement. Follow these steps to ensure your dish turns out juicy, flavorful, and perfectly cooked every time.
Arranging and Preparing Your Baking Pan
Start by trimming any excess skin or fat from the thighs. This helps them cook evenly and prevents flare-ups in the oven. Use a tablespoon to measure and drizzle olive oil over the meat. This ensures the right amount of moisture and helps the seasoning stick.
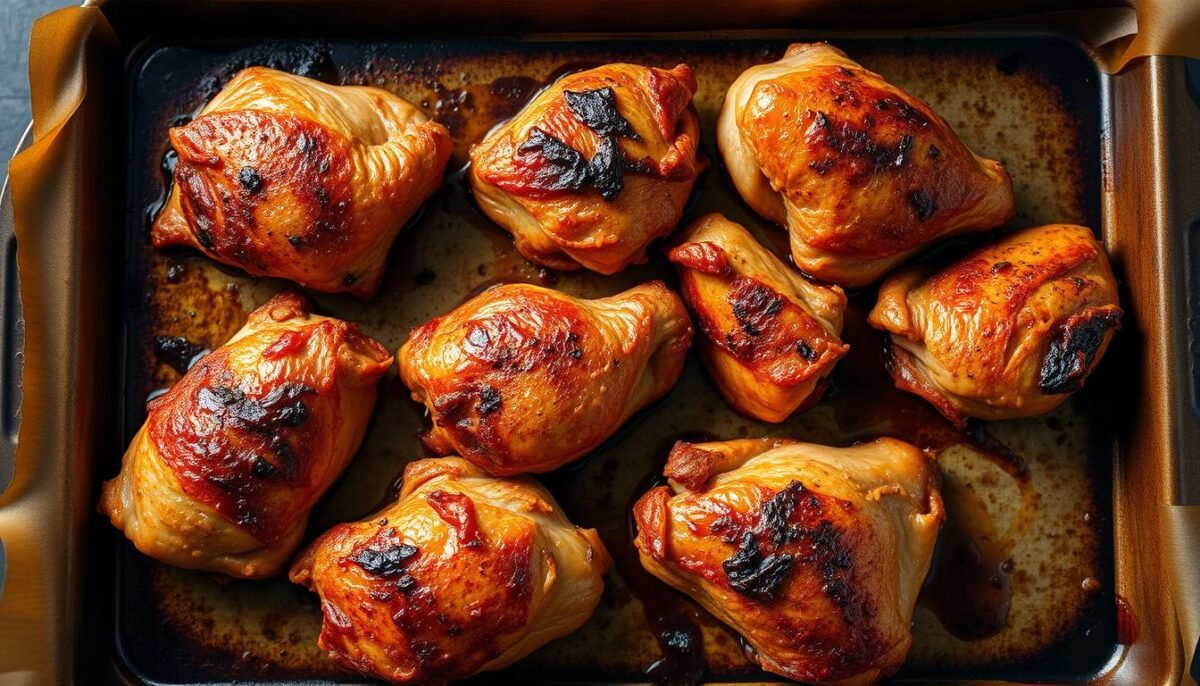
Next, arrange the thighs in a single layer on your baking pan. Leave a little space between each piece to allow heat to circulate. This ensures even cooking and prevents steaming. If you’re using bone-in cuts, place them skin-side up for maximum crispiness.
Hands-Off Baking Process Explained
Once your pan is ready, pop it into the preheated oven. The beauty of this method is its hands-off nature. After arranging the thighs, you can let the oven do the work. Bake at 400°F for 30-40 minutes, depending on the size of your cuts.
To ensure safety and juiciness, use a digital thermometer to check the internal temperature. The thighs should reach 165°F. Let them rest for a few minutes after baking to lock in moisture. This simple step makes a big difference in the final texture.
For more tips on selecting the right chicken cut, check out our detailed guide. With these steps, you’ll achieve restaurant-quality results at home with minimal effort.
Troubleshooting Common Chicken Thigh Baking Mistakes
Even the most experienced cooks can run into issues when preparing certain dishes. From overcooking to uneven heat, small mistakes can affect the final result. Let’s explore how to avoid these pitfalls and ensure your meal turns out perfectly every time.

Avoiding Overcooking and Dryness
One of the most common mistakes is overcooking, which can leave your meat dry and tough. To prevent this, use a digital thermometer to check the internal temperature. Aim for 165°F for safe and juicy results.
Another tip is to avoid frequent pan rotations. Moving the meat too often can disrupt the cooking process and lead to uneven results. Let it cook undisturbed for the best texture.
Seasoning also plays a role. Be cautious with salt, as too much can draw out moisture. A balanced mix of herbs and spices enhances flavor without compromising juiciness.
Ensuring Even Heat Distribution
Proper placement in the pan is key to even cooking. Arrange the pieces in a single layer, leaving space between each one. This allows heat to circulate evenly, preventing hot spots.
If you’re using bone-in cuts, place them skin-side up. This helps the skin crisp up while keeping the meat tender. A well-prepared dish starts with thoughtful arrangement.
Pair your meal with sides like rice or potato for a complete and satisfying serving. These additions complement the flavors and make your dish more enjoyable.
By addressing these common issues, you’ll elevate your cooking and create meals that are both delicious and consistent. With a little attention to detail, you can avoid mistakes and impress your guests every time.
Mastering Baking chicken thighs with Expert Techniques
Elevate your cooking game with expert techniques that ensure every bite is flavorful and perfectly cooked. Whether you’re aiming for crispy skin or tender meat, these advanced tips will help you achieve restaurant-quality results at home. Let’s dive into the details to make your next meal unforgettable.
Advanced Tips for Perfect Internal Temperature
Managing the internal temperature is crucial for juicy and safe results. Use a digital thermometer to ensure your meat reaches 165°F. This guarantees it’s cooked through without drying out. “Precision is key to perfect cooking,” says a professional chef.
Rendering fat properly also plays a role. Start with high heat to crisp the skin, then lower the temperature to finish cooking. This method locks in moisture while maximizing flavor. For skinless chicken thighs, adjust the timing slightly to prevent dryness.
Resting the meat after cooking is another pro tip. Let it sit for 5-10 minutes to redistribute juices. This simple step ensures every bite is tender and flavorful.
Creative Variations and Serving Suggestions
Experiment with different proteins and side dishes to create a well-rounded meal. Pair your dish with beans or roasted vegetables for added nutrition. These sides complement the flavors and make the meal more satisfying.
For a lighter option, try skinless chicken. It’s just as flavorful with the right seasoning and cooking techniques. Adjust the cooking time to ensure it stays moist and tender.
Here’s a quick guide to advanced techniques:
| Technique | Benefit |
|---|---|
| Use a digital thermometer | Ensures perfect internal temperature |
| Render fat properly | Maximizes flavor and moisture |
| Pair with beans or veggies | Creates a balanced meal |
| Experiment with skinless chicken | Offers a lighter alternative |
Encourage your family to try new variations. Experiment with different seasonings and sides to find their favorites. With these tips, you’ll create meals that delight everyone at the table.
Conclusion
Transforming your dinner routine is easier than you think with these chef-approved techniques. From selecting the right cuts to mastering oven settings, each step ensures juicy, flavorful results every time. Whether you’re cooking for family or hosting guests, these methods make the process stress-free and rewarding.
By following these tips, you can turn a simple meal into a memorable experience. Experiment with seasonings, try different cooking temperatures, and don’t forget to let your dish rest for maximum juiciness. These small adjustments can make a big difference.
We invite you to try these techniques and share your results. Your feedback helps us refine and improve the recipe further. With a little practice, you’ll discover how simple and effective this cooking method can be. Enjoy a delicious, hassle-free dinner tonight!
FAQ
How do I get crispy skin when baking chicken thighs?
Pat the skin dry before seasoning, use a bit of oil, and bake at a high temperature. Broiling for the last few minutes can add extra crunch.
What’s the best way to keep chicken thighs juicy and tender?
Avoid overcooking by using a meat thermometer to check for an internal temperature of 165°F. Bone-in thighs also retain moisture better.
Should I use bone-in or boneless chicken thighs?
Bone-in thighs are great for juiciness and flavor, while boneless thighs cook faster and are easier to eat. Choose based on your preference.
What’s the ideal marinade for chicken thighs?
A mix of olive oil, garlic, lemon juice, and herbs like rosemary or thyme works wonders. Let it marinate for at least 30 minutes for maximum flavor.
What’s the best oven temperature for baking chicken thighs?
Preheat your oven to 425°F for crispy skin and even cooking. Adjust the time based on the size of the thighs.
How do I arrange chicken thighs in the baking pan?
Place them skin-side up in a single layer with some space between each piece. This ensures even heat distribution and crispiness.
How can I prevent overcooking chicken thighs?
Use a meat thermometer to monitor the internal temperature. Remove them from the oven once they reach 165°F to avoid dryness.
Can I add creative variations to baked chicken thighs?
Absolutely! Try adding spices like paprika or cumin, or serve with sides like roasted vegetables, rice, or mashed potatoes for a complete meal.


