


5 Techniques to Create Restaurant-Quality Sloppy Joes
February 5, 2025
8 Ways to Make Your Philly Cheesesteak Irresistible
February 5, 2025
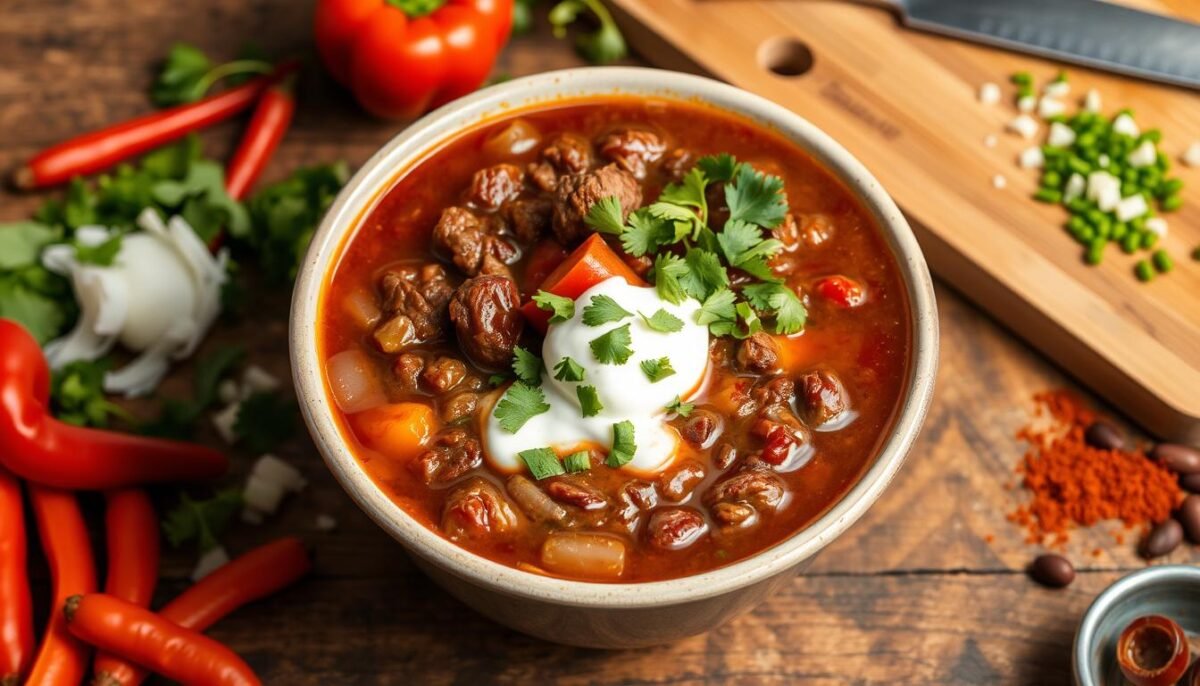
One chilly evening, with snow beginning to fall, I craved something warm. A homemade chili recipe is the perfect way to feel cozy. For me, nothing beats the best beef chili for comfort food.
Trying to perfect my chili recipe, a special winter weekend stands out. The family was over for game night. A beef chili was perfect to satisfy everyone. That night, the chili’s rich spices brought us all closer, making it unforgettable.
I then aimed to create the ultimate beef chili. Through the years, I’ve improved my recipe. Now, it combines classic spices and special techniques. I’m here to share how to make your chili stand out.
Key Takeaways
- Chili simmering time averages 90 minutes for flavor blending, with an additional 30 minutes for heating kidney beans.
- Recommended storage time for refrigerated chili is up to 4 days, with individual servings frozen for up to 3 months.
- Ingredient thickening methods include cornmeal, a cornstarch slurry, or a flour slurry.
- Recipe has won over two dozen Chili Cook-offs with its perfected blend of flavors.
- Winter months are ideal for making this beef chili, providing warmth and comfort during cold times.
Why Beef Chili is My Go-To Comfort Food
There’s something so warm about a bowl of chili. To me, beef chili is the top comfort food. It’s rich and full of flavor, perfect for those cold nights.
It’s not just for dinner at home but also great for parties. It’s a meal everyone looks forward to.
The warmth of classic flavors
The secret to amazing beef chili is in its spices. Spices like chili powder, cumin, and garlic add so much warmth. When it simmers for about 45 minutes, these spices mix well.
This mix creates a savory, comforting taste that’s unforgettable.
Perfect for any occasion
Beef chili is perfect for any event, whether it’s a big dinner party or a cozy night alone. Its versatility makes it fit for any meal. It’s a dish I can always count on, no matter the situation.
Memories tied to my chili recipes
Making beef chili always brings back great memories. Each recipe is tied to moments with friends and family. It’s a tradition that connects me to my past.
It can be hard to find the perfect comfort food, but beef chili is always a hit. For more great meal ideas, check out these unforgettable chicken recipes.
Choosing the Right Beef for My Chili
When making beef chili, the beef you choose is key. You have to pick between ground beef or steak, lean or fatty, and maybe organic. These choices impact the taste and feel of your chili.
Ground beef vs. steak
Ground beef is loved for its ease and quick cook time. It usually has an 80/20 mix, which means it’s mostly muscle with some fat. This mix gives a nice balance of taste and juiciness. For a leaner, more flavorful chili, try ground sirloin with a 90/10 mix. If you like your chili chunky, steak pieces, like diced tri-tip, can make it hearty. Brisket and short ribs also add a deep taste when slow-cooked.
Lean cuts vs. fatty cuts
Picking lean or fatty beef changes how rich your chili will be. Lean ground sirloin is healthier and packed with beef flavor. Fatty cuts, like brisket, make the chili more delicious with their fat melting into the dish. Using both lean and fatty beef can create a nice flavor mix.
Organic options to consider
Choosing organic beef is great for health and ethics. It’s free from bad additives and tastes more natural. Grass-fed beef improves the chili’s taste and nutrition. Going organic means supporting better farming methods.
- Ground beef (80/20 or 90/10 blend)
- Chunks of steak (like diced tri-tip sirloin, brisket, or short ribs)
- Mix of lean and fatty cuts for balanced flavor
- Organic, grass-fed and grass-finished beef for enhanced taste and health benefits
Picking the right beef turns your chili from okay to amazing. Whether you like ground beef, steak chunks, or organic beef, making the right choice is key for great chili.
| Type of Beef | Fat Content | Flavor Profile | Best Use |
|---|---|---|---|
| Ground Beef (80/20) | 20% Fat | Rich and Moist | Everyday Chili |
| Ground Sirloin (90/10) | 10% Fat | Leaner, Stronger Flavor | Healthier Chili Options |
| Brisket | Higher Fat | Robust, Rich | Slow-Cooked Chili |
| Short Ribs | Higher Fat | Deep, Intense Flavor | Gourmet Chili |
| Tri-Tip Sirloin | Moderate Fat | Flavorful, Premium | Special Occasion Chili |
Essential Ingredients for Flavorful Beef Chili
A top-rated chili recipe needs key ingredients for depth and richness. I’ve refined my selection to make my beef chili stand out. It’s both an easy and a must-try homemade chili recipe.
Beans: Which Ones Work Best?
I love using red kidney beans in my chili. They’re hearty and hold up well during cooking. They mix in but also pop with the beef’s savory flavor. You can also use black or pinto beans, but red kidney beans are my top choice.
Spices to Elevate the Taste
Spices are crucial for any chili, and I use plenty. My mix includes chili powder, cumin, dried oregano, and paprika. These spices create a rich, complex flavor. I also add three cloves of garlic for depth, plus 1 to 2 jalapenos for a spicy kick if you like heat.
Fresh vs. Canned Tomatoes
Choosing between fresh and canned tomatoes affects your chili’s taste and texture. I prefer using canned crushed and fire-roasted tomatoes. They’re convenient and have constant flavor. A tablespoon of tomato paste makes the chili’s tomato flavor stronger and sweeter.
These ingredients blend to make a flavorful chili. This recipe is perfect for a family dinner or a casual gathering. The beans, spices, and tomatoes can make this simple dish memorable.
Preparing My Beef Chili Base
I believe every great homemade chili starts with a perfect base. Here’s how I make the best beef chili.
Sautéing onion and garlic perfectly
I begin by sautéing onions and garlic in two tablespoons of oil. They become soft and golden after about six minutes. This step creates a sweet and pungent foundation for a simple chili recipe.
Browning the beef for depth of flavor
I then add two pounds of lean ground beef to the pot, breaking it apart. I cook the beef until it’s no longer pink, about five minutes. Browning the beef adds a deep meaty flavor and locks in juices, making my chili taste even better.
Layering spices the right way
After browning the beef, I mix in a variety of spices. I use one tablespoon of ancho chili powder, 1/4 teaspoon of chipotle chili powder, one tablespoon ground cumin, and two teaspoons of oregano. Layering spices like this ensures every flavor stands out and works together in the dish.
The Ideal Cooking Method for Beef Chili
The way you cook your chili is key to its taste and texture. Whether you use a slow cooker, pressure cooker, or stovetop, each method adds something special to your dish.
Slow cooker vs. stovetop
Using a slow cooker is great when you’re not in a hurry. It lets the flavors come together over four hours on low heat. This makes your chili taste amazing. On the flip side, the stovetop method cooks the chili in 45-60 minutes. It’s faster and still makes the chili flavorful.
Pressure cooking for faster results
If you need your chili fast, a pressure cooker is your friend. It cooks the chili under high pressure for just five minutes. This method is perfect for a quick meal. It still keeps the chili tasty and tender.
The importance of simmering time
No matter how you cook it, simmering time is important. It makes sure the ingredients blend well and the flavors are strong. On the stovetop, simmer for 10-15 minutes to thicken the chili. In the slow cooker, the flavors blend together over time, creating a deep taste.
| Cooking Method | Time | Benefits |
|---|---|---|
| Slow Cooker | 4 hours (low) | Melds flavors beautifully over time |
| Stovetop | 45-60 minutes | Rich, deep flavor in less time |
| Pressure Cooker | 5 minutes (high pressure) | Quick and flavorful results |
Adding Vegetables to Enhance Nutrients
Adding veggies to my chili not only makes it more nutritious but also more exciting to eat. The right vegetables transform a simple chili into a standout, nutritious meal.
Bell Peppers: My Top Choice
Bell peppers are my favorite for boosting my chili’s nutrition. They add beautiful colors and a sweet crunch that perfectly balances the spices. I use a mix of yellow, green, and red bell peppers. These peppers are packed with vitamins A and C, making the chili even healthier.
Chilis for an Extra Kick
If you like a bit of heat, adding chilis is a great idea. I love using jalapeños for a moderate spice that doesn’t overwhelm. For those who dare, habaneros bring a fire that makes any chili extraordinary. Chilis add a wonderful warmth and flavor to every bite.
Other Veggies to Consider
I also add other veggies to make my chili even better. Corn, cherry tomatoes, and zucchini add varied textures and colors. I use 1 ¾ cups of frozen corn, 1 ½ cups of halved cherry tomatoes, 4 cups of zucchini, and 1.5 cups of carrots to keep the textures interesting. This recipe makes each chili serving a nutritious, filling meal with lots of vitamins.
| Vegetable | Quantity | Benefits |
|---|---|---|
| Bell Peppers | 3 medium (yellow, green, red) | Rich in vitamins A & C |
| Chilis (Jalapeños) | To taste | Adds heat and enhances flavor |
| Frozen Corn | 1 ¾ cups | Adds sweetness and fiber |
| Cherry Tomatoes | 1 ½ cups (halved) | Boosts vitamin C and antioxidants |
| Zucchini | 4 cups | Lightens the dish while providing nutrients |
| Carrots | 1.5 cups | Adds sweetness and crunch |
How to Make My Beef Chili Gluten-Free
To whip up a tasty gluten-free chili recipe, pick your ingredients carefully and always check labels. This way, you’ll create a healthy dinner idea that’s safe and enjoyable for everyone.
Tips for Selecting Gluten-Free Products
Choosing certified gluten-free products for your gluten-free chili recipe is key. Use ingredients like beef, tomatoes, beans, and spices, which are naturally without gluten. Also, mix 1 pound ground beef with 1 pound pork breakfast sausage. And make sure any spices and broths you’re using are marked as gluten-free.
Alternatives for Thickening Chili
To thicken your chili, try using cornstarch or masa harina. These gluten-free options will give your chili the perfect thickness. They keep your easy chili recipe delicious and suitable for those avoiding gluten.
Checking Labels for Hidden Gluten
Always read product labels closely to find hidden gluten. Watch out for spice blends, broths, and processed meats, as they may have gluten additives. Checking ensures your gluten-free chili recipe stays truly gluten-free. This makes for a safe, healthy dinner idea.
| Nutrient | Amount per Serving |
|---|---|
| Calories | 301 kcal |
| Carbohydrates | 16 g |
| Protein | 18 g |
| Fat | 19 g |
| Saturated Fat | 6 g |
| Fiber | 6 g |
| Sugar | 4 g |
| Vitamin A | 768 IU |
| Vitamin C | 17 mg |
| Calcium | 41 mg |
| Iron | 2 mg |
The Impact of Cookware on My Chili
Choosing the right cookware can make your chili better and cooking it easier. You’ll get great beef chili, easy cleanup, and cookware that lasts. Each kind of pot or pan has its benefits. So, it’s important to pick one that fits how you like to cook.
Using Cast-Iron Skillets
Cast-iron skillets keep heat well. This gives your beef a perfect browned look and taste. They’re good for more than just chili. You can brown meat or simmer sauces in them. Plus, they add a unique flavor to your chili that makes it even better.
Benefits of Non-Stick Pots
Non-stick pots make cooking and cleaning very easy. You won’t spend much time cleaning up after making your chili. They keep food from sticking. This means stirring is easier and cooking is more even. They’re great for any cook and make life simpler in the kitchen.
The Role of Slow Cookers
Slow cookers are great for making chili with deep flavor. They cook slowly, mixing the flavors over hours. Start your chili in the morning and have it ready by dinner. This makes a rich and tasty meal.
They’re also built to last and easy to clean. This makes making the best beef chili simple and not a hassle.
Resting and Cooling My Chili
Letting chili con carne rest after cooking is key to improving its taste. If you let it sit for 8-12 hours, the meat and beans soak up all the spice flavors. This makes your homemade chili taste even better.
Why allowing flavors to meld matters
The magic of great chili is in letting the flavors mix. Cooking starts the process, but resting for 8-12 hours makes the taste richer. This makes the chili taste fuller and more enjoyable, whether it’s for a family meal or a get-together.
Best practices for storage
To keep your homemade chili tasty and safe, cool it quickly. Putting the chili into shallow containers helps it cool faster. An ice bath can speed up cooling too. Then, keep the chili in sealed containers in the fridge. It stays good for 3-4 days, or freeze it for up to 6 months. Always label your storage with the date.
Reheating tips for maximum flavor
Slowly warming the chili on the stove keeps its flavors and textures. Try to avoid the microwave as it can ruin the chili’s quality. Stir now and then to heat it evenly. If the chili gets too thick, add some broth to thin it. By reheating it this way, your chili will taste just as good as when it was first made.
FAQ
What type of beef should I use for my chili?
You can choose ground beef or steak. Ground beef provides a smoother texture. Steak offers tasty chunks that some people prefer. Either way, your beef chili will be delicious!
Should I use lean cuts or fatty cuts of beef?
That’s up to you. Lean cuts are healthier but might be a bit dry. Fatty cuts are juicier and add flavor. I like using 85% lean ground beef for a great blend.
What are some organic beef options to consider?
Organic beef can make your chili tastier and healthier. Look for organic labels. Try brands like Organic Prairie or shop at your local farmers’ market for the best quality.
Which beans work best in beef chili?
Kidney beans, black beans, and pinto beans are great choices. They bring nice texture and really soak up the chili flavors.
How can I elevate the taste of my chili with spices?
Mix chili powder, cumin, paprika, and oregano together. Add a little cayenne pepper for an extra spicy kick.
Should I use fresh or canned tomatoes?
Both are good options! Fresh tomatoes give a fresh taste, but canned ones are convenient and flavorful. I often use canned crushed tomatoes for quick chili.
How do I sauté onion and garlic perfectly?
Warm olive oil over medium heat, then cook the onions until they’re clear. Next, add minced garlic and cook for one more minute. This creates a tasty base for your chili.
Why is browning the beef important?
Browning the beef adds great flavor by caramelizing it. I always do this step for a rich-tasting chili.
What’s the best way to layer spices?
Put spices in right after the onion and garlic. Do it before adding liquids. This helps to draw out the most flavor.
Slow cooker vs. stovetop: which is better for chili?
Both have their benefits! Slow cookers blend flavors over time and are easy to clean. Stovetops cook faster and give you more control. I use both, based on what my day looks like.
How can I make chili in a pressure cooker?
First, brown the beef, then cook onions and garlic. Add everything to the pressure cooker. Cook on high for 15-20 minutes. Allow for natural release. It’s a speedy way to enjoy a flavorful meal.
Why is simmering time important?
Simmering enhances and deepens flavors. For the best taste, I simmer for at least an hour on low heat.
Are bell peppers a good addition?
Yes! Bell peppers add a sweet flavor and lots of vitamins. They’re a healthy boost for your chili.
Can I add chilis for extra heat?
Definitely! Add jalapeños, serranos, or habaneros for more spice. Adjust the amount to suit your taste and make your chili unforgettable.
What other vegetables work well in chili?
Corn, zucchini, and carrots are wonderful additions. They improve nutrition, texture, and color in your dish.
How can I make my beef chili gluten-free?
Choose gluten-free ingredients and read labels carefully. Use cornstarch or potato starch instead of flour to keep it gluten-free and healthy.
What are some alternatives for thickening gluten-free chili?
You can use cornstarch, potato starch, or mashed beans. These are excellent gluten-free ways to thicken your chili.
Why is checking labels important for gluten-free chili?
Ingredients like spices, broths, and canned beans might have gluten. Always check to make sure everything is gluten-free.
How does cookware impact the flavor of chili?
Good cookware, like cast-iron skillets, helps flavor by cooking evenly. It’s my go-to for browning beef.
What are the benefits of non-stick pots?
Non-stick pots are easy to clean and keep food from sticking. They’re perfect for making quick chili on busy nights.
What role do slow cookers play in making chili?
Slow cookers simplify cooking and blend flavors over hours. They’re great when you need a warm meal waiting for you.
Why should chili cool before storing?
Cooling helps the flavors come together more and makes it safer to store. It also keeps the chili good for longer.
What are the best practices for storing chili?
Keep chili in sealed containers in the fridge for up to 4 days. Or freeze it. This way, reheating is easy and quick.
How should I reheat chili for maximum flavor?
Warm it slowly on the stove, stirring now and then. You can microwave it too. Just remember to stir it halfway through. This keeps the flavor even and delicious.


