


4 Secrets for Juicy BBQ Ribs That Will Wow Your Guests
January 22, 2025
3 Chef-Approved Ways to Elevate Your Mac and Cheese Game
January 22, 2025
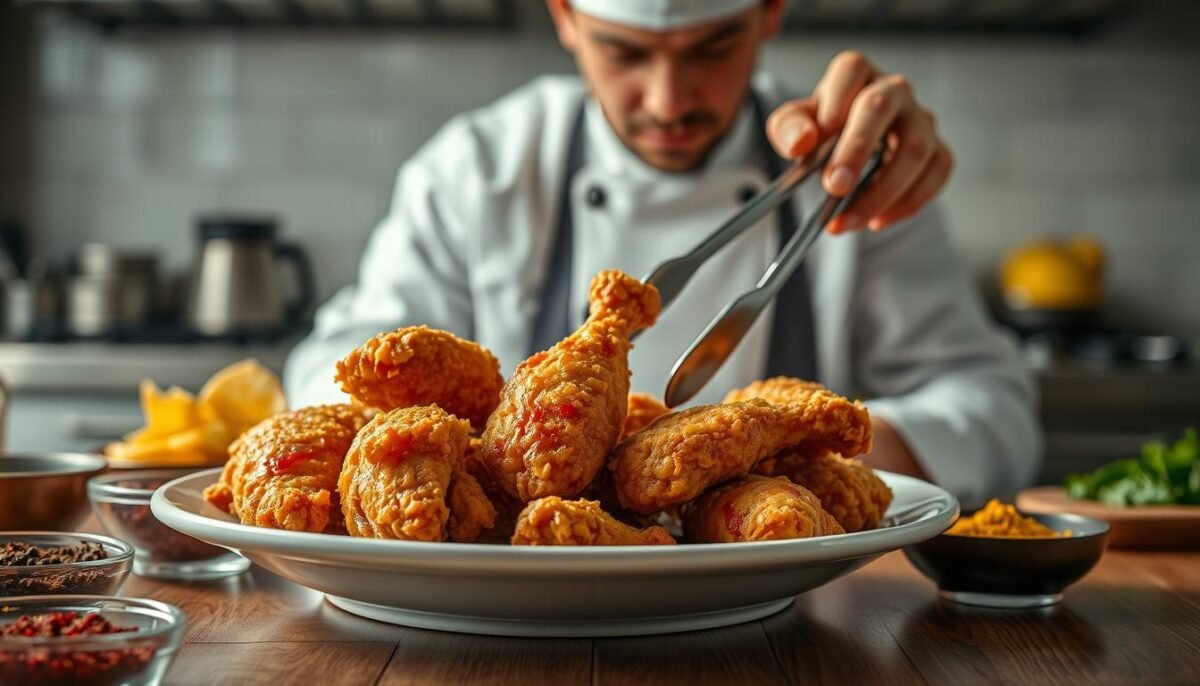
Ever wonder why your homemade fried chicken isn’t as crunchy as the one in restaurants? What secret do chefs use to make their fried chicken perfectly crispy?
Think back to the barbecue last summer. The smell of chicken sizzling filled the air. Your anticipation grew with every minute. Your friend’s chicken had a golden, crunchy outside. With the first bite, you knew their secret worked. Every piece was crispy and full of flavor.
In this guide, we will share key techniques and secrets for crispy fried chicken. You’ll learn about marinating, breading, correct frying temperatures, and resting your chicken. We aim to help you make your fried chicken crispy every time.
Key Takeaways
- Marinate the chicken in a brine for 12-24 hours to boost tenderness and flavor.
- Use cooking oils like peanut or coconut oil that have high smoking points for frying.
- Keep your frying temperature around 335 degrees Fahrenheit for a crispy yet moist chicken.
- Don’t use paper towels to soak up oil; a wire rack does a better job.
- Add all-purpose flour or nutritional yeast to your batter for an extra crispy coating.
Ready to explore more about making homemade fried chicken? Let’s start this crispy journey together!
Understanding the Secrets of Crispy Fried Chicken
Making crispy fried chicken well involves both art and science. We’ll show you how seasoning and the right chicken cut matter. Follow our steps for chicken that is tasty and crispy every time.
The Importance of Seasoning
Seasoning is more than just salt and pepper. It’s key for tasty fried chicken. Mix kosher salt, black pepper, and a little cayenne pepper for big flavor. Also, adding garlic powder and onion powder to your flour will bring out more tastes.
Soak your chicken in buttermilk for 2-3 hours or overnight. This makes it tender and ready for spices. The buttermilk makes the chicken soft and helps it take in all the spice flavors, making your fried chicken juicy and delicious.
Choosing the Right Cut of Chicken
Picking the best chicken cut is very important. Dark meat like crispy chicken thighs and drumsticks are great because they’re moist. They are easier to cook right and make the chicken juicier.
Different cuts mean different textures and how much fat there is. This changes how the chicken soaks in seasoning and how it fries. Dark meat needs to fry longer, about 12 to 25 minutes, because it’s juicier. This ensures it’s cooked well and stays tender.
| Nutrient | Amount per Serving | Percentage of Daily Value |
|---|---|---|
| Calories | 515 kcal | 26% |
| Carbohydrates | 108 g | 20% |
| Protein | 11 g | 22% |
| Fat | 6 g | 10% |
| Saturated Fat | 3 g | 15% |
| Cholesterol | 20 mg | 7% |
| Sodium | 1550 mg | 65% |
| Potassium | 402 mg | 11% |
| Fiber | 11 g | 44% |
| Sugar | 16 g | 4% |
| Vitamin A | 4163 IU | 83% |
| Vitamin C | 20 mg | 33% |
| Calcium | 365 mg | 37% |
| Iron | 6 mg | 33% |
With these tips on seasoning and choosing chicken, you’re ready to make delicious crispy fried chicken. Whether you want moist breasts or juicy thighs, these ideas will ensure a perfect crispy coating every time.
The Best Breading Techniques for Crunch
Want crispy fried chicken wings? Start with the right breading techniques. We’ll show the pros and cons of wet and dry methods. Also, we’ll explain how double breading takes your chicken to the next level.
Wet vs. Dry Breading Methods
Wet and dry breading affects the chicken’s crunch. Wet breading uses eggs or buttermilk before adding flour or breadcrumbs. It makes a thick crust that keeps the chicken juicy.

To get a crisp and tasty coating, mix 1-1/3 cups of flour into the egg. Dry breading, however, coats the chicken in just seasoned flour. This makes the crust lighter. Our tests found double-coated chicken (flour, then egg & milk, then flour) juicier than just dry breading.
Double Breading for Extra Crispiness
For super crispy chicken, try double breading. Dip the chicken in egg wash and flour twice for a thicker crust. This method keeps chicken wings crispy all through frying.
Let breaded chicken sit for 15 to 30 minutes before cooking. This helps the coating stick. Also, mix crushed panko with flour for an extra crunchy coat. A blend of different sized panko crumbs gives a consistent crunch and taste.
In conclusion, both wet and dry methods are great. But, adding double breading will make your fried chicken crunchier. Experiment with breading mixes and techniques for that perfect golden finish.
Right Temperature Matters: Oil and Chicken
Making the best crispy fried chicken starts with the right oil temperature. We aim for 375°F for frying. At this temperature, the chicken gets perfectly crispy. It doesn’t soak up too much oil. Keeping the temperature steady is essential. This way, we get that irresistible crunch every time.
How to Check Oil Temperature
To fry chicken right, checking the oil temperature is crucial. Use a reliable kitchen thermometer. It helps keep the temperature around 375°F. If the oil gets too hot, the chicken’s outside might burn. The inside might stay undercooked. If the oil is too cool, the chicken becomes greasy.
The Impact of Cold Chicken on Frying
Cold chicken can cool the oil fast. This makes the cooking uneven. The coating might not get as crispy. To fix this, let homemade fried chicken warm up for 30 minutes before frying. This keeps the oil temperature stable. It helps the chicken fry evenly, achieving a golden, crisp skin.
The Role of Marinades for Flavor and Texture
Marinades are key to making tasty fried chicken, improving both flavor and texture. They mix ingredients perfectly and need the right time to work. This makes sure the chicken is full of taste but not tough.

Popular Marinade Recipes
Many marinades can make your chicken crispy and delicious. One common choice is buttermilk. It’s acidic and helps make the meat tender and juicy. Here’s a favorite marinade mix:
- 1 cup buttermilk or milk
- 1 whole egg
- 8 teaspoons of spices (like salt, black pepper, garlic powder, onion powder, paprika, chili powder, dried thyme, dried oregano)
For an easy, tasty marinade, try Laajawab Hot & Sweet Chicken Marinade Rub. It’s ready with no need for extra spices or salt. It’s made from natural stuff, avoiding MSG and preservatives. It also has natural tenderizers for soft chicken.
Marinating Time: How Long is Enough?
The time you marinate affects how good your fried chicken will be. Start with at least 10-15 minutes. For best taste, marinate for 2 hours or more, even overnight if possible. Keep it in the fridge at 40 degrees Fahrenheit or below to stop bacteria.
| Marinating Time | Effect |
|---|---|
| 10-15 minutes | Minimal flavor absorption |
| 2 hours | Optimal flavor absorption |
| 12-24 hours | Maximum flavor absorption and tender texture |
Marinating brings many perks, like better taste, less cooking time, and keeping moisture. You can go with a classic buttermilk mix or something ready-made. Taking time to marinate is essential for crispy chicken that’s unbeatable in flavor and texture.
Frying Methods: Deep Frying vs. Pan Frying
Knowing the difference between deep frying and pan frying is key. It helps us make delicious crispy fried chicken. Each method is good for certain situations, like family meals or a busy restaurant.
Pros and Cons of Each Method
- Deep Frying: Produces evenly cooked chicken with a perfect crust. It uses temperatures between 350°F and 375°F. However, it requires a lot of oil which makes it less healthy.
- Pan Frying: This method uses less oil and cooks at 300°F to 350°F. It’s seen as healthier and great for small amounts. But, it’s harder to get an even cook compared to deep frying.
Choosing the Right Equipment
It’s important to pick the right gear for frying. For deep frying, you need a deep fryer or a cast iron Dutch oven. These keep the heat steady for perfectly crispy chicken.
For pan frying, a cast iron skillet or heavy-bottomed pan is best. They hold heat well for even cooking. Using a thermometer to check the oil’s temperature is also a good idea. It helps us get that golden-brown look every time.
Letting Your Chicken Rest: Why It’s Crucial
Making crispy chicken thighs or tasty fried chicken? Don’t skip the rest period. This step is key for juicy, flavorful bites. It lets the moisture spread evenly through the chicken.
The science and timing of resting are both important. Let’s explore why.
The Science Behind Resting
After frying your chicken to a golden brown, let it rest. Cooking makes the meat’s proteins push juices out. Resting for about 10 minutes lets these proteins relax and the juices spread out. This keeps the chicken moist, retaining up to 60% of its juices.
How Long Should You Rest Your Chicken?
The right resting time is key to perfect fried chicken. Research suggests resting for 5 to 10 minutes is best. This helps heat spread inside the meat, preventing overcooking. It also keeps the crust crispy.
Resting on a wire rack instead of paper towels prevents sogginess. This trick ensures crispy chicken every time.
| Factor | Optimal Approach |
|---|---|
| Resting Time | 5-10 minutes |
| Temperature for Safety | At least 165°F |
| Moisture Retention | Up to 60% |
| Best Surface for Resting | Wire Cooling Rack |
By including this key step, your fried chicken will go from good to great. It ensures every bite is juicy and full of flavor.
Achieving That Golden Brown Color
To get that perfect golden brown on fried chicken, we focus on small details and key methods. Controlling the oil’s heat and choosing the right breading are essential. These steps help us get a delicious, golden look every time.
Tips for Monitoring Color
Watching the frying process is a must for that golden brown look. The ideal oil temperature is about 340°F. Use a thermometer to keep the oil at the right temperature. Also, space the chicken pieces well in the fryer to avoid uneven coloring.
Letting the oil get back to temperature between batches improves color. This ensures each piece is perfectly golden brown.
| Ingredients | Quantity |
|---|---|
| Boned and skinned chicken pieces | 2 lb |
| Frank’s RedHot Sauce | ½ cup |
| All-purpose flour | 2-3 cups |
| Buttermilk | 2 cups |
| Panko crumbs | 3 cups or more |
| Peanut oil | ½ cup |
Using Herbs and Spices for Color
The breading mix’s ingredients also affect the chicken’s color. Spices like paprika, cayenne pepper, and turmeric make it tasty and colorful. They create a deeper, golden crust when heated. Try different spice combinations to see what you like best. This will give your chicken an appealing look.
Marinating chicken in buttermilk and Frank’s RedHot Sauce for a few hours adds flavor and color. Then, let the breaded chicken rest in the fridge before frying. This step makes the crust crispy and evenly colored.
By focusing on both frying and ingredient choices, we can make delicious, golden brown fried chicken. Such chicken not only looks amazing but also tastes incredible!
Secrets to Keeping Fried Chicken Crispy
Everyone loves homemade fried chicken, especially when it’s extra crispy. The challenge is keeping it crispy, even after it cools down. Here are some top tips for storing and reheating fried chicken to maintain its crunch.
Storing Leftovers: Best Practices
To keep fried chicken crispy, cool it before storing. Use airtight containers to keep out moisture. This helps avoid sogginess.
Put chicken pieces on a wire rack in the container. This allows air to flow and avoids moisture buildup. Don’t put hot chicken in the fridge. It causes steam and makes the chicken soggy.
Reheating Tips for Maximum Crispiness
How you reheat fried chicken is crucial. Don’t use a microwave as it makes the skin soggy. An oven or toaster oven works best.
Preheat your oven to 350 degrees Fahrenheit. Put your chicken on a wire rack over a baking sheet for even heating. Heat the chicken for 15-20 minutes. You can also refry it briefly for extra crispiness.
Let refrigerated chicken reach room temperature before reheating. This ensures it reheats evenly, keeping the crust crispy. Reheat it slowly to restore the crunch without drying out the chicken.
Serving Suggestions for Fried Chicken
Fried chicken is great on its own. Yet, it’s even better with the right sides. We offer over 40 side dish suggestions to boost your meal. It’s important to balance flavors to match the crispy chicken and bring variety.
Side Dishes That Pair Perfectly
We love pairing our chicken with Southern classics like cornbread, biscuits, and collard greens. These are favorites all year. Try mashed potatoes or succotash for a quick side; they only need about six ingredients. Adding seasonal sides like heirloom tomatoes can also make your meal stand out.
Some other great sides are:
- Corn on the Cob with a buttery finish
- Gourmet Mac and Cheese for creamy goodness
- Red Rice spiced with black and cayenne pepper
- Collard Greens brightened with apple cider vinegar
In summer, we prefer fresh veggies like corn and cucumbers. They’re refreshing and perfect for hot days.
| Side Dish | Preparation Time | Flavors |
|---|---|---|
| Mashed Potatoes | 15 mins | Creamy, Savory |
| Biscuits | 20 mins | Buttery, Flaky |
| Collard Greens | 30 mins | Bright, Acidic |
| Red Rice | 25 mins | Spicy, Hearty |
Creative Ways to Serve Fried Chicken
We can get creative with fried chicken servings. Sliders make a great choice for parties. Or, pair chicken with waffles for a sweet and savory brunch. Adding international flavors can offer a unique twist, like in Asian dishes.
Consider these creative ideas:
- Fried Chicken Sliders with pickles and spicy mayo
- Chicken and Waffles drizzled with maple syrup
- Fried Chicken Salad Wraps for a lighter, handheld meal
- Asian-inspired Fried Chicken bowls with rice and kimchi
These ideas prove the versatility of our crispy chicken. They suit many different occasions, from picnics to dinner parties.
Common Mistakes to Avoid When Frying Chicken
Frying chicken right means aiming for a crispy skin. But, there are traps that can mess up your dish. Understanding these mistakes can make our chicken golden and crunchy. Issues often come from how we fry it and use the fryer.
Overcrowding the Fryer
Putting too many pieces in the fryer is a big mistake. It makes the oil’s temperature drop. This leaves us with soggy, undercooked chicken – not the crispy one we want. To fix this, space the chicken pieces well in the oil. It keeps the temperature right and cooks the chicken evenly. Remember, cooking fewer pieces at a time leads to the best results.
Ignoring Temperature Control
Not watching the temperature is another big error. The best temp for crispy chicken is about 350 degrees Fahrenheit. Using a fry thermometer helps avoid raw or overdone chicken. Also, putting cold chicken in hot oil can lower the oil’s heat. This means cooking takes longer, making the chicken greasy. Let the chicken warm up for 30 minutes before frying for better results.
Avoiding these common errors can make our fried chicken perfect. With enough space and good temperature control, your chicken will be perfectly crispy.
FAQ
Why is seasoning important for crispy fried chicken?
Seasoning boosts the chicken’s taste. It goes beyond salt and pepper. Ingredients like paprika and garlic powder make your fried chicken better.
Which cut of chicken is best for making flavorful fried chicken?
The right cut matters for texture and taste. Thighs are juicy and soak up flavors well. Breasts are lean and taste great when marinated right.
What’s the difference between wet and dry breading methods?
Wet breading means dipping the chicken in eggs or buttermilk, then flour. This makes a thick crust. Dry breading skips the wet step. Wet breading is better for a crispy coat.
How does double breading help with crispiness?
Double breading means coating the chicken in flour and egg wash twice. It gives a thicker, crunchier crust. This step is key for extra crispy chicken.
How should I check the oil temperature when frying chicken?
It’s vital to check the oil’s heat. The best frying temperature is about 375°F. Use a thermometer to keep the oil just right, so your chicken isn’t greasy or raw.
What is the impact of placing cold chicken into hot oil?
Cold chicken lowers the oil’s temperature, causing uneven cooking. Let it sit at room temp before frying for the crispiest results.
What are some popular marinade recipes for flavorful fried chicken?
Buttermilk marinades are top-notch for tender chicken. Mix buttermilk with spices like paprika and garlic. This combo gives a tasty start for your chicken.
How long should I marinate the chicken for optimal flavor?
Marinate the chicken between 12-24 hours. This time lets it soak up flavors, making your fried chicken juicy and full of taste.
What are the pros and cons of deep frying vs. pan frying?
Deep frying cooks evenly and gets a good crust. Pan frying uses less oil, making it a bit healthier. Pan frying takes practice but can be just as good.
What equipment is best for frying chicken?
Use a cast iron Dutch oven for frying. It keeps the oil at a steady temperature. This is crucial for evenly fried and crispy chicken.
Why is resting fried chicken important?
Resting lets juices spread, making the chicken moist. A 10-minute rest improves crispiness as heat spreads.
How long should I rest the chicken after frying?
Let fried chicken rest for about 10 minutes. This step keeps the chicken juicy and tasty.
How can I achieve the perfect golden brown color?
Keep the oil at the right temperature. Use spices like paprika for flavor and color. Watch closely to avoid under or over-browning.
What are the best spices to use for adding color?
Try paprika, cayenne, and turmeric. They add color and boost flavor in your fried chicken.
How should I store leftovers to keep fried chicken crispy?
Let it cool, then store in airtight containers. Reheat in an oven for crispiness. Microwaves make the skin soggy.
What’s the best way to reheat fried chicken without losing its crispiness?
Oven or toaster oven reheating works best. It keeps the meat moist and the outside crispy. Stay away from microwaves for the skin’s sake.
What side dishes pair well with fried chicken?
Mashed potatoes and coleslaw are classics. Or, try spicy rice salads and gourmet mac and cheese. Fried chicken matches well with many sides.
What are some creative ways to serve fried chicken?
Serve it on platters, as sliders, or on waffles for a mix of sweet and savory. Each way fits different events and adds fun to your meal.
What are common mistakes to avoid when frying chicken?
Avoid crowding in the fryer. It drops the oil’s temperature and makes the coating soggy. Space out the chicken and watch the heat for crispy results.
How can temperature control impact the quality of my fried chicken?
Correct heat cooks the chicken evenly and keeps it from getting greasy. Keep the oil around 375°F for the best fried chicken.


