


5 Chef-Approved Techniques for Smoking Pork Shoulder
February 26, 2025
5 Classic Marinade Recipes Every Home Chef Should Master
February 27, 2025
Did you know that 85% of home cooks struggle to achieve the perfect sear and juiciness when preparing a steak? It’s a common challenge, but with the right techniques, you can master it like a pro. Whether you’re hosting a dinner party or treating yourself to a special meal, this guide will help you create a restaurant-worthy dish right in your kitchen.
Imagine this: You’ve invited friends over, and the aroma of a perfectly seared steak fills the air. The first bite is tender, juicy, and bursting with flavor. Sounds amazing, right? With a few simple steps, you can turn this vision into reality. From selecting the right cut to mastering the heat, we’ll walk you through everything you need to know.
This article breaks down the process into easy-to-follow tips. You’ll learn how to prep, season, and cook your steak to perfection. We’ll also cover the importance of resting your meat and using the right tools. By the end, you’ll have the confidence to create a delicious meal every time.
Key Takeaways
- Preheat your cooking surface to ensure a proper sear.
- Choose well-marbled cuts for better moisture retention.
- Season generously and let the steak rest before cooking.
- Use a meat thermometer to achieve your desired doneness.
- Rest the steak after cooking to enhance juiciness and flavor.
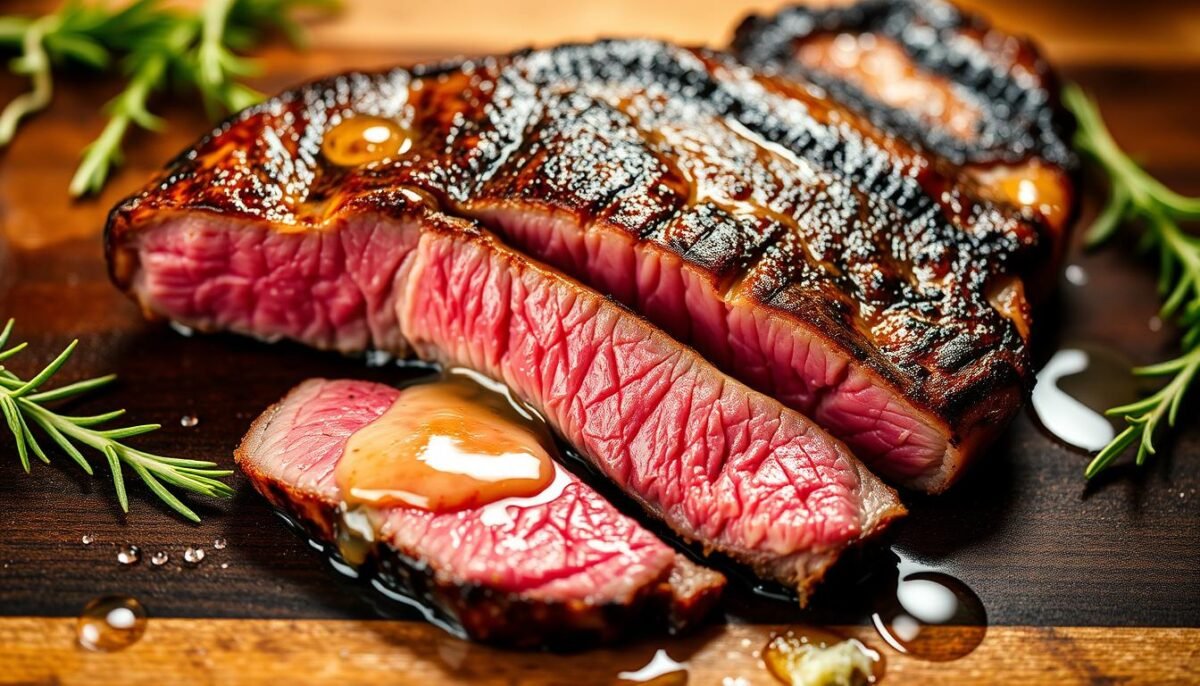
Understanding the Ribeye Steak
When it comes to flavor and texture, the ribeye stands out as a top choice for meat enthusiasts. Its rich marbling and natural tenderness make it a favorite for those who appreciate a juicy, flavorful bite. But what exactly makes this cut so special?
Key Qualities and Marbling
The ribeye’s marbling is its defining feature. These thin streaks of fat melt during cooking, infusing the meat with moisture and enhancing its flavor. The result is a tender and succulent experience that’s hard to beat.
Even marbling is crucial. It ensures that every bite is consistent in texture and taste. Look for cuts with a balanced distribution of fat for the best results.
Choosing the Right Cut
Selecting the perfect ribeye involves more than just marbling. Thickness matters too. A 1-inch cut is ideal, as it cooks evenly and retains its juiciness. Thicker cuts can be harder to manage, especially for beginners.
Pay attention to the fatty cap—the outer layer of fat. This adds flavor and helps keep the meat moist during cooking. A high-quality ribeye is the foundation of a great meal, so take your time when choosing.
Essential Steps for Cooking ribeye steak
The secret to a flawless meal lies in the details. Preparing your meat correctly ensures a delicious outcome. Follow these steps to achieve the perfect result every time.
Bringing Steaks to Room Temperature
Start by letting your meat sit at room temperature for about 30 minutes. This step is crucial for even cooking. Cold meat can lead to uneven results, with the outside overcooking while the inside remains underdone.
Timing matters. Use these minutes to season your meat generously. Adding salt and pepper just before cooking enhances flavor without drawing out moisture.
Using a Meat Thermometer
To achieve the perfect doneness, rely on a meat thermometer. Insert it into the thickest part of the meat to check the internal temperature. Here’s a quick guide:
- Rare: 120-130°F
- Medium Rare: 130-135°F
- Medium: 135-145°F
- Well Done: 155°F and above
Every degree counts. Avoid guessing and let the thermometer guide you to the ideal result.
Timing Your Cooking Process
Use every minute effectively. Once your meat reaches the desired internal temperature, remove it from the heat. Let it rest for 5-10 minutes. This allows the juices to redistribute, ensuring a moist and flavorful bite.
By following these steps, you’ll create a meal that’s both delicious and consistent. Preparation is key, and with practice, you’ll master the process effortlessly.
Perfecting the Searing and Cast Iron Skillet Technique
Achieving a restaurant-quality sear at home is easier than you think. The secret lies in using the right tools and techniques. A cast iron skillet is your best friend for this task, delivering even heat and creating a beautiful crust.
Benefits of a Cast Iron Skillet
A cast iron skillet is unmatched for searing. Its heavy base ensures even heat distribution, preventing hot spots that can ruin your meal. This type of pan retains heat exceptionally well, allowing you to maintain the perfect temperature throughout the process.
Another advantage is its versatility. You can use it on the stovetop or transfer it to the oven for finishing. This makes it ideal for creating a crusty exterior while keeping the inside tender and juicy.
Mastering the Sear for Maximum Flavor
To achieve the perfect sear, start by preheating your skillet over medium-high heat. Add a small amount of oil to prevent sticking. Place your meat in the pan and let it cook undisturbed for 2 minutes per side. This creates a golden-brown crust that locks in flavor and juices.
Adding butter during the final minute enhances richness. Tilt the skillet slightly and spoon the melted butter over the meat. This basting technique adds depth and a glossy finish to your dish.
Here are some tips to ensure success:
- Preheat your cast iron skillet thoroughly before adding the meat.
- Monitor the sear closely to avoid overcooking.
- Use a timer to ensure even cooking on both sides.
- Let the meat rest after searing to redistribute the juices.
By following these steps, you’ll create a meal that’s both visually stunning and packed with flavor. The right tools and techniques make all the difference.
Mastering Heat and Temperature Control
Precision in heat and temperature control is the cornerstone of achieving a perfectly cooked meal. Without it, even the best cuts can fall short of their potential. Understanding how to manage these elements ensures consistent results every time.

Using a Meat Thermometer Effectively
A meat thermometer is your best tool for monitoring internal temperature. Insert it into the thickest part of the meat to get an accurate reading. This eliminates guesswork and ensures your meal is cooked to perfection.
Remove the meat from the heat a few degrees before it reaches the target temperature. This allows for carryover cooking, which continues to raise the internal temperature as the meat rests. Resting is crucial for retaining moisture and enhancing flavor.
Recognizing the Perfect Doneness
Different levels of doneness require specific internal temperatures. Here’s a quick guide to help you achieve your desired result:
| Doneness | Internal Temperature (°F) |
|---|---|
| Rare | 120-130 |
| Medium Rare | 130-135 |
| Medium | 135-145 |
| Well Done | 155+ |
Consistent heat management is key. Avoid frequent temperature fluctuations, as they can lead to uneven cooking. By mastering these techniques, you’ll create a meal that’s both delicious and perfectly cooked.
Enhancing Flavor with Seasoning and Butter Basting
The right seasoning and butter basting can transform your meal into a gourmet experience. These techniques bring out the natural richness of the meat, creating a dish that’s both flavorful and juicy. Let’s explore how to master these essential steps.
Selecting Your Favorite Seasonings
When it comes to seasoning, less is often more. The natural flavor of a ribeye is so robust that it only needs a few key ingredients to shine. Start with a generous sprinkle of salt and pepper. These basics enhance the meat’s taste without overpowering it.
For an extra layer of complexity, consider using a signature blend like Montreal Seasoning. This mix of spices adds a smoky, slightly spicy kick that complements the meat’s richness. Experiment with herbs like rosemary or thyme for a fresh, aromatic twist.
Here’s a quick guide to seasoning options:
| Seasoning | Flavor Profile |
|---|---|
| Salt & Pepper | Classic, enhances natural taste |
| Montreal Seasoning | Smoky, slightly spicy |
| Herbs (Rosemary, Thyme) | Fresh, aromatic |
The Art of Butter Basting
Butter basting is the secret to adding richness and a velvety finish to your meal. Start by heating a tablespoon of oil in your skillet. Once the meat is seared, add a generous pat of butter. Tilt the skillet slightly and spoon the melted butter over the meat continuously.
This technique not only enhances flavor but also helps create a beautiful, golden crust. For an extra touch, add garlic or herbs to the butter. The aromatic infusion takes the dish to the next level.
Remember, timing is key. Baste during the final minutes of cooking to avoid burning the butter. The result is a tender, juicy meal that’s bursting with flavor.
Versatile Methods: Grill, Oven, and Skillet Approaches
Exploring different methods can elevate your meal to new heights. Whether you prefer the smoky flavor of a grill, the even cooking of an oven, or the precision of a skillet, each technique offers unique benefits. Let’s dive into the details to help you choose the best approach for your next dish.

Grilling Techniques for Smoky Flavor
Grilling is a fantastic way to infuse your dish with a rich, smoky taste. Start by preheating your grill to medium heat. This ensures even cooking without charring the exterior. Place your meat on the grill and cook for about 4 minutes per side for a perfect sear.
Monitor the internal temperature using a meat thermometer. Remove the meat when it’s a few degrees below your desired doneness. Let it rest for 5 minutes to lock in the juices. Here’s a quick guide to grilling times:
| Doneness | Grill Time (Per Side) |
|---|---|
| Rare | 3 minutes |
| Medium Rare | 4 minutes |
| Medium | 5 minutes |
Oven Roasting for Even Cooking
Oven roasting is ideal for achieving consistent results. Start by searing your meat in a cast iron pan for 2 minutes per side. This creates a flavorful crust. Then, transfer the pan to a preheated oven at 375°F.
Roast until the internal temperature reaches your desired level. Use a thermometer to avoid overcooking. Rest the meat for 10 minutes before serving. This method ensures a tender, juicy result every time.
By mastering these techniques, you’ll have the flexibility to create a delicious meal using the method that suits your preferences. Experiment and enjoy the process!
Creative Serving Suggestions and Side Pairings
Pairing the right sides with your meal can turn a simple dish into a memorable feast. The perfect complement to a juicy and flavorful main course lies in the details. Whether you’re hosting a dinner or enjoying a quiet night in, the right side can elevate the entire experience.
Classic options like baked or mashed potato are always a hit. They add a comforting texture that balances the richness of the meat. For a fresh twist, consider a vibrant salad. The crispness of greens and the tang of a light dressing can enhance the natural flavors of your dish.
Complementary Sides to Elevate Your Meal
Choosing the right side is about balance. A well-selected accompaniment can highlight the juicy and savory qualities of your meal. Here are some ideas to inspire your next pairing:
- Baked Potato: A classic choice that’s hearty and satisfying. Top it with sour cream, chives, or cheese for extra flavor.
- Mashed Potatoes: Creamy and smooth, this side pairs beautifully with the richness of the meat.
- Fresh Salad: Add a burst of color and freshness with a mix of greens, cherry tomatoes, and a light vinaigrette.
- Grilled Vegetables: Zucchini, asparagus, or bell peppers bring a smoky, charred flavor that complements the dish.
Plating is just as important as the flavors. Arrange your side and main course thoughtfully to create a visually appealing presentation. A well-composed plate not only looks inviting but also enhances the dining experience.
Don’t be afraid to experiment with alternative options. Whether you’re catering to dietary preferences or simply trying something new, the possibilities are endless. The right pairing can transform your meal into a culinary masterpiece.
Conclusion
Mastering the art of a perfect meal is easier than you might think. By following the right method, you can achieve a juicy, flavorful result every time. From searing to seasoning, each step plays a crucial role in creating a dish that’s worthy of any plate.
Experiment with the techniques shared in this guide. Whether you prefer grilling, oven roasting, or using a skillet, the key lies in precision and patience. Tools like a cast iron pan and meat thermometer can make all the difference.
Now it’s your turn to try this recipe at home. Share your results and enjoy the satisfaction of creating something extraordinary. Remember, this guide is here whenever you need a reminder of the perfect way to elevate your meal.
FAQ
What makes a ribeye steak special?
The ribeye is known for its rich marbling, which adds flavor and tenderness. It’s a favorite for its juicy texture and robust taste.
How do I choose the best cut?
Look for a piece with even marbling and a bright red color. Thicker cuts (1.5 inches or more) work best for even cooking.
Why is room temperature important before cooking?
Letting the meat sit out for 30 minutes ensures it cooks evenly. Cold meat can lead to uneven doneness.
What’s the benefit of using a cast iron skillet?
Cast iron retains heat well, creating a perfect sear. It also helps develop a flavorful crust on the outside.
How do I achieve the perfect sear?
Heat your skillet until it’s very hot. Pat the meat dry, add a little oil, and sear for 2-3 minutes per side for a golden crust.
How can I ensure the right doneness?
Use a meat thermometer. For medium-rare, aim for an internal temperature of 130-135°F. Adjust based on your preference.
What seasonings work best?
Keep it simple with salt and pepper. You can also experiment with garlic powder, rosemary, or your favorite herbs.
What’s the trick to butter basting?
Add butter, garlic, and herbs to the skillet during the last minute of cooking. Tilt the pan and spoon the melted butter over the meat for extra flavor.
Can I grill a ribeye instead of using a skillet?
Absolutely! Grilling adds a smoky flavor. Preheat your grill to high heat and cook for 4-5 minutes per side for medium-rare.
What sides pair well with ribeye?
Classic options include roasted potatoes, asparagus, or a fresh salad. These sides complement the rich flavor of the meat.


