


The Secret to Perfectly Crispy Onion Rings: 5 Chef-Approved Hacks
February 15, 2025
Why Do Some Chefs Avoid Overusing Spices in BBQ? 4 Surprising Reasons
February 15, 2025
I still remember the first time I tried to cook a holiday meal. It was a disaster. The bird was dry, the skin was pale, and my family politely nibbled at their plates. That experience taught me one thing: cooking a great meal doesn’t have to be complicated. With the right approach, anyone can create a dish that’s both delicious and impressive.
Did you know that over 46 million turkeys are cooked each year in the U.S. during the holiday season? Yet, many people still struggle to get it right. That’s why I’ve developed my signature “7 Rules” to help chefs master the art of a golden, juicy bird. These tips are simple, effective, and don’t require brining or basting.
Whether you’re a seasoned chef or a first-time cook, these rules will elevate your meal. From ensuring even cooking to achieving that perfect crispy skin, I’ll guide you step by step. Let’s make this year’s feast one to remember!
Key Takeaways
- Simple techniques can create a flavorful and juicy turkey.
- Brining and basting are not necessary for great results.
- Proper cooking temperatures ensure even doneness.
- Resting the turkey allows juices to redistribute.
- Crispy skin can be achieved with the right preparation.
Introduction to a Thanksgiving Turkey Masterpiece
Every holiday feast deserves a centerpiece that brings everyone together. For many, that centerpiece is a beautifully cooked turkey. It’s not just food—it’s a symbol of tradition, warmth, and celebration. Mastering the art of preparing this dish can transform your meal into a true masterpiece.
When I first started cooking turkey, I was nervous. Would it be dry? Would the flavor be right? Over time, I learned that trusting your technique is key. Simple steps, like proper seasoning and even cooking, make all the difference. Now, I approach it with confidence, knowing the result will be both flavorful and tender.
“A well-cooked turkey is more than a dish—it’s a memory in the making.”
What makes a turkey truly special is the balance of flavor and texture. The skin should be golden and crispy, while the meat remains juicy and tender. Achieving this balance doesn’t require complicated methods. With the right approach, you can create a dish that’s both impressive and stress-free.
Here’s a quick guide to what makes a turkey a masterpiece:
- Flavor: Proper seasoning enhances the natural taste of the turkey.
- Texture: Crispy skin and juicy meat are the hallmarks of success.
- Technique: Trusting your process ensures consistent results.
As we dive deeper into this guide, I’ll share the steps that have helped me create unforgettable holiday meals. Whether you’re a seasoned chef or a first-time cook, these tips will make your turkey the star of the table.
Choosing the Right Turkey for Your Feast
Selecting the right turkey is the first step to a memorable holiday meal. Whether you opt for a fresh or frozen bird, the choice you make will impact the flavor and texture of your dish. Let’s break down the options and find the best fit for your feast.
Fresh vs Frozen Options
When it comes to choosing between a fresh and frozen turkey, there are pros and cons to both. Fresh turkeys are typically available just before the holiday season and are known for their natural flavor. However, they can be more expensive and require careful planning to ensure availability.
On the other hand, frozen turkeys are often more affordable and can be purchased well in advance. They also offer flexibility, as they can be stored for months. Just remember to plan ahead for thawing—it takes about 24 hours in the refrigerator for every 4-5 pounds of turkey.
Calculating the Ideal Turkey Size
To ensure everyone at your table gets enough to eat, it’s important to choose the right size turkey. A good rule of thumb is to aim for 1 to 1½ pounds of turkey per person. This accounts for both the meat and the bones, ensuring plenty of leftovers for sandwiches or soups.
For example, if you’re hosting 10 guests, a 12 to 15-pound bird should be perfect. If you’re feeding a larger crowd, consider roasting two smaller turkeys instead of one large one. This ensures even cooking and better results.
Seasoning your turkey starts the moment you select it. Whether you choose a fresh or frozen bird, proper seasoning enhances its natural flavor. From simple salt and pepper to aromatic herbs, the right blend can elevate your dish to the next level.
Choosing the right turkey sets the foundation for a successful holiday meal. Whether you go fresh or frozen, and no matter the size, thoughtful preparation ensures a flavorful and tender centerpiece for your feast.
The Importance of Proper Preparation
Preparation is the secret to a stress-free and delicious meal. When it comes to cooking a turkey, the steps you take before it hits the oven can make all the difference. From thawing to seasoning, proper preparation ensures even cooking, optimal flavor, and a dish that’s as enjoyable as it is impressive.
One of the most important aspects of preparation is timing. For example, if you’re using a frozen turkey, it’s essential to plan ahead. A general rule is to allow 24 hours of thawing in the refrigerator for every 4-5 pounds of turkey. This means a 12-pound bird will take about 2-3 days to fully thaw. Rushing this process can lead to uneven cooking and safety concerns.
Another key step is seasoning. Whether you’re using a simple salt and pepper blend or a mix of aromatic herbs, seasoning enhances the natural flavor of the turkey. I always make sure to season the bird at least a day before cooking, allowing the flavors to penetrate the meat.
Here’s a quick checklist to help you prepare:
- Thaw the turkey in the refrigerator, allowing ample time based on its size.
- Season the bird at least 24 hours before cooking for maximum flavor.
- Ensure your workspace is clean and organized to avoid overcrowding.
- Preheat the oven to the correct temperature before roasting.
Following these steps not only ensures a flavorful dish but also makes the cooking process smoother. Plus, proper preparation leads to more enjoyable leftovers, giving you and your family something to savor long after the meal is over.
By taking the time to prepare, you set the stage for a successful and stress-free cooking experience. Trust me, the effort you put in before the oven is turned on will pay off in every bite.
Perfect Thanksgiving Turkey Rules
Cooking a holiday centerpiece can feel daunting, but with the right steps, it’s easier than you think. Over the years, I’ve learned that following a few simple rules can make all the difference. These guidelines focus on achieving the ideal internal temperature, preserving moisture, and ensuring even cooking. Let’s dive in!
First, temperature is key. The internal temperature of the thickest part of the thigh should reach 165°F. This ensures the meat is safe to eat while remaining juicy. Use a reliable thermometer to check, as guessing can lead to overcooking.
Second, timing matters. Roasting at 325°F typically takes about 15-20 minutes per pound. For example, a 12-pound bird will need around 3 to 3¾ hours. Here’s a quick reference table for cooking times:
| Turkey Size (lbs) | Cooking Time (hours) |
|---|---|
| 8-12 | 2¾ – 3 |
| 12-14 | 3 – 3¾ |
| 14-18 | 3¾ – 4¼ |
| 18-20 | 4¼ – 4½ |
| 20-24 | 4½ – 5 |
Third, seasoning enhances flavor. Whether you use a simple salt and pepper blend or aromatic herbs, let the seasoning sit on the bird for at least 24 hours. This allows the flavors to penetrate the meat deeply.
Fourth, resting is crucial. After cooking, let the bird rest for at least 20 minutes. This allows the juices to redistribute, ensuring every bite is moist and flavorful.
Fifth, even cooking is essential. Start by roasting at a high temperature (500°F) for 45 minutes to crisp the skin, then reduce to 325°F for the remaining time. This method ensures a beautifully browned exterior and tender meat.
Sixth, size matters. Choose a bird that’s 1 to 1½ pounds per person. For 10 guests, a 12 to 15-pound bird is ideal. This ensures plenty of leftovers without overcooking.
Finally, trust your process. Cooking a bird is as much about confidence as it is about technique. Follow these steps, and you’ll create a dish that’s both impressive and stress-free.
By adhering to these guidelines, you’ll master the art of roasting a flavorful and juicy centerpiece. Whether you’re a seasoned chef or a first-time cook, these rules will ensure your holiday meal is a success.
The Role of Brining and Seasoning
Brining and seasoning are game-changers when it comes to cooking a flavorful bird. These techniques not only enhance the taste but also ensure the meat stays juicy and tender. Whether you’re a seasoned chef or a first-time cook, understanding these methods can elevate your dish to the next level.
Dry and Wet Brine Methods
Brining involves soaking the bird in a solution of salt and water or applying a dry rub. Both methods work to break down proteins, allowing the meat to retain moisture during cooking. Here’s a breakdown of the two techniques:
- Dry Brine: A mixture of salt, sugar, and herbs is rubbed directly onto the bird. It’s left uncovered in the refrigerator for 24-48 hours, allowing the flavors to penetrate deeply. This method is great for achieving crispy skin.
- Wet Brine: The bird is submerged in a saltwater solution, often with added herbs and spices. It requires at least 24 hours in the fridge and ensures even moisture distribution throughout the meat.
Here’s a quick comparison of the two methods:
| Method | Preparation Time | Key Benefit |
|---|---|---|
| Dry Brine | 24-48 hours | Crispy skin, deep flavor |
| Wet Brine | 24-48 hours | Even moisture, tender meat |
Both methods have their advantages, so choose based on your preferences and time constraints. For a quicker option, dry brining is often more convenient.
Enhancing Flavor with Herbs and Butter
Seasoning is just as important as brining. Fresh herbs like rosemary, thyme, and sage add aromatic depth, while butter helps create a rich, golden crust. Here’s how to use them effectively:
- Herbs: Mix chopped herbs with butter and rub it under the skin. This infuses the meat with flavor and keeps it moist.
- Salt: Use kosher salt for brining or seasoning. A good rule is half a teaspoon to one teaspoon per pound of meat.
- Butter: Spread softened butter over the skin before roasting. This enhances browning and adds richness.
Proper seasoning is key to a dish that’s both flavorful and visually appealing. Avoid over-salting by measuring carefully and tasting as you go.
By mastering these techniques, you’ll create a bird that’s juicy, flavorful, and sure to impress. Whether you choose a dry or wet brine, and no matter how you season it, these steps will make your meal unforgettable.
Essential Tools and Equipment for Roasting a Turkey
Having the right tools can make roasting a turkey feel effortless. Whether you’re a seasoned chef or a first-time cook, investing in quality equipment ensures a stress-free experience. Let’s dive into the must-have items that simplify the process and guarantee delicious results.
Roasting Tray & Rack
A sturdy roasting tray and rack are the foundation of a successful roast. The tray catches drippings, while the rack elevates the bird for even cooking. I recommend a tray with a 2 to 2.5-inch height to prevent spills and ensure stability.
For budget-friendly options, look for trays around $28. If you’re willing to invest, higher-end models offer durability and added features like non-stick coatings. A good rack ensures crispy skin and tender meat, making it worth the investment.
Digital Thermometer & Knife
An accurate digital thermometer is non-negotiable. It ensures the internal temperature reaches 165°F in the thickest part of the thigh, guaranteeing safety and juiciness. I’ve found that models priced between $39 and $115 offer reliable results.
Pair your thermometer with a sharp carving knife. A good knife, around $50, makes slicing effortless and ensures clean, even cuts. For larger birds, an electric knife can be a game-changer, though it’s not essential.
Here’s a quick checklist of essential tools:
- Roasting Tray & Rack: Ensures even cooking and catches drippings.
- Digital Thermometer: Guarantees the right internal temperature.
- Carving Knife: Makes slicing clean and efficient.
For more tips on mastering kitchen techniques, check out this guide on sautéing meat like a pro. It’s packed with insights that can elevate your cooking skills.
By equipping your kitchen with these essentials, you’ll transform turkey roasting from daunting to delightful. Whether you’re working with a budget or splurging on high-end tools, the right equipment makes all the difference.
Step-by-Step Guide to Prepping Your Turkey
Prepping a turkey doesn’t have to be overwhelming—it’s all about breaking it down into simple steps. Each stage, from seasoning to stuffing, ensures a flavorful and juicy result. Let’s walk through the process together.
First, pat the turkey dry with paper towels. This step is crucial for achieving crispy skin. Moisture on the surface can steam the skin instead of browning it, so take your time here.
Next, apply a butter-herb mixture under the skin. Mix softened butter with fresh herbs like rosemary, thyme, and sage. Gently separate the skin from the meat and spread the mixture evenly. This infuses the meat with flavor and keeps it moist.
Then, season the outside generously with salt and pepper. For extra flavor, add a sprinkle of garlic powder or paprika. Let the turkey sit at room temperature for about an hour before roasting. This ensures even cooking.
Now, stuff the cavity with aromatics. Use a mix of onions, carrots, celery, and fresh herbs. These ingredients add depth to the flavor and keep the meat juicy. Avoid overstuffing, as it can slow down cooking.
Here’s a quick reference table for timing:
| Step | Time Required |
|---|---|
| Patting Dry | 5 minutes |
| Applying Butter Mixture | 10 minutes |
| Seasoning | 5 minutes |
| Stuffing with Aromatics | 10 minutes |
| Resting at Room Temperature | 1 hour |
“Preparation is the foundation of a great meal. Take your time, and the results will speak for themselves.”
By following these steps, you’ll set the stage for a delicious and stress-free cooking experience. Remember, careful preparation ensures a dish that’s both impressive and enjoyable.
Mastering the Art of Roasting: Temperature and Timing
Roasting a turkey is both an art and a science, requiring precision and patience. The key to success lies in understanding how temperature and time work together to create a flavorful and juicy result. Let’s break down the essentials to help you achieve the perfect roast.
First, internal temperature is critical. The thickest part of the thigh should reach 165°F to ensure safety and juiciness. Using a reliable thermometer is a must—guessing can lead to overcooking or undercooking. For even more tender meat, aim for 180°F in the thigh.
Next, timing plays a crucial role. At 325°F, a 12-pound bird typically takes about 3 to 3¾ hours. Here’s a quick reference table for cooking times:
| Turkey Size (lbs) | Cooking Time (hours) |
|---|---|
| 8-12 | 2¾ – 3 |
| 12-14 | 3 – 3¾ |
| 14-18 | 3¾ – 4¼ |
| 18-20 | 4¼ – 4½ |
| 20-24 | 4½ – 5 |
Minor adjustments in oven settings can make a big difference. For example, starting at a high temperature (500°F) for 45 minutes crisps the skin, while reducing to 325°F ensures even cooking. This method delivers a beautifully browned exterior and tender meat.
Monitoring progress is essential. Check the temperature periodically, especially during the last hour of cooking. If the skin browns too quickly, tent it with aluminum foil to prevent burning. For more tips on achieving the right doneness, check out this guide on cooking meat to perfection.
By mastering temperature and timing, you’ll create a roast turkey that’s both impressive and stress-free. Remember, patience and precision are your best tools in the kitchen.
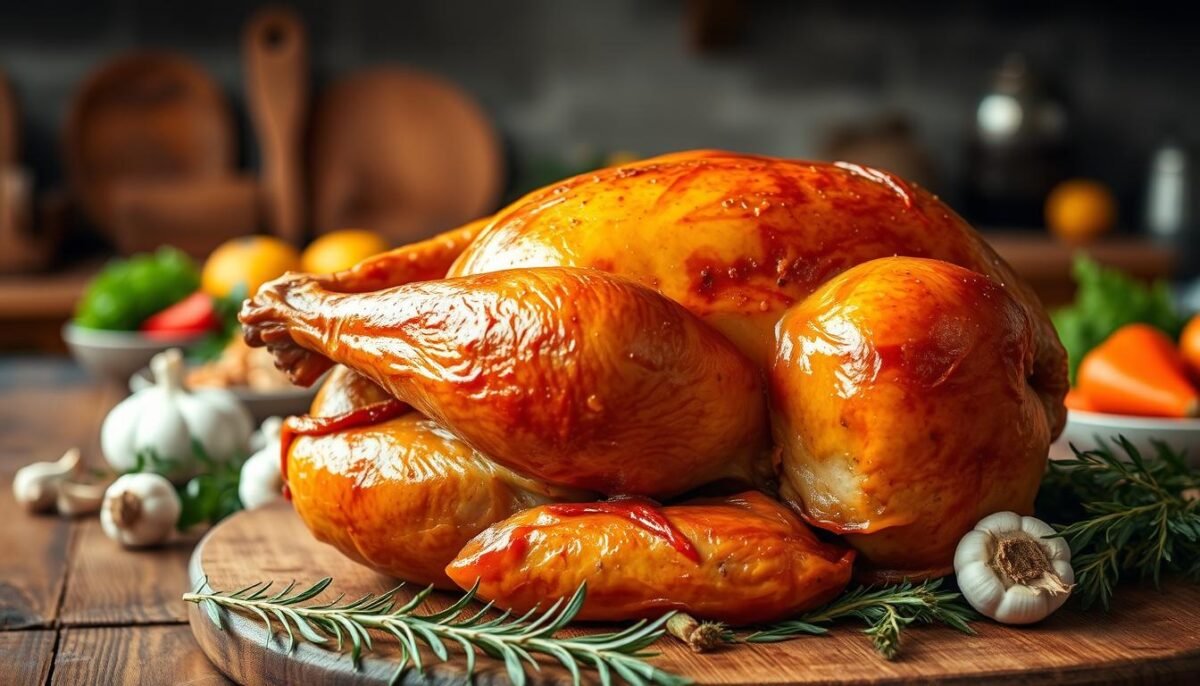
Achieving Crispy Skin and Juicy Meat
The secret to a memorable roast lies in balancing crispy skin and juicy meat. It’s a combination that elevates your dish from good to extraordinary. With a few simple techniques, you can achieve this contrast every time.
First, prepare the skin for maximum crispiness. Start by patting it dry with paper towels. Removing excess moisture is crucial—it allows the skin to brown instead of steam. For extra crispiness, let the bird air-dry in the refrigerator for a few hours or overnight.
Next, season generously. A mix of salt, pepper, and herbs enhances the flavor while drawing out moisture. For an added layer of richness, rub softened butter under the skin. This not only flavors the meat but also helps the skin crisp up beautifully.
To keep the meat juicy, roast at the right temperature. Start at a high heat (500°F) for 20 minutes to crisp the skin, then reduce to 325°F for even cooking. Use a thermometer to ensure the internal temperature reaches 165°F in the thickest part of the thigh.
Here’s a quick checklist for success:
- Pat the skin dry and air-dry in the fridge.
- Season generously and use butter for flavor.
- Roast at high heat initially, then reduce for even cooking.
- Monitor the internal temperature with a thermometer.
By following these steps, you’ll create a dish that’s both visually stunning and delicious. The crispy skin and juicy meat will make your roast the star of the table.
Letting Your Turkey Rest for Ultimate Juiciness
Patience is the secret ingredient to a juicy, flavorful turkey. After hours of roasting, it’s tempting to carve right away, but waiting is crucial. Resting allows the juices to redistribute, ensuring every bite is moist and tender.
Benefits of a Proper Resting Period
Resting your turkey isn’t just a suggestion—it’s a game-changer. When you remove it from the oven, the heat causes the juices to move toward the surface. Letting it rest for at least 30 minutes allows those juices to settle back into the meat, enhancing both flavor and texture.
Here’s why resting matters:
- Juice Redistribution: The meat becomes more tender and evenly moist.
- Easier Carving: Resting firms up the meat, making it simpler to slice.
- Enhanced Flavor: The juices infuse the meat, creating a richer taste.
For larger birds, aim for 45 minutes to an hour. Covering the turkey loosely with foil helps retain heat without trapping steam, which can soften the skin. If you’re concerned about the turkey cooling too much, preheat your serving platter to keep it warm.
Resting also improves leftovers. A well-rested turkey stays juicier when reheated, making it perfect for sandwiches, soups, or casseroles. Trust me, the extra time is worth it.
“A rested turkey is a gift to your taste buds—and your patience.”
By letting your turkey rest, you’re not just finishing the cooking process—you’re elevating it. This simple step ensures a dish that’s as impressive as it is delicious.
Carving Your Turkey with Confidence
Carving a turkey can feel intimidating, but with the right approach, it’s easier than you think. The key is to work methodically, using sharp tools and simple techniques. Whether you’re serving a crowd or just your family, carving with confidence ensures every slice is neat and appetizing.
Effective Carving Techniques
Start by placing the turkey on a sturdy cutting board. Use a sharp knife with a thicker blade near the handle for stability. Begin by removing the legs and thighs. Cut through the joint where the leg meets the body, then separate the drumstick from the thigh.
Next, focus on the breast. Slice downward along the breastbone, removing the entire breast in one piece. Then, slice it crosswise into even portions. For the wings, cut through the joint where they attach to the body. Finally, check the cavity for any remaining meat or stuffing.
Plating and Presentation Tips
Arrange the carved meat on a large platter for a professional look. Place the breast slices in the center, with the legs and wings on the sides. Garnish with fresh herbs or citrus slices for a pop of color. This not only looks impressive but also makes serving easier.
Here’s a quick reference table for carving steps:
| Step | Action |
|---|---|
| 1 | Remove legs and thighs |
| 2 | Separate drumsticks from thighs |
| 3 | Slice breast meat |
| 4 | Remove wings |
| 5 | Check cavity for remaining meat |
By following these steps, you’ll carve your turkey like a pro. Remember, a well-carved bird is the finishing touch to a memorable meal.
Creative Variations and Flavor Boosters
Adding a personal touch to your roast can transform it into something extraordinary. While traditional recipes are timeless, experimenting with flavors can elevate your dish to new heights. Let’s explore some creative twists that will make your meal unforgettable.
One of my favorite ways to enhance flavor is by using compound butter. Mix softened butter with fresh herbs like rosemary, thyme, and sage. Spread this mixture under the skin before roasting. It infuses the meat with rich, aromatic flavors and keeps it juicy.
Here are some creative ideas to try:
- Herb Blends: Experiment with different combinations. Try adding citrus zest or garlic for a fresh twist.
- Spice Rubs: A mix of paprika, cumin, and chili powder can add a smoky, bold flavor.
- Marinades: Soak the bird in a mixture of soy sauce, honey, and ginger for an Asian-inspired twist.
Another way to add excitement is by introducing a slight roast twist. For example, roasting with a layer of bacon on top adds a smoky flavor and keeps the meat moist. Or, try stuffing the cavity with citrus fruits and herbs for a refreshing aroma.
“Creativity in the kitchen turns a meal into an experience.”
Don’t be afraid to experiment. Whether it’s a new herb blend or a unique roasting technique, these upgrades maintain the dish’s timeless appeal while adding excitement. Your roast will be the star of the table, and your guests will be asking for your secret.
Complementing Your Turkey with Perfect Side Dishes
A great meal isn’t complete without the right sides to complement the main dish. When it comes to a roast turkey, the perfect accompaniments can elevate the entire feast. From creamy mashed potatoes to rich gravy, these sides add balance and flavor to every bite.
One of my go-to sides is mashed potatoes. They’re creamy, comforting, and pair beautifully with the savory flavors of turkey. To make them extra special, I add a touch of garlic and a splash of cream. For a twist, try mixing in roasted garlic or chives for added depth.
Another essential is gravy. Made from the drippings of the roasted turkey, it’s rich, flavorful, and ties the meal together. I like to simmer it with a bit of thyme and rosemary for an aromatic touch. Pour it over the turkey and potatoes for a truly indulgent experience.
Here are a few more side dish ideas to round out your meal:
- Roasted Vegetables: Carrots, Brussels sprouts, and parsnips add color and texture.
- Stuffing: A classic favorite, packed with herbs and savory flavors.
- Cranberry Sauce: Sweet and tangy, it’s the perfect contrast to rich dishes.
Don’t forget about leftovers. They’re a treasure trove of possibilities. Turn extra turkey into sandwiches, soups, or casseroles. Mashed potatoes can be transformed into potato pancakes, and gravy makes a great base for stews.
“The right sides don’t just complement the meal—they make it unforgettable.”
By pairing your turkey with these delicious sides, you’ll create a feast that’s both balanced and memorable. Whether you stick to classics or try something new, these dishes will make your meal truly special.
Pairing the Right Wine and Beverages for Thanksgiving
Choosing the right drinks to pair with your meal can elevate the entire dining experience. Whether you’re serving wine or non-alcoholic options, the right beverage enhances the flavors of your dish and creates a harmonious balance. Let’s explore how to make the perfect pairing for your feast.
Wine Pairings
When it comes to wine, the key is to match the intensity of the dish with the right bottle. For a traditional meal, Pinot Noir and Gamay are excellent choices. These red wines have delicate tannins and fruity notes that complement the rich flavors without overpowering them.
If you prefer white wine, opt for a Riesling or Sauvignon Blanc. These wines are crisp and refreshing, balancing the savory elements of the meal. For a festive touch, consider a sparkling wine like Champagne or Prosecco. They add a celebratory vibe and pair well with appetizers.
Non-Alcoholic Choices
Not everyone drinks alcohol, and that’s okay. There are plenty of non-alcoholic options that are just as delightful. Sparkling apple cider or cranberry spritzers are festive and refreshing. For a more unique twist, try a herbal tea infused with citrus or spices. These drinks are flavorful and complement the meal beautifully.
Here’s a quick guide to pairing drinks with your feast:
- Red Wine: Pinot Noir, Gamay, or Syrah for rich, savory dishes.
- White Wine: Riesling, Sauvignon Blanc, or Chardonnay for lighter, crisp flavors.
- Non-Alcoholic: Sparkling cider, cranberry spritzers, or herbal teas.
“The right drink doesn’t just complement the meal—it enhances every bite.”
When serving, keep the temperature in mind. White wines and sparkling drinks should be chilled, while red wines are best served slightly below room temperature. Timing is also important—serve lighter drinks with appetizers and richer options with the main course.
By thoughtfully pairing your beverages, you’ll create a dining experience that’s both memorable and enjoyable. Whether you choose wine or non-alcoholic options, the right drink can make all the difference.
Safety Tips When Handling and Cooking Turkey
Ensuring safety while handling and cooking is just as important as the recipe itself. From thawing to serving, following proper protocols keeps your meal delicious and your guests healthy. Let’s dive into the essential practices every cook should know.
Proper Thawing Process
Thawing your turkey safely is the first step. If frozen, plan ahead—allow 24 hours in the refrigerator for every 4 to 5 pounds. For example, a 12-pound bird will take about 3 days. If you’re short on time, use the cold water method. Submerge the turkey in cold water, changing it every 30 minutes. This takes about 30 minutes per pound.

Never thaw your turkey at room temperature. This can lead to bacterial growth in the “danger zone” between 40°F and 140°F. Always keep it refrigerated or in cold water until ready to cook.
Food Safety & Hygiene Practices
Handling raw turkey requires extra care. Wash your hands thoroughly with soap and water for at least 20 seconds before and after touching the bird. Use separate cutting boards and utensils for raw meat to avoid cross-contamination.
Clean all surfaces with hot, soapy water after preparing the turkey. Pay special attention to the cavity, where bacteria can hide. Avoid rinsing the turkey, as this can spread harmful bacteria around your kitchen.
Here’s a quick checklist for safe handling:
- Thaw in the refrigerator or cold water—never at room temperature.
- Wash hands and surfaces thoroughly before and after handling.
- Use separate tools for raw meat and other ingredients.
- Clean the cavity and avoid rinsing the turkey.
Using a Thermometer for Safety
Checking the internal temperature is crucial. The thickest parts of the breast, thigh, and wing should reach 165°F. Insert the thermometer into the cavity to ensure the stuffing is also safe to eat.
Don’t rely on appearance or time alone. A properly calibrated thermometer is your best tool for ensuring the turkey is cooked through. Let the bird rest for at least 20 minutes after cooking to allow the juices to redistribute.
“Safety isn’t just a step—it’s the foundation of a great meal.”
By following these tips, you’ll create a meal that’s not only delicious but also safe for everyone at the table. Remember, a little caution goes a long way in ensuring a successful and enjoyable feast.
Conclusion
Crafting a standout holiday centerpiece doesn’t have to be overwhelming—it’s about trusting the process and enjoying each step. From selecting the right size to mastering the internal temperature, every detail matters. Whether you’re a seasoned chef or a first-time cook, these tips ensure your dish is flavorful and juicy.
Remember, preparation is key. Thawing, seasoning, and using a reliable thermometer are simple steps that make a big difference. Letting the meat rest after cooking allows the juices to redistribute, ensuring every bite is tender. Don’t forget to experiment with herbs and spices to add your personal touch.
By following these guidelines, you’ll create a meal that’s both impressive and stress-free. Share your results and keep refining your skills—every step brings you closer to mastering the art of roasting. Here’s to a feast that’s as memorable as it is delicious!
FAQ
Should I choose a fresh or frozen bird for my feast?
It depends on your preference and timing. Fresh ones are ready to cook, while frozen ones need proper thawing. I usually go for fresh if I’m short on time.
How do I calculate the right size for my gathering?
A good rule is about 1 to 1.5 pounds per person. For leftovers, aim for 1.5 pounds. I always add a little extra just in case.
What’s the best way to season my bird?
I love using a mix of salt, pepper, and herbs like rosemary and thyme. Rubbing butter under the skin adds extra flavor and keeps the meat juicy.
How long should I let it rest after roasting?
I recommend at least 20-30 minutes. This lets the juices redistribute, making every bite tender and flavorful.
What’s the secret to crispy skin?
Pat the skin dry before roasting and brush it with melted butter or oil. I also avoid covering it with foil during cooking to keep it crisp.
How do I know when it’s fully cooked?
Use a digital thermometer. The breast should read 165°F, and the thigh should be 175°F. I always double-check to be safe.
Can I brine it ahead of time?
Absolutely! I prefer a dry brine for convenience, but a wet brine works great too. Just make sure to plan ahead for the soaking time.
What’s the best way to carve it?
Start by removing the legs and wings, then slice the breast against the grain. I use a sharp knife and a sturdy cutting board for clean cuts.
Any tips for pairing side dishes?
Classic sides like mashed potatoes, stuffing, and green beans are always a hit. I also love adding a cranberry sauce for a tangy contrast.
How do I safely handle and cook it?
Always thaw it in the fridge, never at room temperature. Wash your hands and surfaces thoroughly, and cook it to the right internal temperature to avoid any risks.


