


How to Make Real Russian Pelmeni – A Cozy Winter Classic
April 28, 2025
Peruvian Cuisine 101: Ceviche, Lomo Saltado, and More
April 30, 2025
I still remember the first time I tasted a bowl of pho that truly moved me. It wasn’t in a bustling restaurant or at a friend’s dinner party—it was in a tiny kitchen, where steam curled around a pot simmering with spices I couldn’t yet name. The broth, rich and golden, carried whispers of star anise and cinnamon, and each sip felt like a warm embrace. That moment sparked a years-long journey to recreate that magic in my own home.
What I’ve learned is this: crafting pho isn’t just about following steps. It’s about patience, intuition, and honoring traditions passed down through generations. My guide distills those lessons into something anyone can master. Whether you’re craving comfort or aiming to impress, this recipe bridges the gap between restaurant-quality flavor and homemade simplicity.
We’ll explore time-tested techniques alongside modern shortcuts, always prioritizing that soulful depth that defines this dish. From selecting bones to balancing spices, every detail matters. And don’t worry—this isn’t a rigid formula. It’s an invitation to make the process your own while staying true to its roots.
Key Takeaways
- Discover the secrets to a broth that balances spice, sweetness, and umami
- Learn how to layer flavors using accessible ingredients
- Adapt traditional methods to fit modern kitchens
- Master the art of assembling bowls with fresh herbs and textures
- Gain confidence through clear, step-by-step guidance
Introduction to Vietnamese Pho
My kitchen became a laboratory for broth experiments after that first transformative bowl. I’d stand over pots for hours, chasing that elusive balance of spice and comfort. The magic started with simple acts—blackening onions over flames, scraping ginger’s smoky skin—but these steps shaped everything.
My Broth Breakthrough
Early attempts taught me the power of patience. I’ll never forget the day I finally nailed the aroma—that moment when star anise and charred roots melted into a golden broth. It wasn’t just dinner. It felt like unlocking a secret language of flavors.
Old Ways, New Tricks
Traditional methods demand time, but modern kitchens offer clever compromises. Here’s how to honor the essence while adapting to real life:
| Traditional Method | Modern Shortcut | Time Saved |
|---|---|---|
| Charring over open flame | Broiler roasting | 15 minutes |
| 8-hour bone simmer | Pressure cooker broth | 5 hours |
| Hand-toasting spices | Pre-ground blends | 10 minutes |
Whether you simmer for hours or use a quick recipe, the goal remains: deep, layered flavor. I’ve served both versions to friends—they couldn’t tell the difference. The key lies in quality bones and that irreplaceable char on your aromatics.
Ready to try? This isn’t about rigid rules. It’s about making pho your own. Grab those onions, fire up the stove, and let’s build something beautiful together—one ladle of broth at a time.
Exploring the Origins and Cultural Significance
The story of this beloved noodle soup reads like a spice-scented history book. Born in northern villages during the 1920s, it blended local ingenuity with French colonial influences—think savory bone broths meeting aromatic spice routes. What began as street vendor fare became a national treasure through wars and migrations, carrying the taste of resilience in every steamy bowl.

History and Evolution of the Dish
Early versions relied on simplicity: bones, charred onions, and a handful of spices traded along ancient routes. Over time, cooks layered complexity into the broth. Star anise brought warmth, cloves added bite, and coriander seeds tied everything together. These weren’t just flavors—they were edible heirlooms.
Modern adaptations honor tradition while bending rules. Compare grandmas’ methods to today’s kitchens:
| Traditional Approach | Contemporary Twist | Flavor Impact |
|---|---|---|
| 8-hour bone simmer | 4-hour pressure cooker broth | Same richness, less time |
| Whole toasted spices | Pre-measured spice sachets | Consistent aroma |
| Well water sources | Filtered water systems | Cleaner base flavor |
That golden broth owes its magic to hours of gentle cooking. Proteins break down, marrow melts, and spices infuse every molecule. I’ve found using filtered water makes flavors pop brighter—a small upgrade with big results.
What fascinates me most? How today’s recipe tweaks mirror history itself. Street vendors once used beef bones because they were affordable; now we choose them for depth. Whether simmering all day or using smart shortcuts, the soul remains in those carefully balanced ingredients.
Knowing this backstory transforms cooking from routine to ritual. Each cinnamon stick or clove isn’t just seasoning—it’s a chapter in pho’s ongoing journey from humble carts to global kitchens.
Essential Ingredients for an Authentic Pho Broth
Building a broth that sings requires precision. Every component works in harmony—like instruments in an orchestra. Miss one note, and the melody falters. Let’s break down the non-negotiables.
Beef Bones, Onions, and Ginger Essentials
Start with beef bones—knuckle or marrow work best. Parboiling removes impurities while locking in flavor. I learned this the hard way after a cloudy broth ruined my first attempt. Now, I never skip this step.
Charring onions and ginger transforms them. That blackened skin adds smokiness and gives the liquid its golden hue. My trick? Use tongs to hold them over a gas flame until blistered. It’s faster than broiling and smells incredible.
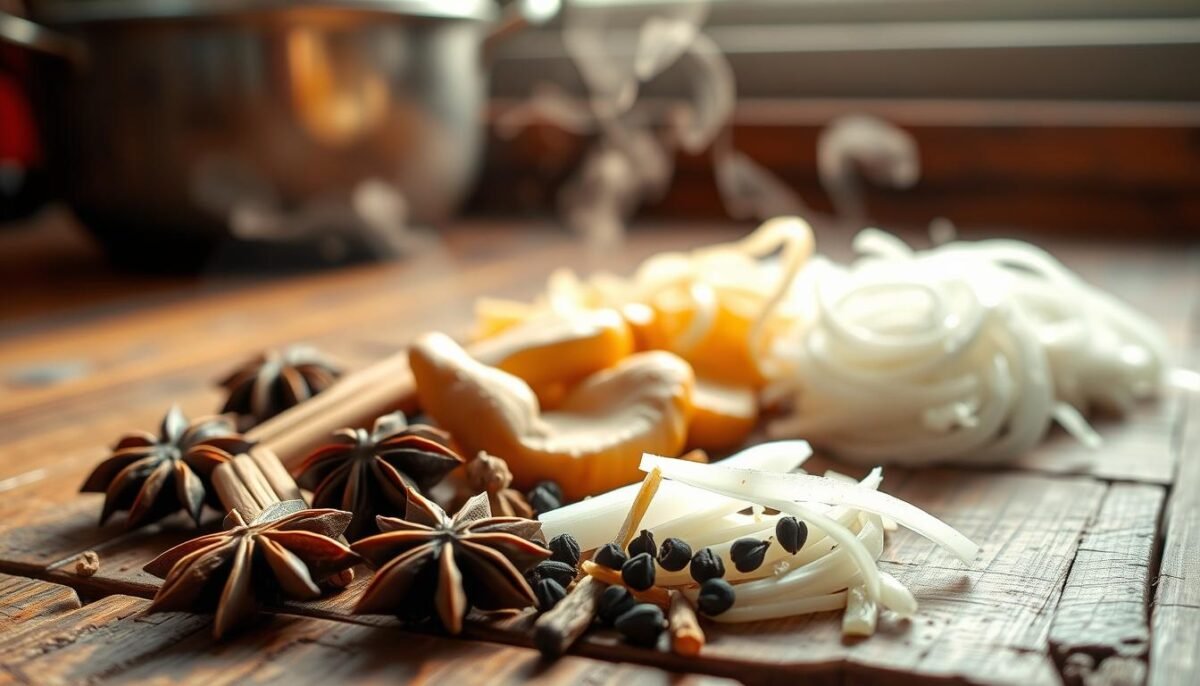
Spices and Seasonings: Cinnamon, Star Anise, and Cloves
The spice blend is your secret weapon. Toast whole cinnamon, star anise, and cloves briefly to awaken their oils. I once substituted ground spices—the broth tasted flat. Whole pods make all the difference.
Fish sauce adds umami magic. Add it late to preserve its brightness. A pinch of coriander seeds? Yes. They bring a citrusy lift that balances the richness. Even the water matters—filtered lets each flavor shine.
These elements aren’t just ingredients. They’re time capsules of tradition. Honor them, and your broth becomes more than soup—it’s a story in every sip.
Step-by-Step Vietnamese pho cooking guide
That moment when your kitchen fills with the scent of charring ginger and onions? That’s when the magic begins. Let me walk you through each step—no chef’s hat required.
Parboiling Bones and Charring Aromatics
Start with beef bones—knuckle or marrow work best. Rinse them cold, then boil for 10 minutes. This removes impurities that cloud the broth. Trust me, I learned this after serving murky soup to very polite friends.
While bones drain, char your aromatics. Hold onions and ginger over flames until blackened—about 5 minutes. This isn’t just for looks. That smoky depth? It’s the foundation of your broth’s golden hue.
Simmering Techniques for a Rich, Flavorful Broth
Combine bones, 12 cups water, and charred goods in your largest pot. Bring to a gentle bubble—never a rolling boil. Skim foam for the first 30 minutes. Here’s where patience pays: let it whisper on the stove for 4-6 hours.
Add spices in the final hour. Toast star anise, cloves, and coriander briefly, then tie them in cheesecloth. This prevents bitterness while letting flavors bloom. Fish sauce goes in last—just 15 minutes before straining.
While broth simmers, cook noodles separately. Soak rice sticks in hot water for 8 minutes, then rinse cold. They’ll stay springy until assembly. Pro tip: toss with a little broth to prevent sticking.
When everything comes together—silky noodles, thinly sliced beef, that aromatic liquid gold—you’ll taste every careful step. It’s not just food. It’s alchemy.
Essential Tools and Equipment for Homemade Pho
The right tools turned my broth experiments from chaotic to controlled. What once felt like wrestling with pots and strainers became a smooth dance between tradition and practicality. Let’s talk gear—the unsung heroes behind every great bowl.

Must-Have Kitchen Equipment
Start with a 10-quart stockpot. Its heavy base prevents scorching, while the size accommodates bones and water without boiling over. I learned this after cleaning my stovetop three times in one weekend.
A sturdy baking sheet makes charring aromatics foolproof. Lay onions and ginger flat for even blistering—no more dropping pieces into burner grates. Pair this with a fine-mesh strainer to achieve that crystal-clear broth every recipe deserves.
Don’t overlook these helpers:
- Muslin spice bags: Keep pods contained without losing flavor
- Wide, shallow bowls: Perfect for layering noodles and toppings
- Quality ladle: Controls broth distribution like a pro
Using filtered water matters more than you’d think. It lets spices and bones shine without mineral interference. At home, I keep a pitcher specifically for broth-making—it’s a small habit with big flavor payoffs.
Great tools don’t just save time. They honor the dish’s roots while adapting to modern kitchens. Whether you’re simmering for hours or using smart shortcuts, the right equipment ensures your efforts translate into steaming bowls of comfort.
Mastering Rice Noodles and Meat Preparation
I once served a bowl where the noodles clumped together like old spaghetti—a chewy disaster that taught me texture matters as much as flavor. Getting rice noodles right and slicing proteins paper-thin transforms good broth into greatness. Let’s tackle these final puzzle pieces.

Cooking Rice Noodles to Perfection
Timing is everything. Soak dried rice noodles in hot (not boiling) water for 8-10 minutes. Test a strand—it should bend without snapping. Overcooked? They’ll turn mushy. Undercooked? Rubbery. Rinse immediately in cold water to stop cooking. Toss with a splash of broth to prevent sticking.
Slicing Meat and Exploring Protein Options
Freeze steak for 45 minutes first. A sharp knife glides through partially frozen beef, creating translucent slices that cook instantly in hot broth. Always cut against the grain. Chicken thighs? Shred after poaching. For shrimp, butterfly them to maximize surface area.
Protein flexibility keeps things exciting:
- Thinly sliced ribeye (classic choice)
- Shredded rotisserie chicken (weeknight hero)
- Pork tenderloin marinated with ginger (adds zing)
Remember: noodles should spring back slightly when bitten, while meat melts like butter. Nail both, and you’ve mastered the yin-yang of this iconic dish.
Garnishing Your Pho: Fresh Toppings and Sauces
The first time I arranged a pho garnish platter, I realized toppings aren’t just accents—they’re invitations to play with flavor. Crisp bean sprouts and lime wedges jostled with emerald herbs, each element promising texture and brightness. This isn’t garnish as afterthought; it’s where diners make the bowl their own.

Building Your Flavor Canvas
Start with crunchy bean sprouts—their mild sweetness balances rich broth. Add a squeeze of lime to cut through richness, adjusting acidity to taste. Thai basil’s peppery notes and cilantro’s citrusy punch create layers that evolve with every bite.
| Essential Toppings | Flavor Boosters | Presentation Tips |
|---|---|---|
| Fresh bean sprouts | Hoisin sauce drizzle | Group herbs in small piles |
| Lime wedges | Fish sauce blend | Serve sauces in ramekins |
| Thai basil leaves | Chili oil swirl | Use contrasting colors |
Offer hoisin and extra fish sauce on the side. I keep mine in squeeze bottles for controlled drizzling. A cinnamon stick tucked into the herb plate adds aromatic intrigue—guests can steep it like tea.
Arrange toppings like a painter’s palette. Cluster cilantro beside mint, let sprouts cascade from a bowl. The goal? Let each addition feel intentional yet playful. Your garnish spread isn’t just functional—it’s the final brushstroke on a culinary masterpiece.
Time-Saving Tips and Variations for Pho Recipes
Balancing rich flavor with busy schedules feels like solving a delicious puzzle. Through countless experiments, I’ve discovered tricks that shave hours off simmering time without sacrificing depth. Let’s rethink tradition with smart swaps that keep your broth singing.
Broth Hacks for the Time-Crunched
Quality store-bought broth becomes your secret weapon. Boost it with charred onions, a splash of fish sauce, and toasted spices for instant complexity. I’ve fooled pho purists with this 45-minute hybrid method—just don’t tell grandma.
Pressure cookers transform all-day projects into 90-minute miracles. Layer ingredients as usual, set to high heat, and let physics work its magic. The intense pressure extracts marrow faster than traditional simmering. For crock-pots, start before breakfast—your kitchen will smell incredible by dinner.
Equipment as Your Ally
Modern tools offer clever shortcuts:
- Instant Pot: Cuts simmering time from 6 hours to 1.5
- Pre-sliced frozen beef: Thins cuts instantly cook in hot broth
- Spice sachets: Eliminate tedious straining
Even with shortcuts, timing remains crucial. Add fresh herbs right before serving to preserve their vibrancy. For noodles, soak them while your broth reheats—they’ll stay perfectly springy.
Want to personalize? Try these twists:
- Swap beef for turkey bones in autumn
- Add lemongrass to the spice mix for citrusy notes
- Top with quick-pickled veggies for crunch
Remember: Great pho isn’t about how many hours you spend. It’s about layering flavors with intention. Whether you’re pressure-cooking or doctoring store broth, every shortcut should honor the dish’s soul.
Conclusion
Perfecting that first bowl taught me more than technique—it revealed how food connects us. A great broth needs time and care, whether simmered for hours or crafted with smart shortcuts. Thinly sliced beef, springy noodles, and fresh herbs like basil complete the experience, turning simple ingredients into something extraordinary.
Your kitchen becomes a playground here. Swap spices, try different cuts of meat, or adjust serving styles to match your taste. Even on busy days, a pressure cooker can deliver rich depth in 90 minutes. What matters isn’t perfection—it’s the joy of making each recipe your own.
Every steaming bowl celebrates tradition while inviting creativity. Share your twists with friends, garnish with lime and coriander, and savor the warmth you’ve built from scratch. Trust me: once you taste homemade pho, takeout never hits the same.
FAQ
How long should I simmer the broth for the best flavor?
I always aim for 6-8 hours on low heat. This slow process extracts deep flavors from beef bones and spices like cinnamon and star anise. If you’re short on time, an Instant Pot can cut it down to 2-3 hours.
Can I use chicken instead of beef in my recipe?
Absolutely! While traditional recipes focus on beef, I’ve had great results with chicken bones or even tofu for a vegetarian twist. Adjust spices slightly to complement the protein you choose.
Why do my rice noodles turn mushy?
Overcooking is usually the culprit. I soak them in hot water for just 5-7 minutes, then rinse with cold water to stop the cooking process. They’ll soften perfectly when added to hot broth later.
What’s the secret to balancing fish sauce in the broth?
Start with 1-2 tablespoons and taste as you go. I add it during the last 30 minutes of simmering to preserve its sharpness. Too much can overpower the delicate spices like cloves and coriander seeds.
Can I freeze leftover broth for later use?
Yes! I store mine in airtight containers for up to 3 months. Thaw it overnight, then reheat gently. Fresh herbs like Thai basil and lime wedges should always be added just before serving.
Are there quick substitutes for hard-to-find spices?
If you can’t find star anise, a pinch of five-spice powder works in a pinch. For fresh herbs, cilantro or mint can stand in for Thai basil, though the flavor profile will shift slightly.
How do I prevent the broth from becoming cloudy?
Parboiling the bones first is key. I rinse them thoroughly after boiling to remove impurities. Skimming foam during simmering also keeps the broth clear and rich.
What’s your favorite way to serve bean sprouts and herbs?
I keep them raw and let everyone customize their bowl. The crunch of sprouts and freshness of basil or cilantro add texture that contrasts beautifully with tender meat and silky noodles.
Can I make a vegetarian version without losing depth?
Definitely! I use roasted mushrooms and charred onions to build umami. Swap fish sauce for soy sauce or Bragg’s Liquid Aminos, and add a dash of smoked paprika for complexity.


