


4 Secrets to Making the Perfect BBQ Chicken on the Grill
February 26, 2025
How to Roast Pork Tenderloin for a Perfect Midweek Dinner
February 26, 2025
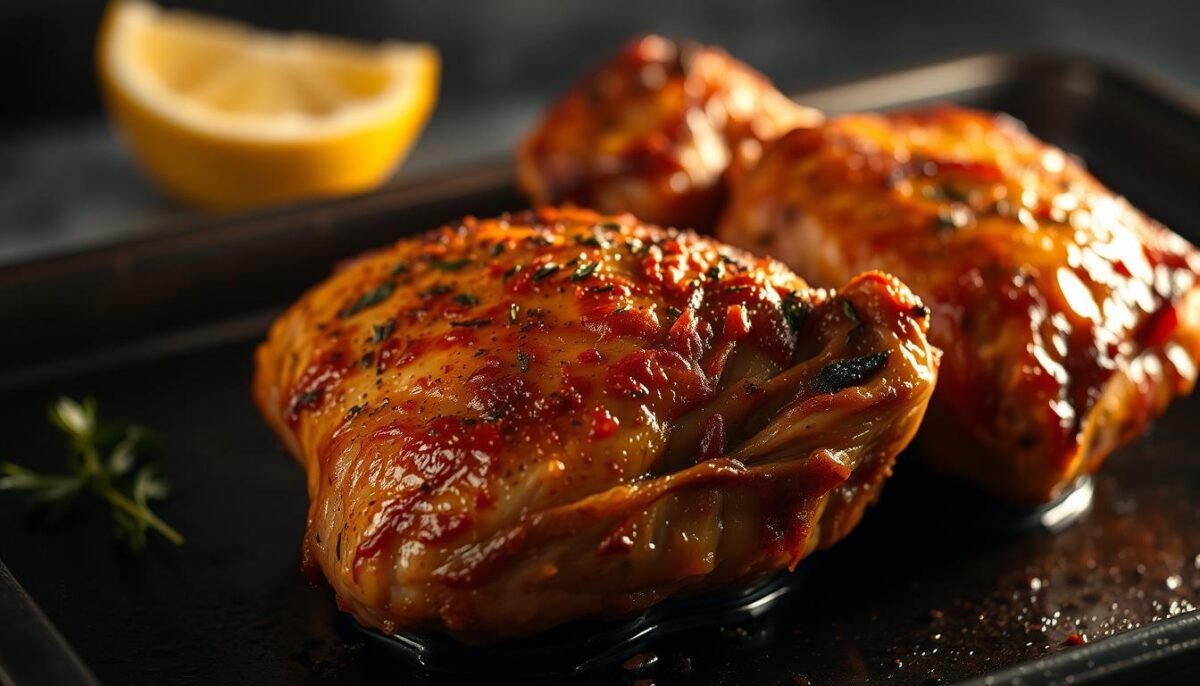
Did you know that over 90% of home cooks struggle to achieve perfectly crispy skin on their dishes? It’s a common challenge, but the solution is simpler than you think. With just a few easy steps, you can create a meal that’s both crispy and juicy, making it a family favorite in no time.
Imagine this: It’s a busy weeknight, and you’re craving something hearty yet effortless. You pop a few ingredients into the oven, and within minutes, the aroma fills your kitchen. The result? A dish with golden, crackling skin and tender, flavorful meat that feels like it came straight from a restaurant.
This recipe is designed for everyone, whether you’re a seasoned chef or just starting out. With minimal prep and hands-off baking, you’ll have a meal that’s both impressive and stress-free. Let’s dive into the secrets of making this ultimate weeknight dinner.
Key Takeaways
- Learn a simple method for achieving crispy skin and juicy meat.
- Discover family-tested techniques for foolproof results.
- Enjoy a recipe that requires minimal prep and hands-off baking.
- Get tips on essential tools and seasoning secrets.
- Perfect your cooking skills with this easy, weeknight-friendly dish.
Introduction and Recipe Overview
Achieving perfectly crispy skin doesn’t have to be a mystery. This recipe transforms a simple dish into a crispy, juicy masterpiece that’s both easy to prepare and incredibly satisfying. Whether you’re cooking for a weeknight dinner or a family gathering, this method ensures golden, crackling skin and tender, flavorful meat every time.
One of the secrets lies in choosing the right cut. Compared to chicken breast, thighs are more cost-effective and naturally richer in flavor. They also stay juicier during cooking, making them a favorite among home cooks. Plus, they’re forgiving—perfect for beginners and seasoned chefs alike.
To achieve the best results, it’s essential to reach the correct internal temperature. Baking until the meat hits 180-190°F ensures optimal tenderness. This hands-off process requires minimal prep and everyday pantry staples, making it a go-to recipe for busy households.
Here’s a quick comparison of chicken thighs and breasts:
| Feature | Chicken Thighs | Chicken Breast |
|---|---|---|
| Flavor | Rich and juicy | Mild and lean |
| Cost | More affordable | Typically pricier |
| Cooking Time | Forgiving, stays moist | Easily overcooked |
“The key to a great meal is simplicity. This recipe proves that with just a few steps, you can create something truly special.”
In the next sections, we’ll dive into the tools, ingredients, and techniques you’ll need to perfect this dish. From seasoning tips to baking guidelines, you’ll learn everything to make this a family favorite.
Gathering Your Ingredients and Tools
Cooking a delicious meal starts with the right ingredients and tools. Whether you’re a beginner or a seasoned cook, having everything prepared ensures a smooth and enjoyable experience. Let’s break down what you’ll need to create this flavorful dish.
Essential Pantry Staples
Most of the items you’ll need are likely already in your pantry. Here’s a quick checklist:
- Salt and pepper: The foundation of any great seasoning.
- Garlic powder and onion powder: Adds depth to the flavor.
- Paprika: For a hint of smokiness and color.
- Italian seasoning: A versatile blend of herbs.
- Olive oil: Extra virgin olive oil is ideal for a golden, crispy finish.
These simple ingredients work together to create a rich and balanced taste. Using high-quality olive oil ensures the dish turns out perfectly every time.
Recommended Kitchen Equipment
Having the right tools makes the process easier and more efficient. Here’s what you’ll need:
- A 9×13 baking dish: Perfect for even cooking.
- Digital meat thermometer: Ensures the meat reaches the ideal temperature.
- Parchment paper: For easy cleanup and preventing sticking.
- Mixing bowl: To combine your seasoning blend.
These tools not only simplify the process but also guarantee consistent results. With everything ready, you’re set to create a meal that’s both delicious and stress-free.
Preparing Your Chicken Thighs
The secret to a crispy finish lies in how you prep your ingredients. Proper preparation ensures golden, crackling skin and tender, juicy meat. Let’s dive into the essential steps to get your dish ready for the oven.
Trimming and Drying for Optimal Crispiness
Start by trimming any excess skin from your chicken thighs. Use kitchen shears or a sharp knife to remove any unwanted pieces. This step helps the skin crisp up evenly during baking.
Next, pat the thighs dry with paper towels. Removing moisture is crucial for achieving that perfect crispiness. Make sure to dry both sides thoroughly for the best results.
Preheating Your Oven Correctly
Before you start cooking, preheat your oven to 400°F. This step is essential for locking in juices and ensuring even cooking. A properly heated oven sets the stage for a flawless bake.
While the oven heats up, arrange your chicken thighs in a baking dish. Make sure they’re not overlapping to allow for even heat distribution. Using parchment paper can prevent sticking and make cleanup a breeze.
| Step | Why It Matters |
|---|---|
| Trim excess skin | Ensures even crispiness |
| Pat dry with paper towels | Removes moisture for a crispy finish |
| Preheat oven to 400°F | Locks in juices and promotes even baking |
| Arrange thighs without overlapping | Allows for consistent heat distribution |
By following these steps, you’ll set yourself up for success. Proper preparation ensures a dish that’s both crispy and flavorful. For more tips on how to select the right cut and ensure, check out our expert guide.
Creating a Flavorful Seasoning Mix
Crafting the perfect seasoning mix is the key to unlocking bold flavors. Whether you’re a beginner or a seasoned cook, a well-balanced blend can transform your dish from ordinary to extraordinary. Let’s explore how to create a classic herb and spice mix and discover creative alternatives to personalize your flavor profile.

Classic Herb and Spice Blend
Start with a simple yet effective blend of pantry staples. Combine salt, pepper, garlic powder, onion powder, paprika, and Italian seasoning in a small bowl. These ingredients work together to enhance the natural flavors of your dish.
Add a tablespoon of olive oil to help the seasoning adhere, ensuring a crispy finish. Mix thoroughly to create a uniform blend. This classic mix is foolproof and works wonders for a variety of recipes.
Alternative Seasoning Ideas
For those who love to experiment, try swapping out traditional spices for unique flavors. Za’atar, a Middle Eastern blend, adds a tangy, herbal twist. Smoked paprika brings a deep, smoky richness that’s perfect for bold dishes.
Don’t be afraid to mix and match. Even minor tweaks, like adding a pinch of cayenne for heat or a dash of lemon zest for brightness, can transform your meal. The key is to maintain the core techniques while exploring new combinations.
Remember, the right seasoning mix is all about enhancing the natural flavors of your ingredients. Whether you stick to the classics or venture into creative alternatives, the possibilities are endless. Happy cooking!
Oven-roasted chicken thighs: Baking to Perfection
Getting the perfect bake is easier than you think. With the right time and temperature, you can achieve a dish that’s crispy on the outside and tender on the inside. Let’s break down the process step by step.
Time and Temperature Guidelines
Start by preheating your oven to 400°F. This ensures even cooking and locks in the juices. Place your prepared thighs in a baking dish, making sure they’re not overlapping. Bake for 30-40 minutes, or until the internal temperature reaches 180-190°F.
While chicken is technically safe at 165°F, cooking it to a higher temperature ensures extra tenderness. Use a digital meat thermometer to monitor the internal temperature accurately. This simple tool takes the guesswork out of cooking.
- Bake at 400°F for 30-40 minutes.
- Check the internal temperature with a thermometer.
- For extra crispiness, broil for 2-3 minutes at the end.
Broiling adds a golden, crackling finish to your dish. Just keep an eye on it to avoid burning. This step is optional but highly recommended for that restaurant-quality texture.
Don’t worry about overcooking. The higher temperature not only ensures safety but also enhances flavor and juiciness. This method is simple, foolproof, and delivers consistent results every time.
By following these guidelines, you’ll transform your dish into a flavorful, juicy masterpiece. Happy baking!
Ensuring Juicy and Tender Meat
Ensuring your dish stays moist and flavorful is simpler than you might think. The key lies in understanding the science behind cooking and how to achieve the ideal internal temperature. By following a few straightforward steps, you can transform your meal into a juicy, tender masterpiece.
Dark meat, like chicken thighs, naturally stays moist even when cooked at higher temperatures. Unlike white meat, which can dry out quickly, dark meat contains more fat and connective tissue. Cooking it to a slightly higher internal temperature—around 180-190°F—helps break down these tissues, resulting in a more tender and flavorful bite.
Why Higher Temperatures Work
Cooking dark meat to a higher degree than the standard 165°F guideline has several benefits. First, it ensures the connective tissues break down completely, making the meat more tender. Second, it enhances the natural flavors, giving you a richer, more satisfying dish.
Here’s a quick comparison of cooking temperatures and their effects:
| Temperature | Effect on Meat |
|---|---|
| 165°F | Safe to eat but may not be fully tender |
| 180-190°F | Breaks down connective tissue for juicier, more tender meat |
Using a digital thermometer, like a Thermapen, makes it easy to monitor the internal temperature accurately. This tool ensures you achieve the perfect balance between safety and flavor.
Nutritional Benefits of Dark Meat
Dark meat isn’t just flavorful—it’s also packed with nutrients. It’s a great source of iron and essential vitamins, making it a healthier choice for your meals. Plus, its natural juiciness means you don’t need to add extra fats or oils, keeping your dish light and nutritious.
By following these tips, you’ll consistently achieve juicy, tender results. Patience and attention to detail are your best tools for creating a dish that’s both delicious and nutritious.
Creative Serving Suggestions and Sides
Transform your dinner into a complete feast with creative sides that elevate your dish. Pairing your meal with the right accompaniments not only enhances flavor but also creates a balanced, satisfying experience. Whether you prefer fresh salads, roasted vegetables, or hearty starches, there’s a combination for every taste.
One of the easiest ways to plan a meal is by using the “dinner trifecta” concept. This approach combines a protein, a vegetable, and a starch for a well-rounded plate. For example, pair your dish with garlic mashed potatoes and steamed broccoli for a classic, comforting meal.
Dinner Trifecta Combinations
Here are some ideas to inspire your next meal:
- Roasted Vegetables: Toss carrots, Brussels sprouts, or zucchini with olive oil and a pinch of garlic powder. Roast them in the same oven as your dish for convenience.
- Fresh Salads: A crisp green salad with a tangy vinaigrette adds a refreshing contrast to the rich flavors of your meal.
- Hearty Starches: Mashed potatoes, rice pilaf, or roasted sweet potatoes are filling and flavorful options.
For a creative twist, try sautéed spinach with garlic or a quinoa salad with roasted vegetables. These sides not only complement your dish but also add variety to your plate.
| Side Option | Why It Works |
|---|---|
| Roasted Vegetables | Adds texture and depth to the meal |
| Fresh Salad | Provides a light, refreshing contrast |
| Mashed Potatoes | Offers a creamy, comforting element |
Presentation is key to making your meal feel special. Use a stylish baking dish to serve your dish, and arrange sides neatly on the plate. Garnish with fresh herbs or a sprinkle of paprika for a pop of color.
Don’t be afraid to personalize your sides to match your preferences or dietary needs. The “dinner trifecta” concept is flexible, allowing you to mix and match ingredients for a meal that’s uniquely yours. Happy cooking!
Variations and Pro Tips for Culinary Success
Discover advanced tips to customize and perfect your recipe. Whether you’re experimenting with flavors or refining your technique, these variations and pro tips will help you achieve culinary success.
For a unique twist, try a miso-glazed or teriyaki version. These adaptations add depth and complexity to your dish. Simply mix a tablespoon of miso paste or teriyaki sauce with a teaspoon of honey for a sweet and savory glaze.

If you prefer a lighter option, skinless chicken or boneless cuts work well. While bone-in thighs offer richer flavor, skinless and boneless options are quicker to cook and easier to eat. Pair them with a spice blend of salt, black pepper, and paprika for a simple yet delicious meal.
For extra crispiness, use a baking rack placed over a sheet pan. This allows heat to circulate evenly, ensuring a golden finish. Line the pan with parchment paper for easy cleanup.
When it comes to seasoning, don’t be afraid to experiment. Swap traditional herbs for za’atar or smoked paprika. Add a dash of ground black pepper or a drizzle of olive oil for an extra flavor boost. Measure ingredients accurately using a teaspoon or tablespoon for consistent results.
Storing leftovers? Keep them in an airtight container in the fridge. To reheat, use an oven or air fryer to maintain crispiness. Avoid microwaving, as it can make the skin soggy.
For more tips on perfecting your cooking techniques, check out our guide on essential tips for cooking chicken. Small tweaks can elevate your dish while keeping the basic method intact. Happy cooking!
Conclusion
Mastering a delicious and crispy dish is easier than you might imagine. With simple steps like proper preparation, seasoning, and baking, you can make a meal that’s both juicy and flavorful. Whether you choose chicken thighs or breast, the key lies in attention to detail.
Chicken thighs, rich in iron and vitamins, stay tender even when baked to perfection. For a golden finish, place them in a preheated oven and monitor the internal temperature. A blend of spices like garlic powder and paprika adds depth to the flavor.
Feel free to experiment with variations and creative sides. This recipe is not just easy but also versatile, making it perfect for any occasion. Share your results and enjoy a meal that’s both satisfying and nutritious. Happy cooking!
FAQ
What’s the best way to dry the meat before baking?
Pat it thoroughly with paper towels to remove excess moisture. This helps achieve a crispy texture when baked.
How long should I bake the meat for perfect results?
Bake at 425°F for about 25-30 minutes, or until the internal temperature reaches 165°F. Adjust time based on thickness.
Can I use skinless cuts for this recipe?
Yes, but keep in mind skinless pieces may not get as crispy. You can add a bit of olive oil to enhance browning.
What’s a simple seasoning blend I can use?
Mix salt, black pepper, garlic powder, and paprika for a classic flavor. Feel free to experiment with your favorite spices.
How do I know when the meat is fully cooked?
Use a meat thermometer to check the internal temperature. It should read 165°F for safe and juicy results.
What sides pair well with this dish?
Try roasted vegetables, a fresh salad, or mashed potatoes for a complete and satisfying meal.
Can I marinate the meat beforehand?
Absolutely! Marinating for 30 minutes to a few hours can add extra flavor. Just pat it dry before baking.
What’s the best way to store leftovers?
Place them in an airtight container and refrigerate for up to 3 days. Reheat in the oven for the best texture.


