


How to Roast Pork Tenderloin for a Perfect Midweek Dinner
February 26, 2025
5 Tips for Cooking the Perfect Ribeye Steak Every Time
February 27, 2025
Did you know that over 70% of BBQ enthusiasts say that achieving the perfect bark and tender meat is their ultimate goal? If you’ve ever struggled with getting that authentic BBQ flavor, you’re not alone. Many home cooks find the process intimidating, but it doesn’t have to be.
Take Sarah, for example. She was new to smoking and worried about ruining her first attempt. But with a few simple tips and the right techniques, she ended up with a dish that her family couldn’t stop raving about. Her secret? Following chef-approved methods that anyone can master.
In this guide, you’ll learn five expert techniques to transform your pork shoulder into a smoky, flavorful masterpiece. Whether you’re a pitmaster or a beginner, these methods will help you achieve a perfect bark, tender meat, and that authentic BBQ taste. All you need are a few ingredients, a good smoker, and a little patience.
Ready to elevate your BBQ game? Let’s dive in and discover how simple and rewarding this process can be.
Key Takeaways
- Learn chef-approved methods for perfect results every time.
- Achieve a crispy bark and tender, juicy meat.
- Use techniques trusted by pitmasters and home chefs alike.
- Requires minimal ingredients and tools.
- Patience is key to unlocking authentic BBQ flavor.
Introduction
Achieving restaurant-quality pulled pork at home is easier than you think with the right techniques. This guide is designed to walk you through every step, from selecting the perfect cut to mastering the finishing touches. Whether you’re a beginner or a seasoned BBQ enthusiast, these chef-approved methods will help you create a dish that’s tender, flavorful, and unforgettable.
Overview of the Guide
This guide focuses on simplicity and precision. You’ll learn how to use a three-ingredient recipe to create amazing flavor. We’ll also cover essential steps like preheating your smoker, applying rubs, and monitoring the internal temperature of your meat. These time-tested techniques are trusted by pitmasters and home chefs alike.
What You Will Learn
By the end of this guide, you’ll have all the knowledge you need to make mouthwatering pulled pork. Here’s a quick overview of what’s covered:
- Meat Selection: How to choose the best cut for your recipe.
- Preheating: The importance of setting the right temperature before cooking.
- Applying Rubs: Simple yet effective ways to enhance flavor.
- Temperature Control: Tips for monitoring internal temperature for perfect results.
- Finishing Touches: Wrapping and resting your meat for maximum tenderness.
| Step | Key Details |
|---|---|
| Meat Selection | Choose a well-marbled cut for better flavor and tenderness. |
| Preheating | Ensure your smoker reaches the ideal temperature before adding meat. |
| Applying Rubs | Use a simple three-ingredient rub for maximum flavor. |
| Temperature Control | Monitor internal temperature to avoid overcooking or undercooking. |
| Finishing Touches | Wrap and rest your meat to lock in juices and tenderness. |
With these steps, you’ll be able to create a dish that’s sure to impress. Let’s get started and unlock the secrets to perfect pulled pork!
Understanding the Pork Shoulder Cut
Understanding the differences between pork butt and pork shoulder can make or break your BBQ game. These cuts are often confused, but knowing their unique qualities will help you choose the right one for your recipe.
Pork Butt vs. Pork Shoulder
Both pork butt and pork shoulder come from the upper shoulder region of the pig. Despite the name, pork butt (also called Boston butt) is not from the rear. It’s located higher up, near the neck, while the pork shoulder is slightly lower.
These cuts are rich in marbling and connective tissue, which makes them perfect for low-and-slow cooking. The fat melts during the process, keeping the meat tender and flavorful. This is why they’re ideal for shredding into pulled pork.
In grocery stores, you might notice labeling differences. Pork butt is often larger and has more fat, while pork shoulder is leaner. Both are excellent choices, but the one you pick depends on your preference for fat content and size.
Choosing the right cut is crucial for a quality BBQ recipe. Whether you go with pork butt or pork shoulder, you’re setting yourself up for success. Both cuts deliver that melt-in-your-mouth texture everyone loves.
Essential Tools and Ingredients
The right tools and ingredients can make all the difference in your BBQ journey. Whether you’re a beginner or a seasoned pitmaster, having the proper equipment and high-quality components ensures your dish turns out flavorful and tender every time.
Must-Have Equipment: Smoker, Thermometer, and More
To achieve the best results, you’ll need a few essential tools. A reliable smoker is the foundation of any great BBQ. Look for one that maintains consistent heat and has enough space for your cut of meat.
An accurate thermometer is another must-have. Monitoring the internal temperature ensures your meat is cooked perfectly. Don’t forget heat-resistant gloves for handling hot equipment and meat safely.
Other helpful accessories include a meat injector for adding flavor and a spray bottle for keeping the meat moist during the process. These tools can elevate your BBQ game and make the process smoother.
Key Ingredients for Flavor and Tenderness
Great flavor starts with the right ingredients. A simple yet effective rub can transform your dish. Combine ingredients like brown sugar, paprika, and salt for a sweet and savory blend.
Yellow mustard is often used as a binder for the rub, helping it stick to the meat. For a fruity twist, consider adding apple juice or cider to your recipe. This adds a subtle sweetness that complements the smoky flavor.
Here’s a quick guide to the essential tools and ingredients:
| Category | Items |
|---|---|
| Equipment | Smoker, thermometer, gloves, meat injector, spray bottle |
| Ingredients | Yellow mustard, sweet BBQ rub, apple juice, brown sugar, paprika |
With the right tools and ingredients, you’re well on your way to creating a BBQ masterpiece. Remember, quality matters—so invest in reliable equipment and fresh components for the best results.
Preparing the Pork Shoulder for Smoking
Preparing your meat for the smoker is a crucial step that sets the stage for mouthwatering results. Proper preparation ensures even cooking, a flavorful bark, and tender, juicy meat. Let’s break down the essential steps to get your cut ready for the smoker.
Trimming Excess Fat
Start by trimming any excess fat from the meat. While fat adds flavor and moisture during the cook, too much can prevent the rub from adhering properly. Use a sharp knife to remove thick layers, leaving a thin, even coating. This balance helps the meat stay moist while allowing the rub to work its magic.
Applying Mustard and Dry Rub
Next, coat the meat with a thin layer of mustard. This acts as a binder, helping the rub stick evenly. Don’t worry—the mustard flavor won’t overpower the final dish. It’s all about creating a base for the rub to cling to.
Now, it’s time to apply the dry rub. A simple blend of brown sugar, paprika, and salt works wonders. The brown sugar adds a subtle sweetness and helps form that irresistible bark. Sprinkle the rub generously over the meat, ensuring every inch is covered. Use your hands to press it into the surface for maximum flavor.
- Trim excess fat while leaving a thin layer for moisture.
- Slather the meat with mustard for better rub adhesion.
- Apply a dry rub with brown sugar for sweetness and bark.
- Press the rub into the meat for even coverage.
With these steps, your meat will be perfectly prepped for a long, flavorful smoke. Take your time here—it’s the foundation of a great BBQ experience.
Setting Up Your Smoker
Mastering the art of BBQ starts with setting up your smoker correctly. A well-prepared smoker ensures even cooking, deep flavor, and tender results. Let’s break down the essential steps to get your equipment ready for a low-and-slow cook.
Choosing the Right Wood: Hickory and Apple
The type of wood you use plays a big role in the flavor of your dish. Hickory is a popular choice for its bold, smoky taste, while apple offers a sweeter, milder note. Both options are excellent for enhancing the natural flavors of your meat.
- Hickory: Ideal for a robust, traditional BBQ flavor.
- Apple: Perfect for adding a subtle, fruity sweetness.
Establishing the Ideal Temperature
Maintaining a steady temperature is key to achieving perfect results. For most BBQ recipes, aim for a range of 225°F to 250°F. This low-and-slow approach allows the meat to cook evenly and absorb maximum flavor.
Preheat your smoker to the desired temperature before adding the meat. Use a reliable thermometer to monitor the heat throughout the process. Consistency is crucial—fluctuations can lead to uneven cooking.
Here’s a table summarizing the key steps:
| Step | Details |
|---|---|
| Wood Selection | Choose hickory for bold flavor or apple for sweetness. |
| Preheating | Set your smoker to 225°F-250°F before adding meat. |
| Monitoring | Use a thermometer to maintain consistent heat. |
For more tips on managing heat effectively, check out this guide on heat control. With these steps, you’ll be well on your way to creating a BBQ masterpiece.
Step-by-Step Smoking Process
Getting the perfect BBQ results starts with mastering the smoking process. This step-by-step guide will walk you through preheating, placing the meat, and monitoring the internal temperature for flawless results.
Preheating and Placing the Meat
Begin by preheating your smoker to the ideal temperature of 225°F to 250°F. This ensures even cooking from the start. Once the smoker is ready, place the meat on the grill with the fat side up. This allows the fat to render slowly, keeping the meat moist and flavorful.
Set a timer to track the cooking time. Most recipes require several hours, so patience is key. For example, plan for about 1.5 hours per pound of meat. This ensures the meat cooks thoroughly without drying out.
Monitoring the Internal Temperature
Using a reliable thermometer is crucial for achieving perfect results. Insert the probe into the thickest part of the meat, avoiding bones. The target internal temperature is around 195°F to 205°F for tender, pull-apart meat.
Check the temperature every hour during the cooking process. This helps you avoid overcooking or undercooking. If the temperature rises too quickly, adjust the smoker’s heat accordingly.
Here’s a quick summary of the key steps:
| Step | Details |
|---|---|
| Preheating | Set smoker to 225°F-250°F before adding meat. |
| Placing Meat | Position meat fat side up for even cooking. |
| Monitoring | Use a thermometer to check internal temperature every hour. |
| Timing | Allow 1.5 hours per pound for thorough cooking. |
With these steps, you’ll master the smoking process and create a dish that’s tender, flavorful, and unforgettable. Remember, patience and attention to detail are your best tools for BBQ success.
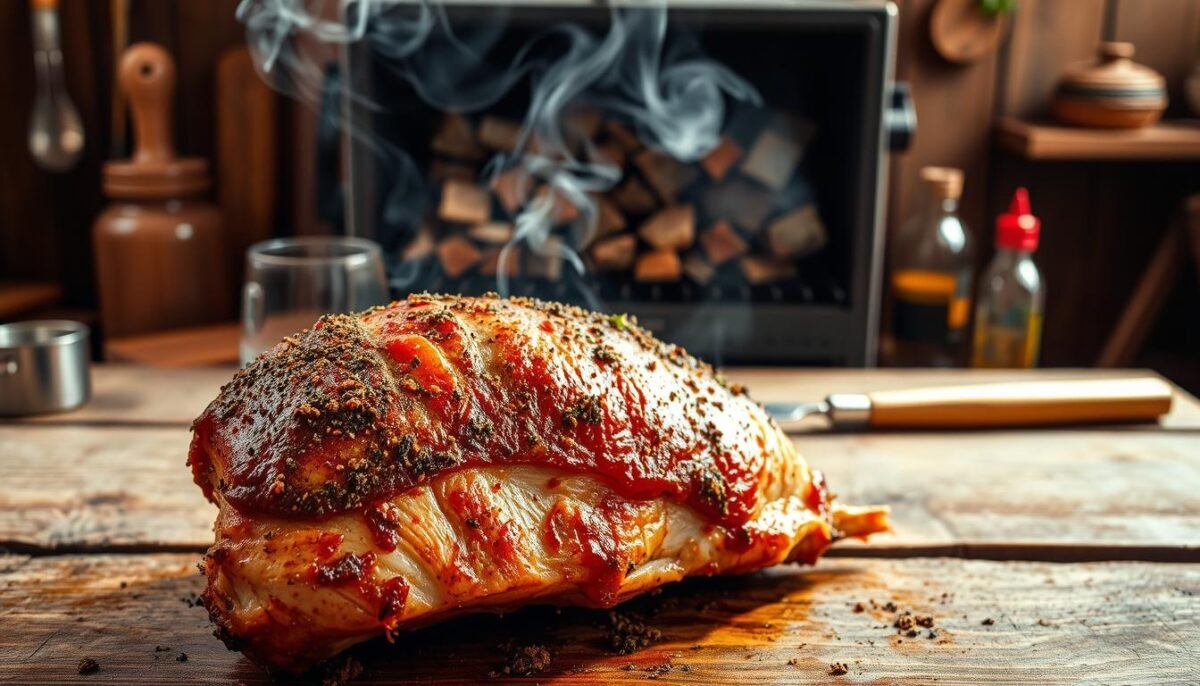
Expert Tips for Achieving an Authentic Bark
The secret to a standout BBQ lies in achieving that perfect, flavorful bark. This crispy, caramelized outer layer is highly coveted in authentic BBQ. It’s the result of prolonged exposure to smoke, a well-balanced rub, and careful heat management.
So, what exactly is a bark? It’s the dark, crusty exterior that forms on the meat during the cooking process. This layer is packed with flavor and texture, making it a hallmark of great BBQ. Achieving it requires patience and attention to detail.
To enhance the outer crust while locking in moisture, start with a generous rub. A mix of brown sugar, paprika, and salt works wonders. Apply it evenly and press it into the meat. This helps create a solid base for the bark to form.
Managing the smoke flow is also crucial. Keep the top surface of the meat well exposed to the smoke. This ensures even caramelization and prevents the bark from becoming too thick or bitter. Use a spray bottle with apple juice to keep the surface moist without washing away the rub.
For an extra layer of flavor, pair the bark with a light drizzle of BBQ sauce. This adds a sweet and tangy contrast that complements the smoky crust. Remember, less is more—too much sauce can overpower the bark.
“A balanced bark is the result of patience and proper smoker management. It’s worth the effort for that authentic BBQ experience.”
Here are some expert tips to keep in mind:
- Use a consistent temperature to avoid uneven cooking.
- Rotate the meat occasionally for even exposure to smoke.
- Allow the meat to rest after cooking to let the bark set.
With these techniques, you’ll master the art of creating a flavorful, crispy bark that elevates your BBQ game. Remember, the key is patience and attention to detail. Happy smoking!
Mastering Smoking Pork Shoulder Temperature
Have you ever noticed your meat’s temperature suddenly stops rising during cooking? This is known as the stall phase, a natural part of the BBQ process. Understanding and navigating this phase is key to achieving tender, flavorful results.
Navigating the Stall Phase
The stall occurs when the internal temperature of the meat plateaus, often around 150°F to 170°F. This happens because the meat’s moisture evaporates, cooling the surface and slowing the cooking process. While it can be frustrating, the stall is essential for breaking down connective tissue and creating tender pulled pork.
Monitoring the temp is more important than strictly following time guidelines. Every cut of meat is different, and the stall can last anywhere from one to several hours. Relying on a thermometer ensures you don’t overcook or undercook your dish.
Here are some strategies to navigate the stall phase:
- Wrap the meat: Use foil or butcher paper to trap heat and moisture, speeding up the process.
- Adjust the heat: Slightly increase the smoker’s temperature to push through the stall.
- Be patient: Let the process unfold naturally for the best results.
Remember, the stall is a sign that your meat is on its way to becoming tender and juicy. By focusing on internal temperature and using these strategies, you’ll master this phase and achieve BBQ perfection.
Wrapping and Resting the Meat
The final steps of wrapping and resting your meat can make all the difference in achieving that perfect BBQ texture and flavor. These techniques ensure your dish stays juicy, tender, and packed with smoky goodness. Let’s dive into the details to help you master this crucial phase.
When and How to Wrap in Foil
Wrapping your meat in foil is a game-changer. Once the internal temperature reaches around 160°F, it’s time to wrap. This step helps retain moisture and heat, allowing the meat to continue cooking evenly.
To wrap, place the meat on a large sheet of foil. Ensure the shiny side faces inward to reflect heat. Fold the edges tightly to create a seal, trapping steam and juices inside. This method prevents the meat from drying out and enhances tenderness.

Handling the Bone and Fat
After cooking, carefully remove the bone and any excess fat. Use heat-resistant gloves to handle the hot meat. The bone should slide out easily if the meat is fully cooked. Discard any large pieces of fat, but keep the rendered juices for added flavor.
The Importance of Resting
Resting the meat is just as important as cooking it. Let it sit in the foil for at least 30 minutes. This allows the juices to redistribute, resulting in a juicier, more flavorful end product. The liquid inside the wrap also helps enhance flavor penetration.
Here’s a quick summary of the key steps:
| Step | Details |
|---|---|
| Wrapping | Wrap at 160°F to retain moisture and heat. |
| Handling | Remove bone and excess fat carefully. |
| Resting | Rest for 30 minutes to redistribute juices. |
By following these tips, you’ll ensure your meat is tender, juicy, and bursting with flavor. Happy BBQing!
Reheating and Freezing Your Smoked Pork
Preserving the flavor and texture of your smoked pork after cooking is just as important as the smoking process itself. Whether you’re reheating leftovers or freezing for later, these tips will ensure your dish stays delicious and tender.
Best Practices for Reheating
Reheating smoked pork properly is key to maintaining its moisture and flavor. One effective method is using a skillet. Heat it over medium-low, add a splash of apple juice or cider, and gently warm the meat. This helps reintroduce moisture without drying it out.
Another option is to use your smoker. Set it to 225°F, wrap the meat in foil, and let it heat slowly. This method preserves the smoky flavor and keeps the meat tender. For a quicker approach, simmer the pork in a pot with a bit of liquid until warmed through.
Tips for Proper Storage and Freezing
Proper storage is essential to keep your smoke pork fresh and flavorful. For short-term storage, place the meat in an airtight container and refrigerate for up to four days. Adding a light spritz of apple juice before sealing can help retain moisture.
For longer storage, freezing is your best bet. Wrap the meat tightly in foil or plastic wrap, then place it in a freezer-safe bag. Remove as much air as possible to prevent freezer burn. Label the bag with the date to keep track of freshness.
Here’s a quick guide to reheating and freezing:
| Method | Details |
|---|---|
| Skillet Reheating | Use low heat and add apple juice for moisture. |
| Smoker Reheating | Wrap in foil and heat at 225°F for smoky flavor. |
| Freezing | Wrap tightly and remove air to prevent freezer burn. |
“Thoughtful storage and reheating techniques ensure your smoked pork remains a crowd-pleaser, even days later.”
By following these steps, you’ll keep your smoked pork juicy, flavorful, and ready to enjoy anytime. Happy cooking!
Enhancing Flavor with Sauces and Rubs
The right combination of sauces and rubs can transform your BBQ from good to unforgettable. These elements add depth, complexity, and a personal touch to your dish. Whether you prefer sweet, tangy, or spicy, there’s a pairing that will elevate your meal to the next level.
Homemade BBQ Sauce Pairings
Creating your own sauce allows you to tailor the flavor to your liking. A classic homemade BBQ sauce combines ketchup, brown sugar, vinegar, and spices. For a tangy twist, add mustard or apple cider vinegar. If you enjoy heat, incorporate chili powder or hot sauce.
Pairing the right sauce with your dish is key. A sweet and smoky sauce complements the rich flavor of pulled pork, while a tangy vinegar-based sauce adds a refreshing contrast. Experiment with different combinations to find your favorite.
Customizing Your Rub
A good rub is the foundation of great flavor. Start with a base of salt, sugar, and paprika, then add spices like garlic powder, onion powder, or cayenne pepper. For a unique twist, try incorporating coffee grounds or cocoa powder for a deep, earthy flavor.
Customizing your rub allows you to create a signature blend that suits your taste. Apply it generously to the meat, pressing it into the surface for maximum flavor penetration. This step ensures every bite is packed with deliciousness.
Serving Ideas
Presentation is just as important as preparation. Serve your pulled pork on a soft bun with a tangy slaw on the side. The crunch of the slaw adds texture, while the acidity balances the richness of the meat.
For a more casual approach, use the pork as a topping for nachos or tacos. Add a drizzle of your favorite sauce for an extra burst of flavor. The possibilities are endless, so don’t be afraid to get creative.
“The best BBQ is the one that reflects your personal taste. Experiment with flavors and techniques to make it your own.”
By exploring different sauces, rubs, and serving ideas, you’ll create a dish that’s uniquely yours. Remember, the key to great BBQ is balance—so mix and match flavors to find the perfect combination. Happy cooking!
Additional Chef Tips and Variations
Elevating your BBQ game involves more than just following a recipe—it’s about adding your personal touch. With a few advanced techniques, you can customize your dish to suit your unique flavor preferences. Let’s explore some expert tips to help you take your BBQ to the next level.
Customizing Your Rub and Spritz
Your rub and spritz are the foundation of flavor. Start with a basic blend of salt, sugar, and paprika, then experiment with spices like garlic powder, cumin, or chili flakes. For a smoky twist, add a touch of smoked paprika or coffee grounds. These small tweaks can create a signature flavor that’s uniquely yours.
When applying the rub, press it firmly into the meat to ensure it sticks. For the spritz, use a mix of apple cider vinegar and water to keep the surface moist during cooking. Adding a splash of apple juice can enhance sweetness and caramelization.

Alternative Wood and Flavor Enhancements
Choosing the right wood can dramatically change the flavor profile of your dish. While hickory and apple are popular, consider experimenting with cherry or pecan for a fruity or nutty twist. Each wood type brings its own unique aroma and taste to the table.
For a deeper flavor, try using a pellet smoker. These devices offer precise temperature control and consistent smoke output, making them ideal for beginners and pros alike. Alternatively, traditional charcoal setups provide a classic, smoky flavor that’s hard to beat.
Injections are another way to add moisture and flavor. Use a marinade or broth and inject it into the meat before cooking. This technique ensures every bite is juicy and flavorful. Be mindful of where you place the needle to distribute the liquid evenly.
“The beauty of BBQ lies in its versatility. Don’t be afraid to experiment with different woods, rubs, and techniques to find your perfect combination.”
Here are some quick tips to keep in mind:
- Use precise cuts to ensure even cooking and flavor distribution.
- Experiment with different wood types to find your favorite flavor profile.
- Try a pellet smoker for consistent results and ease of use.
- Use injections to add moisture and enhance flavor.
By incorporating these variations, you can make the recipe your own while maintaining quality. Remember, the best BBQ is the one that reflects your personal taste. Happy cooking!
Conclusion
Creating a mouthwatering BBQ masterpiece is simpler than you might think when you follow expert techniques. Start by selecting the right cut, whether it’s a pork butt or another flavorful option. Proper preparation, like trimming excess fat and applying a mustard binder, sets the stage for success.
Maintaining the ideal temp in your smoker is crucial. Use a reliable thermometer to monitor the internal temperature and avoid overcooking. Experiment with different woods like hickory or fruit varieties to enhance the flavor profile.
Don’t forget the importance of resting your meat. This step locks in juices and ensures a tender, flavorful result. Pair your dish with a homemade sauce or a tangy cider spritz for an extra layer of taste.
With patience and attention to detail, you can create restaurant-quality pulled pork every time. These chef-approved techniques make the process enjoyable and rewarding. Happy grilling!
FAQ
What’s the difference between pork butt and pork shoulder?
Pork butt comes from the upper part of the shoulder, while pork shoulder is from the lower section. Both are great for smoking, but pork butt tends to have more marbling, making it juicier.
What’s the best wood for smoking pork shoulder?
Hickory and apple wood are popular choices. Hickory adds a strong, smoky flavor, while apple wood offers a sweeter, milder taste. You can also mix them for a balanced profile.
How long does it take to smoke a pork shoulder?
It typically takes 1.5 to 2 hours per pound at 225°F. Plan for 8 to 12 hours, depending on the size of the cut. Patience is key for tender, flavorful results.
What’s the ideal internal temperature for smoked pork shoulder?
Aim for an internal temp of 195°F to 205°F. This ensures the meat is tender enough to pull apart easily. Use a reliable meat thermometer to check.
Should I wrap the pork shoulder in foil during smoking?
Wrapping in foil, also known as the Texas crutch, helps speed up cooking and keeps the meat moist. Do this during the stall phase, around 160°F to 170°F internal temperature.
Can I use a dry rub for pork shoulder?
Absolutely! A dry rub with brown sugar, paprika, garlic powder, and other spices adds flavor and helps create a delicious bark. Apply it generously before smoking.
How do I reheat smoked pork shoulder without drying it out?
Reheat it in the oven at 250°F, wrapped in foil with a splash of apple juice or broth. This keeps it moist and flavorful. Avoid microwaving to prevent dryness.
Can I freeze smoked pork shoulder?
Yes! Store it in airtight containers or freezer bags for up to 3 months. Thaw in the fridge overnight before reheating for the best texture.
What’s the stall phase, and how do I handle it?
The stall happens when the meat’s internal temperature plateaus around 160°F due to evaporative cooling. Wrap the meat in foil to push through this phase faster.
What’s the best way to apply mustard before adding a rub?
Spread a thin layer of yellow mustard over the meat to help the rub stick. It won’t affect the flavor but ensures even seasoning coverage.


