


How to Sear Tuna Steaks for a Restaurant-Quality Finish
February 22, 2025
5 Secrets to Pan-Searing Sea Bass Like a Michelin Chef
February 23, 2025
I remember the first time I tried cooking fish for a dinner party. I was so excited to impress my guests, but my excitement quickly turned to panic when I realized the fish was dry and flavorless. It was a lesson I’ll never forget—cooking fish requires precision and care, especially when it comes to halibut.
Did you know that halibut is one of the leanest fish, with only 16g of fat per serving? This makes it incredibly healthy but also tricky to cook. Overcooking it by even a minute can leave it dry and tough. That’s why I’ve perfected a 4-step method to ensure your baked halibut stays tender, juicy, and full of flavor every time.
Whether you’re a beginner or a seasoned cook, this process is straightforward and works for both quick weeknight meals and special occasions. Let’s dive into the steps that will transform your halibut recipe into a crowd-pleaser.
Key Takeaways
- Halibut is lean and can dry out easily if overcooked.
- Proper seasoning and butter balance are key to flavor.
- Cooking time should be precise—12-14 minutes at 400°F.
- Use garlic, lemon, and butter for a delicious flavor profile.
- This method is perfect for both beginners and experienced cooks.
Introduction: My Journey with Halibut Recipes
Growing up, seafood was never a staple in my household, but that changed when I discovered halibut. It was during a family dinner at a coastal restaurant that I first tasted this delicate fish. The flavor was unlike anything I’d experienced—mild, yet rich, and perfectly tender. That meal sparked my curiosity and led me to explore halibut recipes in my own kitchen.
At first, cooking fish felt intimidating. I worried about overcooking it or losing its natural flavor. But halibut became my gateway to mastering seafood dishes. I started experimenting with simple techniques, like seasoning it with pepper and cooking it in the oven for just a few minutes. These small steps made a big difference.
What I love most about halibut is its versatility. Whether pan-seared, grilled, or baked, it adapts beautifully to different flavors. Over time, I’ve learned that the key to a great recipe lies in precision—timing and temperature are everything. This journey has not only improved my cooking skills but also deepened my appreciation for seafood.
How I Discovered My Love for Seafood
My love for seafood grew gradually. It began with halibut but expanded to include other varieties of fish. I realized that fresh ingredients and careful preparation could transform even the simplest dish into something extraordinary. Cooking became less about following instructions and more about understanding the process.
One of my biggest breakthroughs was learning to trust the oven. Baking halibut at the right temperature ensured it stayed moist and flavorful. I also discovered the importance of balancing seasonings—just a pinch of pepper could elevate the dish without overpowering it. These lessons have shaped my approach to cooking and inspired me to share my experiences with others.
Why I Love Baking halibut
There’s something incredibly satisfying about creating a dish that’s both healthy and delicious. For me, halibut has always been a standout choice. Its mild, sweet flavor and tender texture make it a versatile option for any dinner table. Whether you’re cooking for a special occasion or a quick weeknight meal, this fish never disappoints.
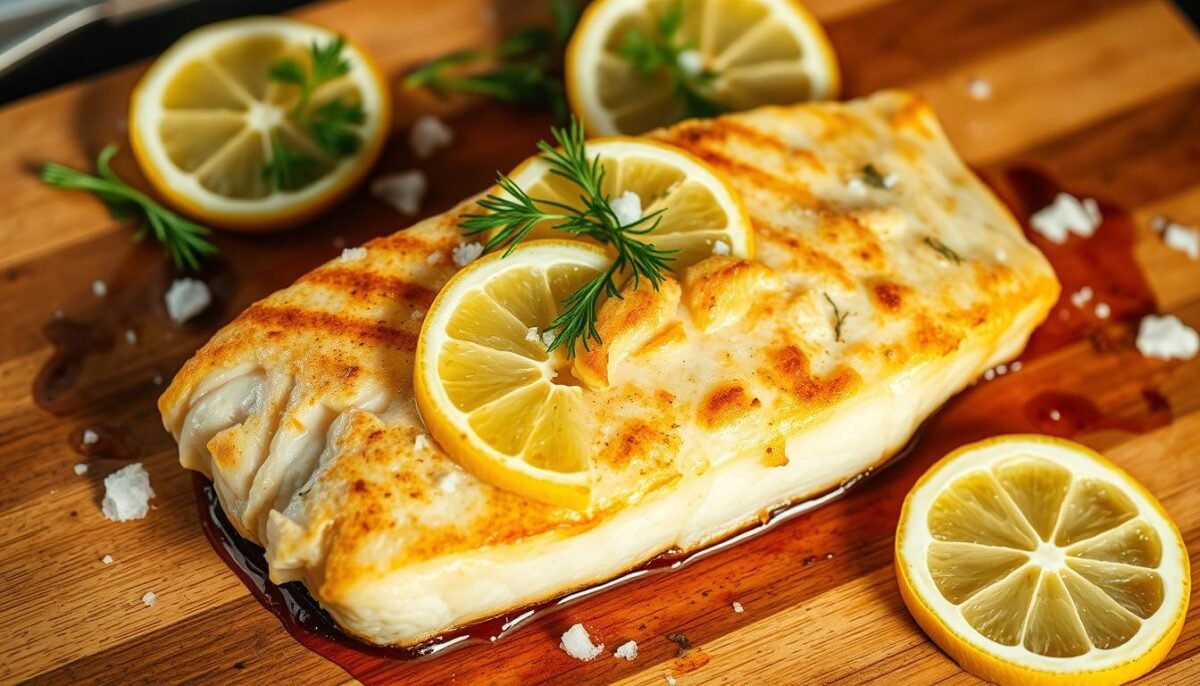
Flavor and Texture Highlights
What I love most about halibut is its delicate, flaky texture. When cooked just right, it practically melts in your mouth. The natural sweetness of the fish pairs beautifully with a squeeze of lemon and a sprinkle of fresh parsley. These simple additions enhance the flavor without overpowering it.
Timing is crucial when preparing this dish. Overcooking can lead to dryness, so I always keep a close eye on the time. Baking it at 400°F for 12-14 minutes ensures it stays moist and tender. This method locks in the natural juices, creating a dish that’s both flavorful and satisfying.
Health and Nutritional Benefits
Beyond its taste, halibut is a nutritional powerhouse. It’s packed with high-quality protein, making it an excellent choice for a balanced meal. With only 16g of fat per serving, it’s also a lean option for those watching their calorie intake.
This fish is rich in essential vitamins and minerals, including Vitamin A and potassium. These nutrients support overall health and well-being. For a deeper dive into cooking techniques that preserve these benefits, check out this guide on baking fish like a pro.
Essential Ingredients and Seasonings for a Perfect Halibut Meal
The secret to a perfect fish dish lies in the quality of its ingredients. For a flavorful and tender result, I rely on a few key components: butter, garlic, and lemon. These elements not only enhance the natural taste but also help maintain moisture during cooking.
Key Ingredients: Butter, Garlic, and Lemon
Butter is my go-to for adding richness and preventing dryness. It creates a golden crust while keeping the fish tender. Freshly minced garlic adds a robust flavor that pairs beautifully with the mildness of the fish. A squeeze of lemon brightens the dish, balancing the richness of the butter and the savory notes of the garlic.
These ingredients work together to create a harmonious flavor profile. The butter locks in moisture, the garlic provides depth, and the lemon adds a refreshing finish. It’s a combination that never fails to impress.
Substitutions and Pantry Staples
When fresh ingredients aren’t available, pantry staples can save the day. Olive oil can replace butter for a lighter option. Garlic powder works in place of fresh garlic, though it’s best to use it sparingly. Bottled lemon juice can substitute for fresh lemon, but fresh is always preferred for its vibrant flavor.
Seasoning is another critical factor. A pinch of salt enhances the natural taste, while black pepper adds a subtle kick. Paprika or smoked paprika can introduce a smoky depth, perfect for variety. Always taste as you go to ensure the seasoning doesn’t overpower the fish.
These ingredients also pair well with side dishes. Whether it’s roasted vegetables, a fresh salad, or a grain like rice, the flavors complement each other beautifully. The result is a balanced meal that’s both satisfying and nutritious.
Step-by-Step Halibut Recipe Walkthrough
Cooking fish has always been a rewarding challenge for me, especially when it comes to mastering the perfect recipe. Today, I’ll walk you through the process of preparing a delicious dish that’s both simple and flavorful. Let’s start with prepping the fish and creating a rich garlic herb butter.
Prepping the Fresh Halibut
Begin by selecting fresh fillets. Ensure they’re cleaned and deboned properly. Pat them dry with a paper towel to remove excess moisture. This step is crucial for achieving a golden crust.
Next, season the fillets lightly with salt and pepper. Place them in a greased baking dish, arranging them evenly for consistent cooking. This ensures each piece cooks at the same rate.
Making the Garlic Herb Butter
For the garlic herb butter, melt 2 tablespoons of unsalted butter in a small saucepan. Add 3 cloves of minced garlic and sauté until fragrant. Stir in fresh herbs like parsley or dill for added flavor.
Once the mixture is ready, drizzle it over the fillets. This not only enhances the taste but also keeps the fish moist during cooking. For a printable recipe card, click here.
| Ingredient | Quantity |
|---|---|
| Unsalted Butter | 2 tablespoons |
| Garlic | 3 cloves |
| Fresh Herbs | 1 tablespoon |
Following these steps ensures a dish that’s rich in flavor and perfectly cooked. Don’t forget to print the recipe for easy reference. Your guests will vote this dish a winner!
Baking halibut: Techniques to Keep It Moist
Perfecting the art of cooking fish has always been a journey of trial and error for me. One of the most important lessons I’ve learned is that precision in oven settings and timing is key to retaining moisture. Let me share my favorite techniques to ensure your dish turns out perfectly every time.
Oven Settings and Timing Strategies
Setting your oven to the right temperature is crucial. I recommend preheating it to 400°F or 425°F, depending on the thickness of the fillets. This ensures even cooking and prevents the fish from drying out. A lightly oiled baking dish also helps promote even heat distribution.
Timing is another critical factor. For fillets that are about 1 inch thick, 12-16 minutes is usually perfect. Always check the internal temperature with a thermometer—it should reach 145°F for properly cooked seafood. Overcooking can ruin the texture, so keep a close eye on the clock.
Here’s a quick reference table for cooking times based on fillet thickness:
| Fillet Thickness | Cooking Time |
|---|---|
| 1 inch | 12-14 minutes |
| 1.5 inches | 14-16 minutes |
| 2 inches | 16-18 minutes |
Another way to lock in moisture is to brush the fillets with oil before baking. This creates a protective layer that keeps the fish tender. I prefer using avocado oil because of its high smoke point, but olive oil works well too.
Understanding cooking time and oven settings is the best way to achieve a succulent, moist result. These tips have transformed my seafood dishes, and I’m confident they’ll do the same for you.
Adjusting Cooking Time and Oven Settings
Getting the texture just right is a skill I’ve honed over years of experimenting in the kitchen. One of the most important factors is adjusting the cooking time and oven settings. Even a slight change can make a big difference in the final result.
For fillets that are about 1 inch thick, I recommend cooking them for 12-14 minutes at 400°F. Thicker cuts may need an extra 2-4 minutes. Always check the internal temperature with a thermometer—it should reach 145°F for perfectly cooked fish.
Temperature Tips for Tender Fish
Preheating the oven is crucial. I set mine to 400°F for most recipes. This ensures even heat distribution and prevents the fish from drying out. A lightly oiled baking dish also helps lock in moisture.
Adding a bit of extra fat, like butter, can make a big difference. I often create a simple mixture of melted butter, garlic, and herbs. This not only adds flavor but also forms a protective layer on the top of the fish, keeping it tender.
Here’s a quick guide to cooking times based on fillet thickness:
| Fillet Thickness | Cooking Time |
|---|---|
| 1 inch | 12-14 minutes |
| 1.5 inches | 14-16 minutes |
| 2 inches | 16-18 minutes |
Another tip is to look for visual cues. The fish should turn opaque and flake easily with a fork. These indicators let you know it’s perfectly cooked. With these techniques, you’ll achieve a moist, flavorful dish every time.
Pairing Halibut with Delicious Sides
Pairing the right sides with your main dish can elevate the entire meal. When it comes to seafood, the goal is to complement its light, delicate flavor without overpowering it. I’ve found that a mix of fresh vegetables, salads, and hearty carbs creates a balanced plate that’s both satisfying and nutritious.
Vegetable and Salad Options
Fresh vegetables are a natural choice for seafood dishes. Roasted asparagus or green beans add a crisp texture and vibrant color to your plate. For a lighter option, try a fresh salad in a vinegary bowl. Ingredients like fennel, celery, and shaved Brussels sprouts provide a refreshing crunch and are packed with vitamin C.
Another favorite of mine is a herby pea salad. It combines leeks, zucchini, and peas for a burst of freshness. If you’re looking for something seasonal, an autumn harvest salad with oranges and pomegranate is a delightful choice. These sides not only enhance the meal but also add essential nutrients to your diet.
Carb and Starch Alternatives
For heartier options, consider carb-based sides. Mashed potatoes or garlic rice are classic pairings that soak up the flavors of the dish. Couscous is another versatile choice—it’s quick to prepare and can be flavored with lemon or herbs for extra zest.
If you’re aiming for something crispy, air-fried zucchini fries or roasted sweet potatoes are crowd-pleasers. These sides are easy to prepare and can be made ahead of time. For a complete guide on selecting the best fish for your meal, check out these tips for choosing the best fish for.
| Side Dish | Preparation Time |
|---|---|
| Roasted Asparagus | 15 minutes |
| Herby Pea Salad | 10 minutes |
| Garlic Rice | 20 minutes |
| Air-Fried Zucchini Fries | 25 minutes |
When plating, I like to arrange the sides around the main dish in a baking dish for a visually appealing presentation. A sprinkle of fresh herbs or a drizzle of olive oil can tie everything together. These pairings not only enhance the flavor but also make the meal feel complete.
Variations and Substitutions for Different Tastes
One of the joys of cooking is discovering how small changes can transform a dish. While fresh halibut fillets are my go-to, I’ve found that other white fish like cod, flounder, or tilapia can work just as well. These substitutions not only cater to different tastes but also make the recipe more accessible.
Exploring Alternate White Fish Options
If halibut isn’t available, cod is a fantastic substitute. It’s affordable and has a mild flavor that pairs well with seasonings. Flounder is another great choice—its delicate texture cooks quickly and stays moist. For a budget-friendly option, tilapia works, though it has a slightly stronger taste.
When using different fillets, adjust cooking times slightly. Thicker cuts like cod may need an extra minute or two, while thinner fillets like flounder cook faster. Always check the internal temperature to ensure it reaches 145°F for perfect doneness.
Swapping Butter for Olive Oil
While butter adds richness, olive oil is a lighter alternative that still keeps the fish moist. I’ve found that using olive oil enhances the natural flavors without overpowering them. For a Mediterranean twist, drizzle a bit of extra virgin olive oil over the dish before serving.
Here’s a quick comparison of fats and their effects:
- Butter: Adds richness and a golden crust.
- Olive Oil: Lighter, enhances natural flavors.
- Avocado Oil: High smoke point, ideal for baking.
Ensuring Moist and Flaky Results
No matter the substitution, the goal is to keep the fish moist and flaky. Brushing the fillet with oil or butter before cooking creates a protective layer. For added moisture, I sometimes add a splash of broth or white wine to the baking dish.
These small adjustments allow you to tailor the recipe to your preferences while still achieving delicious results. Whether you’re using cod, flounder, or tilapia, the key is to experiment and enjoy the process.
Troubleshooting Common Issues in Halibut Recipes
Cooking fish can be tricky, but with the right techniques, you can avoid common mistakes. Overcooking and dryness are frequent challenges, but they’re easy to fix with a few simple adjustments. Let’s explore how to troubleshoot these issues and ensure your dish turns out perfectly every time.

Preventing Dryness and Overcooking
One of the most common problems is overcooking, which leads to dry, tough fish. To prevent this, monitor the oven closely and use a thermometer to check the internal temperature. For medium doneness, aim for 130°F. Letting the fish rest for 3-5 minutes after cooking allows the heat to distribute evenly, keeping it moist.
Another great option is to use a well-seasoned herb blend. Fresh herbs like parsley or dill add flavor and help lock in moisture. A final squeeze of lemon juice can also brighten the dish and counteract any dryness.
Tips for Perfect Texture Every Time
If your fish appears overcooked, don’t panic. A quick fix is to add a touch more lemon juice or a drizzle of melted butter just before serving. These simple remedies can revive the texture and enhance the flavor.
Here’s a quick guide to achieving the perfect texture:
| Issue | Solution |
|---|---|
| Dryness | Add lemon juice or butter before serving. |
| Overcooking | Monitor internal temperature (130°F). |
| Underseasoning | Use a fresh herb blend for added flavor. |
By combining these techniques with careful ingredient choices, you can ensure a moist, flaky result every time. Whether you’re a beginner or an experienced cook, these tips will help you master the art of preparing fish.
Conclusion
Mastering the art of cooking white fish has taught me the importance of precision and patience. By focusing on quality ingredients, timing, and the right seasonings, you can create a dish that’s both flavorful and tender. Fresh herbs and a splash of lemon juice elevate the natural taste, making every bite a delight.
This recipe’s versatility allows you to pair it with a variety of sides. A fresh salad or roasted vegetables complements the dish perfectly, adding balance to your meal. Whether you’re cooking for a weeknight dinner or a special occasion, these tips ensure success.
I encourage you to try this recipe and experiment with different combinations. Share your feedback and let me know how it turns out! For more kitchen tips and delicious recipes, follow me on social media. Happy cooking!
FAQ
How do I keep my halibut from drying out in the oven?
To keep your fish moist, bake it at 375°F and use a garlic herb butter mixture. Cover it with foil for the first half of the cooking time to lock in moisture.
What are the best seasonings for halibut?
I love using garlic, lemon juice, parsley, and a pinch of salt and pepper. These ingredients enhance the natural flavor of the fish without overpowering it.
Can I use other types of white fish for this recipe?
Absolutely! Cod, haddock, or sea bass work well as substitutes. Just adjust the cooking time slightly based on the thickness of the fillet.
What sides pair well with baked halibut?
I recommend roasted vegetables like asparagus or zucchini, a fresh green salad, or a side of quinoa or rice for a complete meal.
How long should I bake halibut?
For a 1-inch thick fillet, bake it for about 12-15 minutes. Thicker cuts may need a few extra minutes, but always check for flakiness with a fork.
Can I use olive oil instead of butter?
Yes, olive oil is a great alternative. It adds a lighter flavor and still helps keep the fish tender and juicy.
What’s the best way to prep halibut before baking?
Pat the fillet dry with paper towels, season it generously, and let it sit at room temperature for 10-15 minutes before placing it in the oven.
How do I know when the halibut is done?
The fish should be opaque and flake easily with a fork. An internal temperature of 145°F is a good indicator it’s ready to serve.


