


Peruvian Cuisine 101: Ceviche, Lomo Saltado, and More
April 30, 2025
Discovering Portuguese Cuisine: Pastéis de Nata and Beyond
April 30, 2025
I’ll never forget the first time I tasted soft, tangy bread cradling a vibrant stew at a friend’s dinner party. The meal felt like a warm embrace – unfamiliar yet deeply comforting. That night sparked my obsession with recreating those bold flavors in my own kitchen.
Years later, I still laugh about my early attempts. My first batch of batter turned into a sticky mess, and my stove looked like a modern art project. But through trial and error, I discovered how time-honored techniques transform simple ingredients into something magical.
This guide walks you through everything I’ve learned. We’ll explore both traditional and modern methods for creating that signature slightly sour taste. You’ll master the art of fermentation – the secret behind the bread’s airy texture – using easy-to-find teff flour.
Whether you’re hosting a dinner party or craving new weeknight flavors, these recipes adapt beautifully to American kitchens. The best part? That spongy flatbread becomes your edible utensil, perfect for scooping up every last drop of richly spiced stew.
Key Takeaways
- Teff flour forms the foundation of authentic sourdough flavor
- Natural fermentation creates the bread’s signature air pockets
- One versatile flatbread works with countless meal combinations
- Traditional methods can be adapted for modern kitchens
- Spice blends build complex flavors in vegetarian-friendly stews
- Proper batter consistency ensures perfect cooking results
Overview of Ethiopian Injera and Spicy Wot Stew
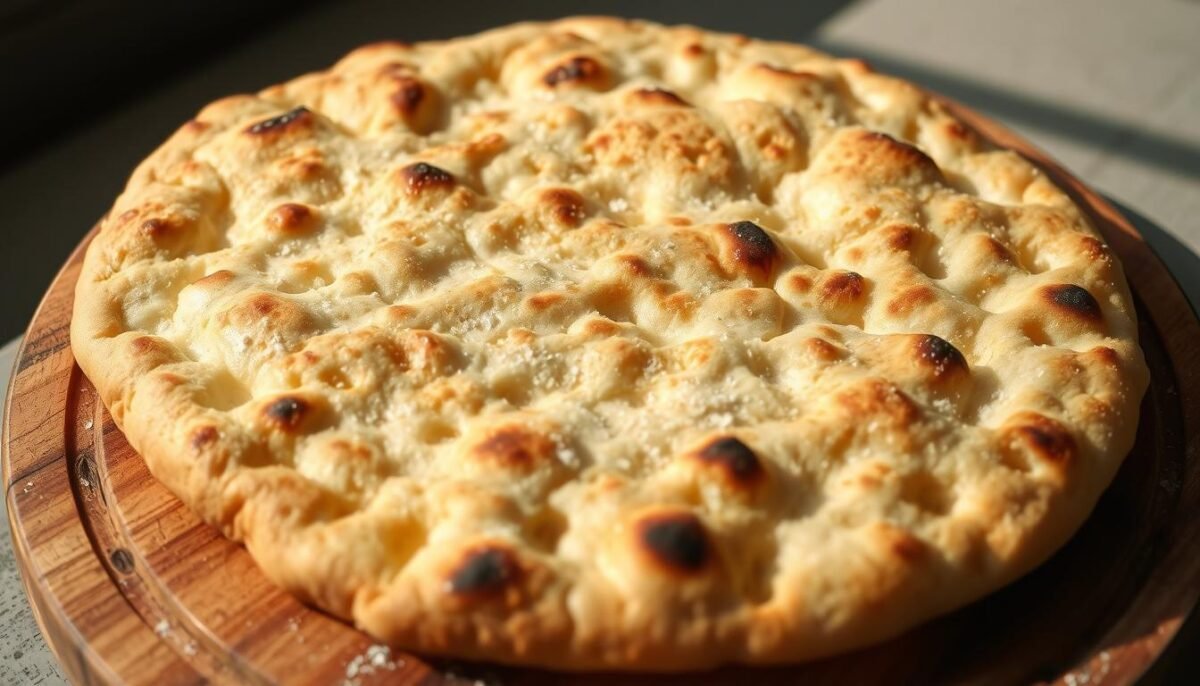
Imagine a meal where every bite connects you to centuries of culinary tradition. At its heart lies a spongy, sour flatbread – the foundation of countless dishes. This versatile bread doubles as both plate and utensil, soaking up richly spiced stews in every tear-and-scoop motion.
The star companion? A vibrant slow-simmered stew bursting with aromatics. Think caramelized onions, garlic, and berbere spice blend creating layers of warmth. It’s the yin to the bread’s tangy yang – each enhancing the other’s complexity.
What truly makes these dishes special is how they’re shared. Meals become interactive experiences on large platters, where everyone eats with their hands. I’ve found this communal style breaks down barriers faster than any icebreaker game.
Traditional preparation relies on natural fermentation – that’s where the signature sour notes come alive. While purists swear by days-long methods, I’ll show you clever shortcuts for weeknight cooking. Whether you choose patience or practicality, quality ingredients make all the difference.
Mastering these staples opens doors to endless variations. Once you nail the basic techniques, you’ll be riffing on flavors like a seasoned pro. Let’s start building your foundation with methods that adapt to any schedule.
Essential Ingredients and Tools for Authentic Preparation
Creating authentic flavors starts with choosing the right components. My kitchen experiments taught me that teff flour is non-negotiable – its nutty taste and gluten-free properties form the bread’s backbone. For texture balance, I mix it with rice or buckwheat flour, depending on what’s in my pantry.
Three elements make or break your batter: salt enhances fermentation, oil prevents sticking, and filtered water controls thickness. I learned this the hard way after a salty batch overpowered the tangy notes I love. Now I measure precisely.
Your tools matter as much as ingredients. A nonstick pan with low edges works best for those lacy edges. My first attempts with a regular skillet left me scraping dough – not ideal when you’re hosting friends. Keep a thin spatula nearby for quick flips.
| Ingredient | Traditional Use | US Store Equivalent | Purpose |
|---|---|---|---|
| Teff Flour | 100% pure | Gluten-free aisle | Base flavor |
| Salt | Sea salt | Fine grain | Fermentation aid |
| Oil | Niter kibbeh | Avocado oil | Non-stick surface |
| Club Soda | Natural bubbles | Sparkling water | Batter lift |
National grocery chains now carry teff in the gluten-free section, though I prefer specialty stores for fresher options. Don’t stress if your blend isn’t perfect – my early mixes used 50% all-purpose flour and still delighted guests. The key lies in balancing tradition with what’s available.
Through trial and error, I discovered that ingredient quality directly affects those signature air pockets. Cheap pans create uneven heat, while stale flour yields dense results. Invest in reliable basics, and your efforts will rise – literally.
Exploring Traditional vs. Quick Injera Methods
My kitchen counter once hosted two identical bowls of batter – one bubbling slowly, the other fizzing urgently. This experiment taught me that great results come through different paths. Let’s unpack both approaches so you can choose your culinary adventure.
Time-Honored Technique
The classic method thrives on patience. You’ll mix teff flour with water and a spoonful of existing starter. Over 72 hours, natural microbes work their magic. I’ve found keeping the bowl at 75°F creates ideal conditions for developing that distinctive tang.
Watch for bubbles forming a lace-like pattern – nature’s progress report. The batter should smell pleasantly sour, like ripe apples. This slow dance between flour and microbes creates those signature air pockets everyone loves.
Modern Kitchen Hack
When time’s tight, I reach for instant yeast. A teaspoon jumpstarts fermentation in hours rather than days. Adding a splash of lemon juice mimics the sour notes missing from rushed batches. The key? Precision measuring – too much yeast creates an unpleasant bitterness.
Both methods demand attention to batter consistency. Too thick, and you’ll get dense results. Too thin, and the bread tears easily. I test mine by dipping a spoon – it should coat the back like warm honey.
While traditional batches develop deeper flavor complexity, the quick version still delivers satisfying results. Choose based on your schedule, but remember – good things come to those who ferment (or fake it convincingly).
Mastering the Ethiopian injera wot recipe
The magic happens when airy bread meets slow-simmered spice. Creating a traditional Queen’s Platter taught me how flavors dance when balanced right. I learned this from a chef in Addis Ababa who said, “Let the bread speak, and the stew will answer.”

Start by laying your tangy base across a large platter. The porous texture acts like a flavor sponge, soaking up every drop of richly seasoned sauce. For beginners, I recommend using chickpea or lentil-based dishes – their creamy textures complement the bread’s slight acidity beautifully.
My early attempts often ended up too sour or overly spicy. Through trial and error, I discovered three balancing secrets:
| Component | Traditional Version | Modern Twist | Purpose |
|---|---|---|---|
| Base | 100% teff | Teff + oat blend | Mildens sourness |
| Protein | Lamb or beef | Mushrooms + walnuts | Adds earthy depth |
| Spice Level | Berbere-heavy | Smoked paprika + cumin | Controls heat |
| Serving Style | Communal platter | Individual bowls | Adapts to small kitchens |
Layering is everything. Spread your bread first, then artfully arrange stew portions. Let guests tear pieces from the edges – it’s half the fun! I still smile remembering my first successful platter, where the last bite tasted as vibrant as the first.
Don’t fear adjustments. One home cook’s “too tangy” is another’s perfect bite. Start with smaller batches, taste as you go, and let the ingredients guide you. As my mentor reminded me: “Good cooking listens more than it shouts.”
Step-by-Step Guide to Making Injera Batter
I once thought batter was just flour and water – until my third kitchen disaster taught me better. The difference between gummy disappointment and airy perfection lies in precise ratios and patient mixing. Let me walk you through the method that finally worked for my busy schedule.
Start with 1 cup teff flour and ½ cup rice flour in a large bowl. Add ¼ teaspoon salt – this isn’t just for taste, it stabilizes fermentation. Slowly pour in 1¾ cups lukewarm water while whisking clockwise. Why clockwise? An Ethiopian friend once told me it helps create even bubbles, and I’ve stuck with it ever since.
Your goal is pancake batter texture – smooth but not runny. Test it by lifting your whisk: the mixture should ribbon back into the bowl. Too thick? Add water 1 tablespoon at a time. Too thin? Sprinkle in extra teff. I keep a spray bottle nearby to mist the surface during resting – this prevents crust formation.
| Ingredient | Measurement | Purpose |
|---|---|---|
| Teff flour | 1 cup | Base flavor |
| Rice flour | ½ cup | Texture balance |
| Water | 1¾ cups | Hydration |
| Salt | ¼ tsp | Fermentation control |
For rushed days, swap ½ cup water with club soda – the bubbles mimic natural fermentation. Cover the bowl with cheesecloth and let it sit overnight. You’ll know it’s ready when tiny bubbles dot the surface like constellations. Remember: Good batter waits for no one – use it within 12 hours of peak fermentation.
My golden rule? Taste a cooked spoonful before making the full batch. Adjust water or salt as needed. This foundation determines everything – get it right, and your main dish will sing.
Precise Cooking Techniques for Perfect Injera
The sizzle of batter hitting hot metal still makes my shoulders relax – it’s the sound of success after years of burnt edges and torn centers. Getting that golden-brown lace pattern requires equal parts science and intuition. Let’s break down the make-or-break steps I’ve perfected through countless breakfast experiments and late-night snack attempts.
Proper Skillet Preparation
Your pan is the stage where magic happens. I use a 10-inch nonstick skillet – anything smaller limits swirling room. Heat it medium-low for 3 minutes before adding oil. My trick? Fold a paper towel into quarters, dip it in avocado oil, and wipe the surface. This creates an invisible barrier without greasiness.
Test the temperature by flicking water droplets. They should dance, not evaporate instantly. I learned this the hard way when my first batch stuck like glue. Now I keep a spray bottle nearby for quick misting between batches. Consistent heat matters more than high heat.
Achieving the Right Batter Consistency
The perfect pour feels like writing with liquid silk. Aim for room-temperature batter that flows like heavy cream. Pour ¼ cup into the center, then immediately tilt and rotate the pan. Within seconds, you’ll have an even 9-inch circle. Too thick? Add water teaspoon by teaspoon.
Watch for tiny bubbles forming across the surface – nature’s timer. Edges will curl upward when ready. Don’t flip it! This isn’t pancakes. Slide a thin spatula underneath once the top looks dry. My aha moment came when I stopped chasing picture-perfect rounds and embraced the rustic charm of irregular edges.
Keep cooked pieces under a clean kitchen towel. The steam softens them into that signature flexible texture. Remember: Every batch teaches something new. Even my “mistakes” now get devoured by hungry friends.
Troubleshooting Common Injera Issues
My kitchen walls still bear witness to my early struggles – splattered batter and smoke alarms singing backup. Through countless trials, I’ve decoded why delicate breads sometimes rebel against our best efforts. Let’s tackle the most frequent hiccups with solutions that actually work.
Solving Sticking Problems
That heart-sinking moment when your creation clings to the pan? Usually three culprits: wrong temperature, inadequate oil, or impatient flipping. Here’s how I fixed it:
| Issue | Causes | Quick Fix |
|---|---|---|
| Center sticks | Pan too hot | Reduce heat by 25% |
| Edges tear | Underseasoned pan | Rub with oiled paper towel |
| Full adhesion | Batter too thick | Add 1 tbsp water at a time |
An Ethiopian chef once told me, “The pan should whisper, not shout”. I keep mine at medium-low (325°F) and re-oil lightly between batches using a folded paper towel. Silicone spatulas work better than metal for gentle lifts.
Adjusting Batter Thickness
Texture issues often trace back to inconsistent batter. Too runny? Mix in rice flour teaspoon by teaspoon until it coats a spoon evenly. Too dense? Let it ferment 30 extra minutes – natural bubbles will lighten it up.
My golden ratio for adjustments:
- 1 tsp rice flour thickens ½ cup batter
- 2 tbsp water thins 1 cup mixture
- 10-minute rest equalizes hydration
Remember, humidity affects flour absorption. On muggy days, I reduce water by 1 tablespoon upfront. A chef friend swears by the “wrinkle test” – cooked edges should form gentle waves, not cracks.
How to Make Spicy Wot Stew
The aroma of caramelizing onions and spices always signals the start of something magical in my kitchen. For this bold dish, I begin by sautéing diced onions until they turn golden – about 15 minutes of patient stirring. This foundation builds the stew’s deep, savory character that clings perfectly to soft flatbread.

Here’s where timing matters: Add berbere spice blend (2 tablespoons for medium heat) and garlic when onions soften. Toast them just 60 seconds – any longer risks bitterness. Deglaze with tomato paste and broth, then simmer your protein or veggies. I’ve found 45 minutes creates tender textures without mushiness.
My secret weapon? A splash of red wine vinegar stirred in during the last 10 minutes of cooking. It brightens the rich flavors without overpowering. Taste as you go – balance the heat with a pinch of sugar if needed, or amp it up with extra chili flakes.
| Ingredient | Traditional Measure | My Adjustment |
|---|---|---|
| Berbere | 3 tbsp | 2 tbsp + 1 tsp smoked paprika |
| Simmer Time | 60 minutes | 45-50 minutes |
| Acidity | Lemon juice | Red wine vinegar |
Serve it piping hot over that tangy flatbread you’ve mastered. The spongy texture soaks up every drop of sauce, creating perfect bites where fiery stew meets cooling sour notes. Trust me – leftovers taste even better as flavors meld overnight.
Serving and Plating Your Ethiopian Meal
The first time I served a communal platter, my guests’ eyes lit up like festival lights – that’s when plating became part of the recipe for me. Presentation transforms humble ingredients into an invitation, where every visual detail whispers, “Come taste something special.”
Artful Arrangements
I create edible landscapes by tearing soft flatbread into crescent shapes. Rolling pieces into tight spirals adds height and makes grabbing effortless. Place stew portions in small bowls at the platter’s center – it keeps sauces contained while showcasing their rich color.
Vibrant garnishes turn functional into fabulous. Scatter quick-pickled carrots or radish slices around the edges. Their bright acidity cuts through rich flavors while adding crunch. Fresh herbs like cilantro or parsley sprigs bring life to monochrome dishes.
Temperature Tactics
Warm your serving platter slightly to keep bread flexible. Layer pieces slightly overlapping – this traps steam and prevents drying. For large gatherings, I cover the base with a clean linen napkin beneath the bread. It absorbs excess moisture without sacrificing texture.
Contrast creates visual drama. Pair deep red stews with pale yellow split pea puree. Add a drizzle of herb oil in zigzag patterns for restaurant-worthy flair. Remember: Edible beauty should enhance taste, not compete with it.
Don’t fear asymmetry. My favorite platters mix orderly stew mounds with casually tossed greens. Let ingredients spill slightly onto the bread’s edges – it whispers, “Dig in, this is meant to be shared.” Your table becomes the canvas; each meal, a new masterpiece.
Nutritional Insights and Health Benefits of Injera
Nutrition labels rarely tell the full story, but when I analyzed my homemade batches, the numbers surprised me. A single 10-inch piece packs about 160 calories with 3g of protein and 33g of carbohydrates. What makes it stand out? The fermentation process unlocks nutrients that ordinary flatbreads simply can’t match.

Teff flour – the foundation of authentic versions – delivers 15% of your daily iron needs per serving. For someone like me who avoids red meat, this grain became a game-changer. Its natural resistant starch acts as a prebiotic, feeding gut bacteria while keeping blood sugar levels steady.
| Nutrient | Teff Version | Whole Wheat Bread |
|---|---|---|
| Calories | 160 | 140 |
| Iron | 2.5mg | 1.1mg |
| Fiber | 3g | 2g |
Three days of fermentation do more than create tangy flavor. They break down phytic acid, boosting mineral absorption by up to 50%. My nutritionist friend explained it like this: “Time turns teff into a nutrient highway your body can actually use.”
For those watching their digestion, the bubbly batter works wonders. The lactic acid produced during resting makes this food easier on sensitive stomachs. I’ve found it digests smoother than most gluten-free options, leaving me energized rather than sluggish.
Next time you reach for wraps or pita, consider this spongy alternative. With its balanced mix of complex carbs and essential minerals, it transforms meals into nourishing experiences. Your taste buds – and gut – might just thank you.
Customizing Recipes for Home Cooking
When I first tried making the bread at home, I panicked—no teff flour in sight. That moment taught me flexibility matters as much as tradition. Now I keep a notebook of successful swaps for when specialty ingredients aren’t available.
Flour Flexibility Made Simple
Through trial and error, I discovered balanced blends create similar results to pure teff. All-purpose flour adds structure, while rice or oat varieties lighten the texture. My go-to mix combines equal parts teff and rice flour for tender results.
| Flour Type | Best For | Ratio | Effect |
|---|---|---|---|
| All-Purpose | Structure | 30% | Firmer edges |
| Rice | Texture | 50% | Softer center |
| Oat | Mildness | 20% | Reduces sourness |
| Buckwheat | Color | 15% | Darker hue |
Time adjustments matter too. Blends with wheat ferment faster—check bubbles every 12 hours. For tanginess without long waits, add ½ tsp lemon juice per cup of batter. It mimics traditional sour notes beautifully.
Small changes create big differences. Swap just 10% of teff with cornstarch for extra flexibility. Or mix in sorghum flour for nutty undertakes. Your kitchen, your rules—as long as that signature spongy texture stays intact.
Embracing the Fermentation Process
Fermentation isn’t just a step—it’s where flavor comes alive. My first successful batch taught me that patience rewards you with complex tanginess no shortcut can match. Let’s unlock the magic happening beneath that bubbly surface.
Three Days to Tangy Perfection
Traditional methods follow a rhythmic dance:
- Day 1: Mix teff flour and water until smooth. Cover with breathable cloth. Watch for tiny bubbles forming like secret messages.
- Day 2: Stir gently each morning and evening. The mixture develops a sweet-sour scent, like apples meeting fresh dough.
- Day 3: Bubbles should lace the surface like nature’s lace. Taste a spoonful—sharp acidity means it’s ready.
I once rushed this phase, only to get bland results. Now I set reminders to check progress. As a chef friend told me: “Good batter whispers when it’s ready—never shouts.”
| Sign | What It Means | Action |
|---|---|---|
| No bubbles | Cold environment | Move to warmer spot |
| Sharp odor | Over-fermented | Use within 4 hours |
| Thick crust | Air exposure | Mist surface & stir |
Science buffs will geek out: Natural microbes break down starches, releasing lactic acid. This not only adds zing but boosts iron absorption by up to 40%. Your gut gets happy, your taste buds dance.
Struggling? Try these fixes:
- Add 1 tsp honey to jumpstart sluggish microbes
- Swap ¼ cup water with sourdough starter for instant tang
- Keep batter near yogurt makers or ovens for steady warmth
Embrace the wobbles. My best batches came from “failed” experiments. As I learned through many sticky counters: Fermentation isn’t a recipe—it’s a conversation.
History and Cultural Significance of Injera in Ethiopia
Centuries before modern ovens, cooks perfected a bread that feeds both body and community. What began as a practical way to preserve grains evolved into a cultural cornerstone. Families pass down starter cultures like heirlooms – mine came from a chef who whispered, “This batter remembers your grandmother’s hands.”
The distinctive sour taste tells a story of patience. Traditional batches ferment for three days, developing complex flavors through natural microbes. I once rushed this process and created bland results – a humbling lesson in respecting time-honored rhythms.
Color variations reveal regional pride. Lighter versions use ivory teff, while darker blends signal robust earthiness. During my travels, a host explained: “Our bread’s hue matches our soil – deep and nourishing.”
More than sustenance, this staple binds people. Meals become shared experiences where hands tear from communal platters. My first attempt hosting felt awkward until laughter broke the silence – torn edges and spilled stew creating instant connection.
Modern kitchens adapt traditions without losing soul. Quick ferments mimic tanginess, and blended flours suit local pantries. Yet the essence remains: food that carries history in every bubbly pocket. Each bite honors generations who turned necessity into art.
Personal Reflections on Ethiopian Cooking
My culinary awakening began in a cramped London flat, where smoke alarms sang backup to my early experiments. A neighbor’s laughter through thin walls became my first cooking lesson – “You’re fighting the dough, not dancing with it!” That moment reshaped how I approach every batch.

Lessons From Shared Kitchens
Amhara, an Addis Ababa-born chef I met at a food festival, taught me that good cooking listens. Her hands moved like poetry while shaping batter – a stark contrast to my frantic whisking. Three principles transformed my results:
- Let fermentation rhythms guide you, not the clock
- Imperfect edges often taste better than perfect circles
- Shared meals need laughter more than precision
Weeknight dinners became my testing ground. I discovered that swapping 20% teff with oat flour softened the tang just enough for my kids’ palates. Failed batches? Turn them into croutons or thick stew thickeners. Every “mistake” became a stepping stone.
Through trial and countless tea-stained notebooks, I learned that passion outweighs perfection. The best meals happened when I stopped worrying about exact measurements and started trusting my senses. Now my kitchen smells like camaraderie – equal parts spice, sourdough, and joy.
Pairing Injera and Wot with Complementary Sides
A vibrant platter of stew and bread becomes a symphony when accompanied by the right notes. Through countless dinner experiments, I’ve discovered how contrasting textures and temperatures elevate each bite. Let me share combinations that turn meals into flavor journeys.
Crunchy elements work magic against soft flatbread. Quick-pickled carrots or radishes add bright acidity that cuts through rich stews. My go-to mix combines thinly sliced veggies with apple cider vinegar and a pinch of sugar – ready in 20 minutes.
For creaminess without heaviness, try crumbled feta instead of traditional Ayib cheese. The saltiness balances tangy flavors beautifully. I often drizzle honey over it for guests who prefer sweet-savory twists.
| Side Dish | Traditional Version | Modern Twist | Purpose |
|---|---|---|---|
| Greens | Spiced collards | Kale with lemon zest | Adds bitterness |
| Salad | Tomato-lentil | Quinoa cucumber | Provides crunch |
| Dressing | Niter kibbeh | Yogurt-tahini | Balances heat |
| Cheese | Ayib | Goat cheese | Enhances creaminess |
Texture play makes meals memorable. I layer silky purees like spiced chickpeas beneath crispy onion rings. The contrast keeps every mouthful exciting. For weeknights, roasted cauliflower florets tossed in berbere make an easy crowd-pleaser.
Don’t fear experimentation. A friend once added mango slices to her platter – the sweetness transformed the meal. Start with small portions, adjust fat content in dressings, and let your palate guide you. After all, the best combinations often come from happy accidents.
Conclusion
Creating this vibrant meal transformed my understanding of how patience and precision yield extraordinary flavors. Whether you choose slow fermentation or modern shortcuts, remember: quality teff flour and filtered water form the foundation. That first perfect pour still makes my heart race – thin batter flowing like liquid silk across a warm pan.
Traditional methods develop deeper complexity, but quick versions still deliver satisfying tang when time’s limited. Keep your measuring cups handy – precise ratios prevent gummy disasters. For stew pairings, balance bold spices with mild flours like oat or rice blends.
Print this guide as your kitchen companion, then make it yours. Swap stew proteins, adjust spice levels, or try new garnishes. When your platter comes together, tag me @FlavorExplorer – I’d love to celebrate your creation! After all, the best meals connect us across counters and continents.
FAQ
Can I use regular flour instead of teff for this recipe?
I’ve tried blending teff with other flours like barley or rice for a milder taste, but pure teff gives that iconic tangy flavor. If you’re in a pinch, a mix of buckwheat and all-purpose flour can work, but it won’t be fully authentic.
Why does my batter stick to the skillet?
Sticking usually happens if the pan isn’t properly seasoned or heated. I always wipe my skillet with a bit of oiled parchment paper before pouring the batter. A nonstick pan or cast iron works best!
How do I tone down the spice in the stew?
I love heat, but if it’s too much, reduce the berbere spice by half or add a spoon of tomato paste. Coconut milk or yogurt stirred in at the end also balances the kick nicely.
Can I skip the fermentation step for a quicker version?
Fermentation gives that classic sourdough taste, but I’ve used baking soda and vinegar in a pinch. It won’t have the same depth, but it’ll still be tasty for a weeknight meal.
What sides pair well with this dish?
I love serving lentils, sautéed greens, or a cooling cabbage salad alongside. A drizzle of spiced butter (niter kibbeh) adds richness, too!
How do I store leftover batter?
I keep mine in a glass jar in the fridge for up to 3 days. If it thickens, just stir in a splash of water before cooking. The flavor gets tangier over time—win!
Is there a gluten-free option for the flatbread?
Teff is naturally gluten-free, so stick with 100% teff flour. Avoid cross-contamination by using clean utensils and pans for a safe, celiac-friendly meal.
Can I make the stew ahead of time?
Absolutely! The flavors deepen if you let it sit overnight. Just reheat gently on the stove, adding a splash of broth if it thickens too much.
What’s the secret to those signature bubbles in the bread?
A well-fermented batter and medium heat are key. Pour it thin, and don’t flip—let the steam create those air pockets. It took me a few tries to nail it!
How do I adjust cooking time for high altitude?
At higher elevations, I add a bit more water to the batter and extend fermentation by 6–8 hours. The stew might need extra simmering time to thicken properly, too.


